
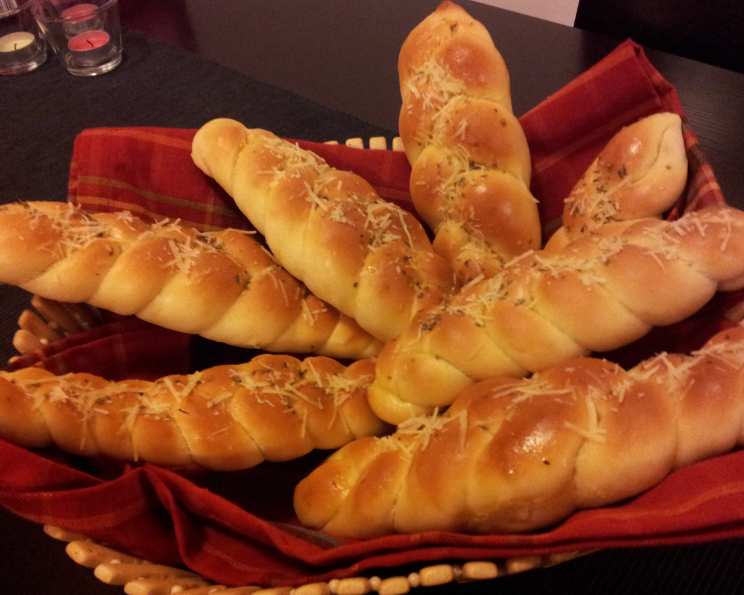
Soft Italian Breadsticks (Abm)
The aroma still lingers, a comforting ghost of my childhood. Every Sunday, Grandma Emilia would pull out her trusty old bread machine, the whirring a familiar soundtrack to our family gatherings. The star of the show? These incredibly soft Italian breadsticks. Slathered with melted butter and showered in Parmesan, they were the perfect accompaniment to her legendary lasagna, a simple pleasure that etched itself into my heart. These aren’t just breadsticks; they’re a taste of home.
Recipe Overview
- Prep Time: 15 minutes
- Cook Time: 15 minutes
- Total Time: 35 minutes
- Yields: 24 breadsticks
- Dietary Type: Vegetarian
Ingredients
Dough:
- 1 cup warm water (70 to 80°F)
- 3 tablespoons soft butter
- 1 1/2 teaspoons salt
- 3 cups bread flour
- 2 tablespoons sugar
- 1 teaspoon Italian seasoning
- 1 teaspoon garlic powder
- 2 1/4 teaspoons active dry yeast
Topping:
- 1 tablespoon melted butter
- 1 tablespoon grated Parmesan cheese
Equipment Needed
- Bread machine
- Floured board
- Knife or pizza cutter
- Greased baking sheets
- Clean kitchen towel
Instructions
-
Begin by adding all of the dough ingredients to your bread machine pan, carefully following the manufacturer’s instructions for the order in which they should be added. This is crucial for proper dough development.
-
Select the dough setting on your bread machine. This cycle will handle both the kneading and the first rise, freeing you up to focus on other tasks.
-
Once the dough cycle is complete, gently turn the dough out onto a lightly floured board. This prevents sticking and makes it easier to handle.
-
Using a knife or pizza cutter, divide the dough in half. Then, cut each half into 12 equal pieces, giving you a total of 24 pieces.
-
Take each piece and roll it into a rope approximately 4 to 6 inches long. Aim for a uniform thickness to ensure even baking.
-
Place the breadstick ropes onto greased baking sheets, spacing them about 2 inches apart. This allows for proper air circulation and prevents them from sticking together during baking and rising.
-
Cover the baking sheets with a clean kitchen towel and let the breadsticks rise in a warm place for about 20 minutes, or until they have doubled in size. This second rise is crucial for achieving a light and airy texture. Avoid drafts, as they can inhibit the rising process.
-
Preheat your oven to 350°F (175°C). Once the breadsticks have risen, bake them for 15 minutes, or until they are golden brown. Keep a close eye on them, as oven temperatures can vary.
-
As soon as the breadsticks come out of the oven, immediately brush them with melted butter and sprinkle generously with grated Parmesan cheese. This adds a rich flavor and a beautiful golden crust.
-
Allow the breadsticks to cool slightly on the baking sheet before serving.
Important Note: Be careful not to overbake the breadsticks, as they can become tough. The key is to bake them until they are just golden brown.
Expert Tips & Tricks
- Dough Consistency: The dough should be soft and slightly sticky. If it seems too dry, add a tablespoon of water at a time until you achieve the desired consistency. Conversely, if it’s too wet, add a tablespoon of flour at a time.
- Yeast Activation: To ensure your yeast is active, proof it in the warm water with a pinch of sugar before adding it to the bread machine. If it doesn’t bubble after 5-10 minutes, the yeast is likely dead and you’ll need to use fresh yeast.
- Flavor Boost: For a more intense garlic flavor, consider adding a clove of minced garlic to the dough. You can also experiment with other herbs and spices, such as oregano, basil, or red pepper flakes.
- Make-Ahead Option: You can prepare the dough ahead of time and store it in the refrigerator for up to 24 hours. Let it come to room temperature before shaping and baking.
- Shiny Crust: For a shinier crust, brush the breadsticks with an egg wash (1 egg beaten with 1 tablespoon of water) before baking.
- Even Baking: Rotate the baking sheets halfway through the baking time to ensure even browning.
- Crispier Breadsticks: For a crispier texture, bake the breadsticks at a slightly lower temperature (325°F/160°C) for a longer time (20-25 minutes).
Serving & Storage Suggestions
Serve these wonderfully soft Italian breadsticks warm, straight from the oven. They are the perfect accompaniment to pasta dishes, soups, salads, or as a simple snack.
Storage:
- Room Temperature: Store leftover breadsticks in an airtight container at room temperature for up to 2 days. They will be at their best on the first day.
- Refrigerator: For longer storage, store the breadsticks in an airtight container in the refrigerator for up to 5 days.
- Freezer: Breadsticks can be frozen for up to 2 months. Wrap them individually in plastic wrap and then place them in a freezer-safe bag or container.
Reheating:
- Oven: Reheat the breadsticks in a preheated oven at 350°F (175°C) for 5-10 minutes, or until warmed through.
- Microwave: Reheat the breadsticks in the microwave for 15-30 seconds, but be aware that they may become slightly soft.
- Toaster Oven: This is a great way to quickly reheat a few breadsticks while maintaining a crisp exterior.
Nutritional Information
Note: Nutritional information is an estimate and may vary based on specific ingredients and portion sizes.
| Nutrient | Amount per Serving | % Daily Value |
|---|---|---|
| Calories | 80.5 kcal | – |
| Calories from Fat | – | – |
| Total Fat | 2.2 g | 3% |
| Saturated Fat | 1.3 g | 6% |
| Cholesterol | 5.3 mg | 1% |
| Sodium | 166.3 mg | 6% |
| Total Carbohydrate | 13.2 g | 4% |
| Dietary Fiber | 0.5 g | 2% |
| Sugars | 1.1 g | – |
| Protein | 1.9 g | 3% |
Variations & Substitutions
- Gluten-Free: Substitute the bread flour with a gluten-free bread flour blend. You may need to add a binding agent like xanthan gum to improve the texture.
- Whole Wheat: Replace half of the bread flour with whole wheat flour for a nuttier flavor and added fiber.
- Vegan: Substitute the butter with a vegan butter alternative and omit the Parmesan cheese or replace it with a vegan Parmesan alternative.
- Herb Infusion: Infuse the warm water with fresh herbs like rosemary or thyme for a more aromatic dough.
- Cheese Variations: Experiment with different types of cheese for the topping, such as Asiago, Pecorino Romano, or a blend of Italian cheeses.
- Spicy Breadsticks: Add a pinch of red pepper flakes to the dough or sprinkle them on top of the breadsticks before baking for a spicy kick.
FAQs (Frequently Asked Questions)
Q: Can I make these breadsticks without a bread machine?
A: Yes, you can! Simply mix all the dough ingredients in a large bowl, knead for 8-10 minutes until smooth and elastic, and then let it rise in a warm place for 1-1.5 hours before proceeding with the recipe.
Q: How do I know when the breadsticks are done?
A: The breadsticks are done when they are golden brown on top and sound hollow when tapped. Be careful not to overbake them, as they can become tough.
Q: Can I freeze the dough for later use?
A: Yes, you can freeze the dough after the first rise. Wrap it tightly in plastic wrap and then place it in a freezer-safe bag or container. Thaw it overnight in the refrigerator before shaping and baking.
Q: What can I use instead of Parmesan cheese?
A: If you don’t have Parmesan cheese, you can use Asiago, Pecorino Romano, or a blend of Italian cheeses. For a vegan option, use a vegan Parmesan alternative or nutritional yeast.
Q: Why are my breadsticks tough?
A: Overbaking is the most common cause of tough breadsticks. Also, using too much flour can result in a dry, tough dough. Be sure to measure your ingredients accurately and avoid overbaking.
Final Thoughts
These soft Italian breadsticks are a timeless classic that will bring joy to your table. Whether you’re serving them alongside a hearty pasta dish or simply enjoying them as a snack, their warm, buttery flavor is sure to please. Don’t be afraid to experiment with different variations and toppings to create your own signature breadsticks. So, gather your ingredients, fire up your bread machine (or your kneading muscles!), and prepare to be transported to a place of warmth and comfort. I encourage you to bake a batch and share them with your loved ones – and please, let me know how they turn out! Pair them with a glass of Chianti for the ultimate Italian experience.