
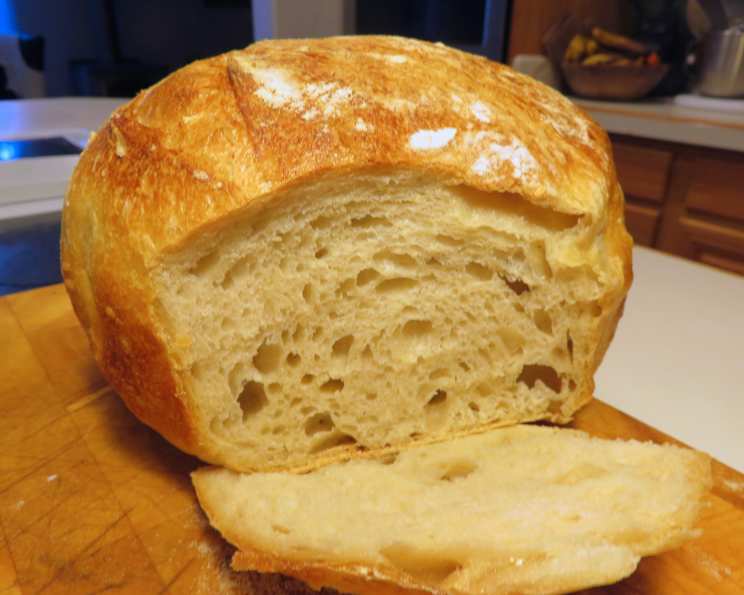
The Timeless Allure of Sourdough Boule: A Baker’s Journey
The scent of sourdough baking always transports me back to my grandmother’s kitchen. She wasn’t a fancy baker, but her crusty, round sourdough boule, sliced thick and slathered with butter still warm from the oven, was legendary within our family. The tangy aroma would fill the entire house, a promise of simple pleasures and shared moments. It was in her kitchen, watching her deft hands coax life out of flour, water, and wild yeast, that my own love affair with baking began.
Recipe Overview
- Prep Time: 20 minutes
- Rise Time: 3-4 hours (total, split into two rises)
- Cook Time: 45-50 minutes
- Total Time: 4 hours 45 minutes – 5 hours 50 minutes
- Yields: 1 Boule
- Serves: 10
- Dietary Type: Vegetarian
Ingredients
- 1 cup sourdough starter (active and bubbly)
- 1 1/4 cups warm water (about 105-115°F)
- 1 1/2 teaspoons active dry yeast
- 3 1/2 cups bread flour (or 3 1/2 cups whole wheat bread flour)
- 1 teaspoon kosher salt
- Semolina flour (for finishing)
Equipment Needed
- Stand mixer with dough hook attachment
- Large bowl
- Cooking spray
- Clean kitchen towel
- 6-8 inch diameter bowl
- Cast-iron vessel with a lid (Dutch oven)
- Sharp knife or lame
- Cooling rack
Instructions
-
In the bowl of a stand mixer fitted with the dough hook attachment, combine the sourdough starter with the warm water.
-
Beat at medium speed until combined, approximately 3 minutes. This step ensures the starter is well distributed in the water.
-
Add the active dry yeast, bread flour (or whole wheat bread flour), and kosher salt.
-
Beat at medium speed until a soft dough forms. Keep a close eye on the dough’s consistency during this step.
-
If the dough appears too dry and crumbly, gradually add more water, 1 tablespoon at a time, until it comes together. Remember, sourdough dough is often a little sticky.
-
The dough should come together as one mass and should appear shaggy and feel sticky. This is perfectly normal!
-
Spray a large bowl with cooking spray. This prevents the dough from sticking during its first rise.
-
Place the dough in the prepared bowl. Cover the bowl, and let it stand in a warm, draft-free place (around 75°F) for 1 to 2 hours, or until the dough has doubled in size. This initial bulk fermentation is crucial for developing flavor.
-
Once the dough has doubled, turn it out onto a lightly oiled surface. This prevents the dough from sticking as you shape it.
-
Deflate the dough gently to remove excess gas and air. Be careful not to overwork it; we want to preserve those precious air pockets.
-
Pull the four corners of the dough into the center, pinching with your fingertips to create a seal. This creates tension and helps form the boule’s shape.
-
Flip the dough over so the seam is on the bottom.
-
Begin to tighten the round by cupping your palms around the dough while rotating it on the oiled surface. This technique, called “rounding,” creates a smooth, taut surface.
-
Line a bowl (approximately 6 to 8 inches in diameter) with a clean kitchen towel, and dust the towel generously with flour. The flour prevents the dough from sticking to the towel during the second proof.
-
Place the loaf, seam-side up, in the prepared bowl. This ensures that the seam will be on the bottom of the loaf when it’s baked.
-
Cover the bowl and proof in a warm, draft-free place (75°F) for 1 to 2 hours, or until the dough has doubled in size again. This second proof is essential for a light and airy crumb.
-
Preheat the oven to 450°F (232°C). Make sure your cast-iron vessel with a lid (Dutch oven) is inside the oven while it preheats; this will ensure even heat distribution and a crispier crust.
-
Carefully remove the hot Dutch oven from the oven.
-
Turn the dough out into the hot Dutch oven.
-
Dust the boule with semolina flour. This adds a subtle nutty flavor and rustic appearance.
-
Score the boule using a sharp knife or a lame. Make 3 or 4, ¼-inch-deep cuts across the top. Scoring allows the dough to expand properly in the oven and prevents it from bursting in unpredictable places.
-
Cover the Dutch oven with the lid and bake for 35 minutes.
-
Increase the temperature to 475°F (246°C), remove the lid, and continue baking for 10-15 minutes, or until the loaf is deeply browned and the crust is firm. Keep a close eye on the loaf during this final stage to prevent burning.
-
Turn the baked boule out onto a rack and let it cool completely before slicing. This is crucial; slicing the bread while it’s still hot will result in a gummy texture.
Expert Tips & Tricks
- Starter Strength: A strong, active sourdough starter is paramount. It should double in size within 4-8 hours after feeding.
- Autolyse: For improved dough hydration and extensibility, consider an autolyse. Combine the flour and water (hold back the starter and salt) and let rest for 30-60 minutes before proceeding with the recipe.
- Scoring: A sharp lame or knife is crucial for clean scores. If you’re using a knife, dampen the blade with water.
- Oven Spring: The initial burst of expansion in the oven is called “oven spring.” A hot Dutch oven and proper scoring will maximize oven spring.
- Baking Stone: If you don’t have a Dutch oven, bake on a preheated baking stone with a pan of hot water on the lower rack to create steam. This helps create a crispy crust.
Serving & Storage Suggestions
Serve your freshly baked sourdough boule sliced and enjoyed with butter, olive oil, or as an accompaniment to soups and stews. It’s also fantastic for sandwiches or toast.
Store the boule at room temperature in a bread bag or wrapped in a clean kitchen towel for up to 3 days. For longer storage, slice the bread and freeze it in an airtight container for up to 2 months. Reheat frozen slices directly from the freezer in a toaster or oven.
Nutritional Information
| Nutrient | Amount per Serving | % Daily Value |
|---|---|---|
| Calories | 161 kcal | – |
| Calories from Fat | 4g | 3% |
| Total Fat | 0.5g | 0% |
| Saturated Fat | 0.1g | 0% |
| Cholesterol | 0mg | 0% |
| Sodium | 234.6mg | 9% |
| Total Carbohydrate | 33.6g | 11% |
| Dietary Fiber | 1.3g | 5% |
| Sugars | 0.1g | 0% |
| Protein | 4.8g | 9% |
Note: Nutritional information is an estimate and can vary based on specific ingredients and portion sizes.
Variations & Substitutions
- Whole Wheat Sourdough: Substitute up to half of the bread flour with whole wheat flour for a nuttier flavor and denser texture.
- Seeded Sourdough: Add 1/2 cup of mixed seeds (such as sesame, poppy, sunflower, and flax) to the dough during the initial mixing.
- Herb Sourdough: Incorporate 2 tablespoons of finely chopped fresh herbs (such as rosemary, thyme, or oregano) into the dough.
- Garlic Sourdough: Add 2 cloves of minced garlic to the dough for a savory twist.
FAQs (Frequently Asked Questions)
Q: My sourdough boule is flat. What went wrong?
A: Several factors can contribute to a flat boule, including a weak starter, insufficient proofing time, or over-handling the dough. Make sure your starter is active and bubbly, allow the dough to rise adequately, and handle it gently when shaping.
Q: Why is my sourdough crust so hard?
A: An overly hard crust can be caused by baking at too high a temperature or for too long. Reduce the oven temperature slightly or shorten the baking time. The Dutch oven method helps create a softer crust.
Q: How can I tell if my sourdough starter is ready to use?
A: A ripe starter will have doubled in size within 4-8 hours after feeding, be bubbly, and have a slightly tangy aroma. A float test (dropping a spoonful of starter into water; it should float) can also indicate readiness.
Q: Can I use all-purpose flour instead of bread flour?
A: Bread flour is recommended for its higher protein content, which contributes to a stronger gluten structure and a chewier texture. However, all-purpose flour can be used in a pinch, but the boule may not have the same rise or structure.
Q: My boule is sticking to the towel during the second proof. What should I do?
A: Make sure to generously flour the towel before placing the dough in the bowl. You can also use a mixture of flour and rice flour for better release. If it still sticks, gently ease the dough out with a spatula.
Final Thoughts
There’s a unique satisfaction in creating something as fundamental and nourishing as a sourdough boule. It’s a process that requires patience and attention, but the reward – a fragrant, crusty loaf that fills your home with warmth – is immeasurable. So, embrace the process, experiment with flavors, and don’t be afraid to make mistakes. Every loaf is a learning experience, and with each attempt, you’ll get closer to mastering this timeless art. Happy baking, and please, share your creations and experiences!