
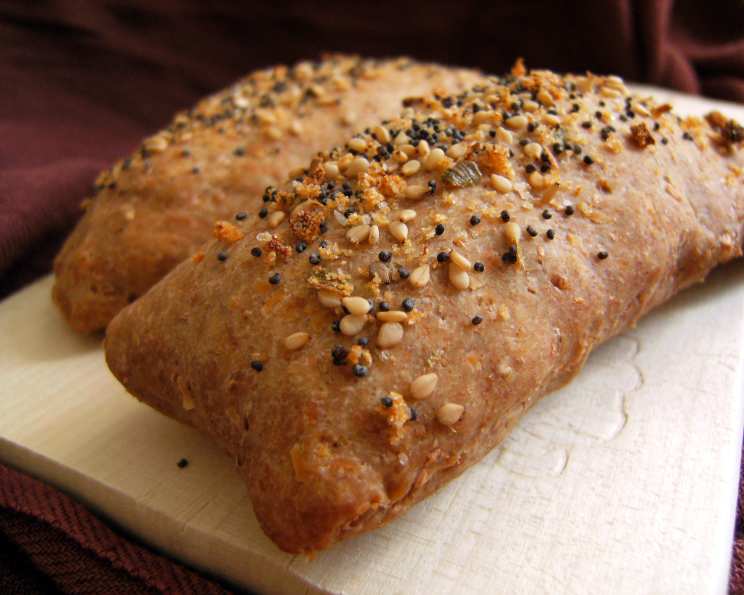
Sourdough Breadsticks: A Rustic Delight
The scent of sourdough baking always transports me back to my grandmother’s kitchen. She had a knack for coaxing magic from simple ingredients, and her sourdough bread was legendary. While she mostly baked loaves, sometimes she’d transform the extra dough into crispy, flavorful breadsticks, perfect for dipping in her homemade tomato soup. Those warm, tangy sticks were a highlight of my childhood, and this recipe is my attempt to recreate that comforting memory.
Recipe Overview
- Prep Time: 30 minutes
- Cook Time: 12-15 minutes
- Total Time: 1 hour 30 minutes – 2 hours 30 minutes (including rising time)
- Yields: 10-12 Bread Sticks
- Dietary Type: Vegetarian (can be made vegan)
Ingredients
- 2 cups all-purpose flour
- 2 cups sourdough starter
- 1-4 tablespoons water (as needed)
- 2 ½ tablespoons olive oil
- 1 teaspoon salt
- ½ cup parmesan cheese, grated (optional, omit for vegan)
Optional Pizza Bread Sticks
- ¾ cup pepperoni, diced
- 6 mozzarella string cheese (split lengthwise)
- olive oil or non-stick olive oil flavored cooking spray
Optional Toppings
- parmesan cheese, grated
- sea salt
- garlic salt
- sesame seeds
- poppy seeds
Equipment Needed
- Mixing bowl
- Stand mixer (optional)
- Plastic wrap
- Pizza peel or baking sheet
- Parchment paper
- Pizza cutter
- Damp towel
- Baking stone (optional)
- Wire rack
Instructions
-
In a mixing bowl, blend together the flour and salt. If using a stand mixer, attach the dough hook.
-
Make a well in the center of the dry ingredients.
-
Pour in the sourdough starter and olive oil.
-
Mix on low speed (or by hand) until the ingredients begin to combine. Add water, 1 tablespoon at a time, as needed, until a shaggy dough forms. The amount of water needed will depend on the hydration level of your sourdough starter.
-
Optional: Add Parmesan cheese. If adding, incorporate the Parmesan cheese at this stage.
-
Knead the dough for approximately 6-8 minutes until it becomes smooth and elastic. If using a stand mixer, knead on medium-low speed. If kneading by hand, turn the dough out onto a lightly floured surface and knead vigorously.
-
NOTE: For Pizza Bread Sticks: If making pizza bread sticks, add the pepperoni and Parmesan cheese (if using) once the flour has been incorporated, approximately 3 minutes after kneading has started. This will prevent the pepperoni from breaking down too much during the kneading process.
-
Remove the dough from the bowl and form it into a ball.
-
Spray a clean bowl with non-stick cooking spray, and place the dough in the bowl, turning once to coat the top with the oil. This will prevent the dough from drying out.
-
Loosely cover the bowl with plastic wrap and let it rise in a warm, draft-free place until doubled in bulk, about 1 ½ – 2 hours. The rising time will vary depending on the strength of your starter and the temperature of your kitchen. A warmer kitchen will result in a faster rise.
-
Turn the dough out onto a floured work surface and gently pull (do not roll) it into a rectangle approximately 16 x 8 x ½ inches. Using a rolling pin can deflate the dough too much and result in denser breadsticks.
-
Using a pizza cutter, cut the dough into 10-12 pieces.
-
For Pizza Breadsticks: Cut each stick slightly wider. Place a mozzarella stick in the center of the dough and fold the dough over to totally encase the cheese with dough. Pinch the seams to seal.
-
Place the sticks 2 inches apart on a pizza peel (or the back of a pizza pan) covered with parchment paper.
-
Cover the sticks with a damp towel and allow them to rise until doubled, about 45 minutes. Again, this rising time will vary.
-
Place a baking stone in the oven (if using) and preheat the oven to 375 degrees F (190 degrees C). If you don’t have a baking stone, you can bake the breadsticks directly on the parchment-lined baking sheet.
-
Brush the tops of the dough with olive oil and sprinkle with your preferred toppings.
-
Bake for 12-15 minutes, or until the bottoms are light brown. Keep an eye on them, as baking times can vary depending on your oven.
-
Serve warm.
-
Note: If you plan to freeze or serve later, bake the breadsticks plain (without toppings), cool on a wire rack, and store in a plastic ziplock bag. Just before serving, brush the tops with butter or olive oil, sprinkle on your preferred toppings, and pop into a hot oven for a couple of minutes to warm them through and melt the toppings.
Expert Tips & Tricks
- Starter Strength: A well-fed, active sourdough starter is crucial for light and airy breadsticks. Make sure your starter has doubled in size after feeding before using it in the recipe.
- Dough Handling: Be gentle when handling the dough. Overworking it can result in tough breadsticks.
- Baking Stone: Using a baking stone helps to create a crispy crust. If you don’t have one, preheating your baking sheet in the oven can also help.
- Steam: For an extra-crispy crust, you can add steam to the oven during the first few minutes of baking. You can do this by placing a pan of hot water on the bottom rack of the oven.
- Flavor Boost: Experiment with different herbs and spices in the dough or as toppings. Garlic powder, Italian seasoning, or red pepper flakes can add a delicious kick.
Serving & Storage Suggestions
These sourdough breadsticks are delicious served warm with soups, salads, or your favorite pasta dish. They also make a great snack on their own.
Storage:
- Room Temperature: Store baked breadsticks in an airtight container at room temperature for up to 2 days.
- Refrigerator: For longer storage, store in an airtight container in the refrigerator for up to 5 days.
- Freezer: Breadsticks can be frozen for up to 2 months. Wrap them tightly in plastic wrap and then place them in a freezer bag.
Reheating:
- Oven: Preheat oven to 350 degrees F (175 degrees C). Place breadsticks on a baking sheet and bake for 5-10 minutes, or until warmed through.
- Microwave: Microwave breadsticks for 15-30 seconds, or until warmed through. Be careful not to overheat, as they can become tough.
Nutritional Information
| Nutrient | Amount per Serving | % Daily Value* |
|---|---|---|
| Calories | 185.6 kcal | N/A |
| Calories from Fat | 69 kcal | N/A |
| Total Fat | 7.8 g | 11% |
| Saturated Fat | 3.1 g | 15% |
| Cholesterol | 15.3 mg | 5% |
| Sodium | 414.9 mg | 17% |
| Total Carbohydrate | 19.8 g | 6% |
| Dietary Fiber | 0.7 g | 2% |
| Sugars | 0.3 g | N/A |
| Protein | 8.6 g | 17% |
*Percent Daily Values are based on a 2,000 calorie diet. Your daily values may be higher or lower depending on your calorie needs.
Variations & Substitutions
- Vegan Breadsticks: Omit the Parmesan cheese from the dough and use plant-based mozzarella sticks for the pizza breadsticks. Brush with olive oil instead of butter.
- Gluten-Free Breadsticks: Use a gluten-free flour blend suitable for bread baking. Be aware that the texture may be slightly different.
- Herb and Garlic Breadsticks: Add 1-2 cloves of minced garlic and 1-2 tablespoons of chopped fresh herbs (such as rosemary, thyme, or oregano) to the dough.
- Spicy Breadsticks: Add a pinch of red pepper flakes or a dash of hot sauce to the dough.
- Cheese-Stuffed Breadsticks: Instead of mozzarella sticks, use cubes of cheddar, provolone, or other cheeses.
FAQs (Frequently Asked Questions)
Q: My sourdough starter isn’t very active. Can I still make this recipe?
A: While an active starter is ideal, you can still use a less active starter. The rising time will likely be longer, so be patient. You can also add a pinch of commercial yeast to help with the rise.
Q: Can I use bread flour instead of all-purpose flour?
A: Yes, you can use bread flour. It will result in a slightly chewier breadstick.
Q: How do I know when the breadsticks are done?
A: The breadsticks are done when the bottoms are light brown and they sound hollow when tapped.
Q: My breadsticks are too dense. What did I do wrong?
A: Possible causes include using a starter that wasn’t active enough, over-kneading the dough, or not allowing the dough to rise for long enough.
Q: Can I make the dough ahead of time?
A: Yes, you can make the dough ahead of time and store it in the refrigerator for up to 24 hours. Allow the dough to come to room temperature before shaping and baking.
Final Thoughts
Sourdough breadsticks are a delightful way to enjoy the tangy flavor of sourdough in a fun and versatile format. Don’t be intimidated by the process; with a little patience and practice, you’ll be whipping up these rustic treats in no time. Feel free to experiment with different toppings and variations to create your own signature breadsticks. I encourage you to give this recipe a try and share your creations! These breadsticks are incredible alongside a hearty bowl of minestrone soup or served with a platter of antipasti. Enjoy!