
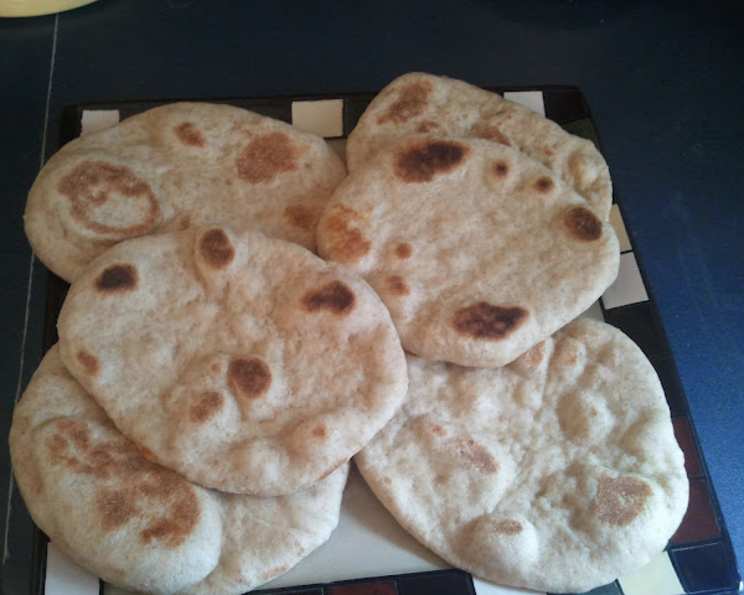
Sourdough Pita Bread: A Taste of Homemade Happiness
The scent of freshly baked bread has always held a special place in my heart. I remember my grandmother, her hands dusted with flour, patiently tending to her sourdough starter. One of my fondest memories is watching her coax magic from that bubbling concoction, transforming it into warm, chewy pita bread. The aroma alone was enough to transport me to a simpler time, filled with love, laughter, and the comforting flavors of home. To this day, that memory inspires me to recreate the same experience in my own kitchen.
Recipe Overview
- Prep Time: 3 hours
- Rise Time: 1 hour
- Cook Time: 20 minutes
- Total Time: 4 hours 5 minutes
- Servings: 8-10
- Dietary Type: Vegetarian
Ingredients
- 2 cups whole wheat flour
- 1 teaspoon sugar
- 1/2 teaspoon salt
- 1/2 cup sourdough starter, freshly fed
- 1 tablespoon olive oil
- 3/4 – 1 cup water
Equipment Needed
- Large mixing bowl
- Clean kitchen towel
- Cast iron griddle or large skillet
Instructions
-
In a large bowl, combine the whole wheat flour, sugar, and salt. Ensure the ingredients are evenly distributed by whisking or stirring them together.
-
Add the olive oil and freshly fed sourdough starter to the dry ingredients.
-
Gradually add the water, 2 to 3 tablespoons at a time, while kneading the dough. Continue kneading until the dough forms a soft and elastic consistency. This process may take 5-7 minutes. Adjust the amount of water as needed to achieve the desired texture.
-
Grease a large bowl with a small amount of olive oil or cooking spray. Place the dough in the bowl, turning it to coat all sides with the grease. This will prevent the dough from sticking to the bowl as it rises.
-
Cover the bowl with a clean kitchen towel. Allow the dough to rise in a warm place until it has doubled in volume. This may take several hours, depending on the temperature of your environment and the activity of your sourdough starter.
-
Once the dough has doubled in size, gently punch it down to release the air.
-
Divide the dough into 8-10 equal-sized pieces. Take one piece and roll it into a 6-inch circle, approximately the thickness of two tortillas.
-
Cover the formed pita rounds with a damp cloth and allow them to rest for 15 minutes. This resting period allows the gluten to relax, resulting in a more tender pita.
-
Heat a cast iron griddle or large skillet over medium-high heat until it is hot. A well-heated surface is crucial for achieving proper puffing of the pita bread.
-
Place a formed pita round on the hot griddle.
-
Cook on one side until the dough puffs up. This should take about 2-3 minutes. Watch closely to prevent burning.
-
Flip the pita and cook on the other side for another 1-2 minutes, or until lightly browned.
-
Remove the cooked pita from the griddle and place it on a plate. Repeat with the remaining dough.
-
Serve warm and enjoy!
Expert Tips & Tricks
- Starter Activity is Key: The success of this recipe hinges on the strength and activity of your sourdough starter. Ensure your starter is bubbly and has at least doubled in size after feeding before using it in the dough. If your starter is sluggish, you may need to feed it more frequently or increase the temperature to encourage activity.
- Water Temperature: Using lukewarm water can help speed up the dough’s rising process, especially in cooler environments.
- Kneading is Crucial: Proper kneading develops the gluten in the flour, resulting in a chewier, more elastic pita bread. Don’t skimp on the kneading time!
- Griddle Temperature Matters: Too low, and the pita won’t puff properly. Too high, and it will burn before it cooks through. Aim for medium-high heat and adjust as needed.
- Puffing Troubleshooting: If your pita bread isn’t puffing up on the griddle, try pressing down gently on the surface with a spatula. This can help create steam inside the pita, encouraging it to puff.
- Dough Consistency: The dough should be soft and elastic, but not sticky. If it’s too sticky, add a little more flour, one tablespoon at a time. If it’s too dry, add a little more water, one tablespoon at a time.
Serving & Storage Suggestions
Serve your freshly baked sourdough pita bread warm, straight from the griddle. They are fantastic on their own, drizzled with olive oil and sprinkled with herbs, or paired with your favorite dips like hummus, baba ghanoush, or tzatziki. Sourdough pita bread also makes an excellent base for gyros, sandwiches, or wraps.
To store leftover pita bread, allow them to cool completely before placing them in an airtight container or resealable bag. They can be stored at room temperature for 1-2 days, in the refrigerator for up to a week, or in the freezer for up to 2 months.
To reheat, wrap the pita bread in a damp paper towel and microwave for 15-20 seconds. Alternatively, you can toast them in a toaster or reheat them in a dry skillet over medium heat.
Nutritional Information
| Nutrient | Amount per Serving | % Daily Value |
|---|---|---|
| Calories | 119 kcal | N/A |
| Fat | 2.4 g | 3% |
| Saturated Fat | 0.4 g | 1% |
| Cholesterol | 0 mg | 0% |
| Sodium | 146.7 mg | 6% |
| Carbohydrate | 22.1 g | 7% |
| Fiber | 3.2 g | 12% |
| Sugars | 0.7 g | 2% |
| Protein | 4 g | 7% |
Variations & Substitutions
- Gluten-Free Pita: Substitute the whole wheat flour with a gluten-free all-purpose flour blend. You may need to adjust the amount of water to achieve the correct dough consistency.
- Herb-Infused Pita: Add dried herbs like oregano, thyme, or rosemary to the flour mixture for a flavorful twist.
- Spiced Pita: Incorporate spices like cumin, coriander, or chili powder for a warm and aromatic pita bread.
- Sweet Pita: Increase the amount of sugar in the recipe and add a pinch of cinnamon for a sweeter pita bread that can be enjoyed with fruit or jam.
- Different Flours: Experiment with different types of flour, such as spelt flour or rye flour, to add unique flavors and textures to your pita bread.
FAQs (Frequently Asked Questions)
Q: My pita bread isn’t puffing up. What am I doing wrong?
A: Ensure your griddle is hot enough. Also, make sure your dough is not too thick. If it’s too thick, the steam won’t be able to build up inside, preventing it from puffing.
Q: Can I use all-purpose flour instead of whole wheat flour?
A: Yes, you can substitute all-purpose flour for whole wheat flour. The texture of the pita bread may be slightly different, resulting in a softer, less chewy texture.
Q: How do I know when my sourdough starter is ready to use?
A: Your sourdough starter is ready to use when it has doubled in size after feeding and is bubbly and active. It should also have a slightly sour aroma.
Q: Can I make the dough ahead of time?
A: Yes, you can make the dough ahead of time and store it in the refrigerator for up to 24 hours. When you’re ready to bake, allow the dough to come to room temperature for about an hour before rolling it out.
Q: My pita bread is too tough. What can I do?
A: Over-kneading the dough can result in a tough pita bread. Be careful not to over-knead the dough, and allow it to rest for the recommended time before rolling it out.
Final Thoughts
Sourdough pita bread is more than just a recipe; it’s an experience. From nurturing your sourdough starter to the satisfying aroma of freshly baked bread filling your kitchen, this recipe offers a chance to connect with the simple joys of cooking. Don’t be afraid to experiment with different flavors and variations to create your own signature pita bread. I encourage you to give this recipe a try and share your creations with friends and family. Pair it with your favorite Mediterranean dips, grilled meats, or fresh salads for a truly memorable meal. Enjoy the process and the delicious results!