
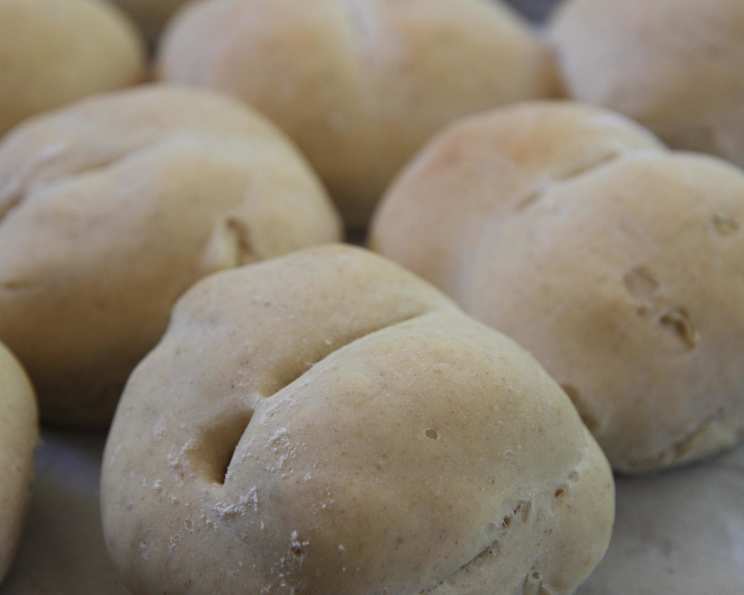
Sourdough Rye and Onion Rolls: A Rustic Delight
The aroma still lingers in my memory – the sharp tang of rye, the sweet whisper of caramelized onion, and the comforting warmth of freshly baked bread. It takes me back to a tiny bakery in Alsace, France, where I spent a summer honing my craft. Every morning, the baker, a stout man with flour dusting his apron, would pull these rustic rolls, pistolets as he called them, from the oven. They were perfect simply slathered with salted butter, or alongside a hearty bowl of onion soup. Recreating them here brings that little corner of France right back into my kitchen.
Recipe Overview
- Prep Time: 45 minutes (plus overnight starter fermentation)
- Cook Time: 16 minutes
- Total Time: 2 hours 1 minute (plus overnight starter fermentation)
- Yields: 12 rolls
- Serves: 8-10
- Dietary Type: Vegetarian
Ingredients
For the Starter Sponge:
- 50 g sourdough starter (1/4 cup)
- 45 g bread flour (1/3 cup)
- 125 g rye flour (1 cup)
- 175 g water (3/4 cup)
- 1/4 onion, finely chopped
For the Dough:
- 356 g bread flour (2 3/4 cup)
- 143 g water (5 oz)
- 9 g salt (1 1/2 teaspoons)
- 9 g instant yeast (1 tablespoon)
- 9 g sugar (1 1/2 teaspoons)
- 20 g oil (1 1/2 tablespoons)
Equipment Needed
- Large mixing bowl
- Measuring cups and spoons
- Kitchen scale
- Dough scraper or knife
- Clean kitchen towel or plastic wrap
- Baking sheet
- Cooling rack
- Straight spoon handle or dowel
Instructions
-
Prepare the Starter Sponge: In a large bowl, combine the sourdough starter, bread flour, rye flour, water, and finely chopped onion. Mix well until a smooth batter forms. This is your sponge.
-
Ferment the Sponge: Cover the bowl and let the sponge ferment overnight at room temperature (ideally around 72°F or 22°C). This process allows the sourdough culture to develop and creates the characteristic flavor of the rolls. You should see signs of activity, such as bubbles forming and the sponge increasing in volume.
-
Combine Dough Ingredients: In the morning, add the bread flour, water, salt, instant yeast, sugar, and oil to the fermented sponge.
-
Rest (Autolyse): Let the mixture sit for 5 to 10 minutes. This allows the flour to fully hydrate, resulting in a more extensible and easier-to-handle dough.
-
Knead the Dough: Turn the dough out onto a lightly floured surface and knead for 10 minutes until smooth and elastic. The dough should be slightly sticky but manageable. If it’s too sticky, add a little more bread flour, one tablespoon at a time.
-
First Rise (Bulk Fermentation): Place the dough in a lightly oiled bowl, turning to coat. Cover the bowl with a clean kitchen towel or plastic wrap. Let the dough rise until it is approximately 1 1/2 times its original volume, which should take about 45 minutes to 1 hour, depending on the temperature of your kitchen.
-
Stretch and Fold: After the first rise, gently deflate the dough. On a lightly floured surface, stretch the dough into a rectangle. Fold it like a letter, bringing the top third down and the bottom third up to meet in the center. Then, fold it in half from side to side. This technique helps develop strength and structure in the dough.
-
Second Rise: Cover the dough again and let it rise until 1 1/2 times its volume (about 45 minutes to 1 hour).
-
Divide and Shape: Turn the dough out onto a lightly floured surface. Use a dough scraper or knife to divide it into 12 even pieces, each weighing approximately 80 grams. Shape each piece into a tight ball.
-
Dust with Flour: Lightly dust the tops of the balls with flour. I prefer to use a sifter for a fine, even coating.
-
Create the Pistolet Shape: Press a straight spoon handle or dowel into the center of each roll to create a deep indentation, dividing the roll almost completely into two halves. Be careful not to cut all the way through. This creates the characteristic “pistolet” shape.
-
Final Proof: Cover the rolls loosely with oiled plastic wrap to prevent them from drying out. Let them rise until they are about 50% larger, which should take about 30 minutes.
-
Preheat Oven: While the rolls are proofing, preheat your oven to 375°F (190°C).
-
Bake: Place the rolls on a baking sheet lined with parchment paper. Bake for 8 minutes. Then, rotate the baking sheet 180 degrees to ensure even browning. Bake for another 8 minutes, or until the rolls are golden brown and the internal temperature reaches 200°F (93°C).
-
Cool: Transfer the baked rolls to a wire rack to cool completely before serving.
Expert Tips & Tricks
- Onion Intensity: If you prefer a stronger onion flavor, sauté the chopped onion in a little butter or oil before adding it to the starter sponge. This will mellow the onion’s sharpness and bring out its sweetness.
- Dough Stickiness: Sourdough dough can be sticky. Resist the urge to add too much flour, as this will result in a dry roll. Instead, keep your hands and work surface lightly floured and use a dough scraper to help you handle the dough.
- Scoring: For a more rustic look, you can score the tops of the rolls with a sharp knife or lame before baking.
- Oven Spring: To encourage a good oven spring (the rapid expansion of the dough in the oven), you can create steam by placing a pan of hot water on the bottom rack of your oven during the first half of baking. Be very careful when handling hot water.
- Make Ahead: The starter sponge can be prepared up to 24 hours in advance and stored in the refrigerator. Just bring it to room temperature before adding the remaining ingredients.
Serving & Storage Suggestions
These sourdough rye and onion rolls are delicious served warm with butter, jam, or cheese. They also make excellent sandwiches or accompaniments to soups and stews.
- Storage: Store the rolls in an airtight container at room temperature for up to 2 days, or in the refrigerator for up to 5 days.
- Freezing: For longer storage, freeze the rolls in a freezer-safe bag for up to 2 months.
- Reheating: To reheat, wrap the rolls in foil and warm them in a 350°F (175°C) oven for 10-15 minutes, or until heated through. You can also microwave them for a shorter time, but they may become slightly softer.
Nutritional Information
| Nutrient | Amount per Serving | % Daily Value |
|---|---|---|
| Calories | 314.1 kcal | N/A |
| Calories from Fat | N/A | N/A |
| Total Fat | 3.4 g | 5% |
| Saturated Fat | 0.5 g | 2% |
| Cholesterol | 0 mg | 0% |
| Sodium | 439.5 mg | 18% |
| Total Carbohydrate | 61.5 g | 20% |
| Dietary Fiber | 3.9 g | 15% |
| Sugars | 1.6 g | 6% |
| Protein | 8.7 g | 17% |
Note: Nutritional information is an estimate and may vary based on specific ingredients and preparation methods.
Variations & Substitutions
- Different Flours: Experiment with different types of flour, such as whole wheat flour or spelt flour, to create your own unique flavor profile.
- Seeds: Add seeds like caraway, sesame, or poppy seeds to the dough for added texture and flavor.
- Herbs: Incorporate fresh herbs, such as rosemary or thyme, into the dough for a savory twist.
- Cheese: Add grated cheese, such as Gruyere or cheddar, to the dough for a cheesy roll.
- Garlic: Roast some garlic and mash it into the dough for a garlicky version.
FAQs (Frequently Asked Questions)
Q: Can I use active dry yeast instead of instant yeast?
A: Yes, you can. Activate the active dry yeast in warm water for 5-10 minutes before adding it to the dough. You might need to adjust the rising time slightly.
Q: My dough is not rising. What am I doing wrong?
A: Several factors can affect dough rising. Make sure your yeast is fresh, the temperature in your kitchen is warm enough, and you haven’t added too much salt, which can inhibit yeast activity.
Q: Can I make the dough in a bread machine?
A: Yes, you can use a bread machine to mix and knead the dough. Follow your bread machine’s instructions for dough making.
Q: How do I know when the rolls are done baking?
A: The rolls are done when they are golden brown and the internal temperature reaches 200°F (93°C). You can use an instant-read thermometer to check the temperature.
Q: Can I freeze the baked rolls?
A: Yes, you can freeze the baked rolls. Wrap them tightly in freezer-safe plastic wrap or place them in a freezer bag. They can be stored in the freezer for up to 2 months.
Final Thoughts
These Sourdough Rye and Onion Rolls are more than just a recipe; they’re a connection to a place and a memory. The rustic flavor and satisfying texture are sure to impress. I encourage you to give this recipe a try, experiment with your own variations, and share the delicious results with your friends and family. Maybe pair them with a French onion soup for a truly immersive culinary experience. I’m confident you’ll find these rolls to be a delightful addition to your baking repertoire.