
The Magic of Sourdough: Cultivating Your Own Starter
The first time I tasted real sourdough bread, I was backpacking through San Francisco. The tangy, chewy, almost addictive flavor was unlike anything I’d ever experienced. I remember standing on a foggy pier, tearing off chunks of a massive sourdough boule, the salty air mingling with the unique aroma of the bread. It wasn’t just a meal; it was an experience, a connection to a tradition, and a flavor I’ve been chasing ever since. That experience sparked my journey into the fascinating world of sourdough, starting with the most fundamental element: the starter.
Recipe Overview
- Prep Time: 5 minutes
- Cook Time: N/A (24 hours fermentation)
- Total Time: 24 hours + ongoing maintenance
- Yields: 2 1/2 cups starter
- Dietary Type: Vegan
Ingredients
- 2 cups flour (unbleached all-purpose or bread flour)
- 1 (1/4 ounce) package active dry yeast or 1 (1/4 ounce) package cake yeast
- 1 1/2 cups tepid water (around 80-85°F)
Equipment Needed
- Large bowl or jar
- Whisk
- Plastic wrap
Instructions
-
In a large bowl or jar, mix the yeast with the water. If you are using active dry yeast, allow the mixture to stand for approximately 10 minutes to activate the yeast. This step, often called proofing, ensures the yeast is alive and ready to work.
-
Sprinkle the flour onto the yeast mixture and whisk it in to form a thick batter. Don’t worry if the batter isn’t perfectly smooth. A few lumps are perfectly acceptable at this stage.
-
Cover the bowl or jar with plastic wrap. Make sure the plastic wrap is securely fastened to prevent drying out and contamination.
-
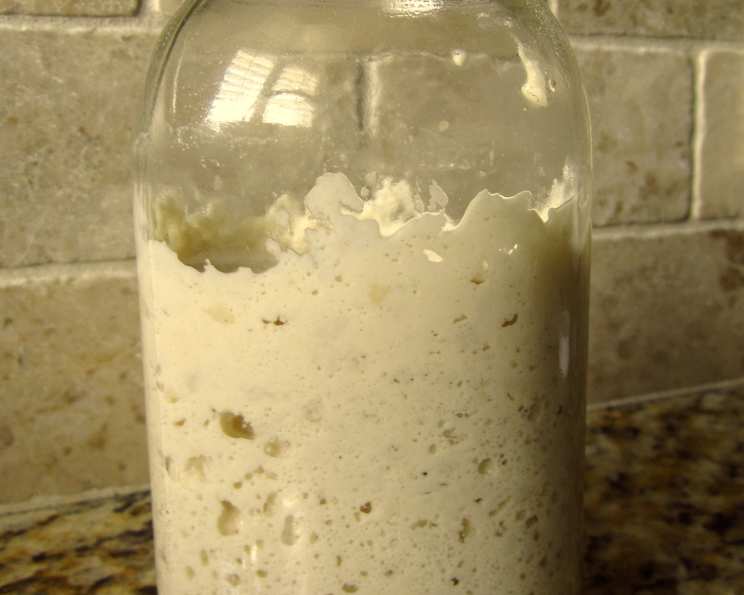
Let the batter stand in a warm (80-85°F) place for about 24 hours, or until it is frothy. The ideal temperature is crucial; too cold, and the yeast will be sluggish. Too hot, and it could damage the yeast. A slightly warm oven (turned off), a proofing drawer, or even a spot near a warm appliance can work well. The starter is ready when it has doubled in size and is bubbly and frothy.
Expert Tips & Tricks
-
Temperature is Key: Maintaining a consistent temperature of 80-85°F is crucial for the starter’s success. Use a kitchen thermometer to check the water temperature before mixing it with the yeast.
-
Choosing Your Flour: Unbleached all-purpose flour works well, but bread flour, with its higher protein content, can give your starter a stronger, more robust character. You can also experiment with whole wheat or rye flour for a different flavor profile.
-
Feeding Your Starter: This recipe creates the initial starter. To maintain a healthy starter for baking, you’ll need to “feed” it regularly. This usually involves discarding a portion of the starter and adding fresh flour and water. This process provides the yeast and bacteria with new food and prevents the buildup of undesirable byproducts. Generally, you want a 1:1:1 ratio of starter to flour to water by weight.
-
Signs of a Good Starter: A healthy starter will have a pleasant, tangy aroma (not an offensive smell like mold). It will also double in size within a few hours after feeding and have a bubbly, frothy texture.
-
Dealing with Hooch: Sometimes, a liquid layer, called “hooch,” will form on top of your starter. This is a byproduct of the fermentation process and is usually a sign that your starter is hungry. You can either pour it off or mix it back in before feeding.
-
Long-term Storage: If you plan to go on vacation, you can store your starter in the refrigerator, which slows down the fermentation process. Before using it again, take it out, discard half, and feed it daily for a couple of days to reactivate it.
Serving & Storage Suggestions
This initial starter needs to be fed regularly to maintain its viability for baking. Once you have established a mature starter (after several days of feeding), you can use it to bake sourdough bread, pancakes, waffles, and other delicious treats. Store your active starter at room temperature if you plan to bake frequently (feeding it daily). If you bake less often, store it in the refrigerator and feed it once a week.
Nutritional Information
Note: Nutritional information is approximate and will vary depending on the flour used.
| Nutrient | Amount per Serving | % Daily Value |
|---|---|---|
| Calories | 140 kcal | 7% |
| Total Fat | 0.5g | 1% |
| Saturated Fat | 0.1g | 0% |
| Cholesterol | 0mg | 0% |
| Sodium | 2mg | 0% |
| Total Carbohydrate | 30g | 10% |
| Dietary Fiber | 1g | 4% |
| Sugars | 0g | 0% |
| Protein | 4g | 8% |
Variations & Substitutions
-
Gluten-Free Starter: Use a blend of gluten-free flours like brown rice flour, tapioca starch, and sorghum flour. Note that gluten-free starters may behave differently and require some adjustments in feeding schedules.
-
Rye Starter: Substitute some or all of the all-purpose flour with rye flour for a robust, earthy flavor.
-
Whole Wheat Starter: Replace some of the all-purpose flour with whole wheat flour. This will give your starter a nuttier flavor and a slightly coarser texture.
-
Honey or Molasses: Add a teaspoon of honey or molasses to the initial mixture to give the yeast a little extra food and to enhance the flavor. This is especially helpful if you are having trouble getting your starter going.
FAQs (Frequently Asked Questions)
Q: Why is my starter not frothy after 24 hours?
A: The most common reason is temperature. Ensure the starter is kept in a warm environment (80-85°F). Also, check the expiration date of your yeast to ensure it’s still active.
Q: My starter smells sour and almost like vinegar. Is that normal?
A: A slightly sour smell is normal for sourdough starters. However, an overly strong vinegar smell might indicate that the starter needs to be fed more frequently. Discard a portion and feed it with fresh flour and water.
Q: Can I use tap water to make my starter?
A: It’s generally best to use filtered or spring water, as tap water can sometimes contain chlorine or other chemicals that can inhibit yeast activity. Let tap water sit out for an hour or two to let the chlorine evaporate, or simply use bottled water.
Q: How often should I feed my starter?
A: If you’re keeping your starter at room temperature, feed it once or twice a day. If it’s in the refrigerator, feed it once a week.
Q: Can I revive a neglected starter?
A: Yes! Even if your starter has been neglected for a while, you can usually revive it. Discard a portion, feed it regularly, and it should come back to life within a few days. Look for signs of activity, such as bubbles and increased volume.
Final Thoughts
Creating your own sourdough starter is an incredibly rewarding experience. It’s a journey of patience, observation, and a bit of culinary magic. Don’t be discouraged if your first attempt isn’t perfect – every starter is unique, and with a little care and attention, you’ll have a thriving culture that will bring you years of delicious sourdough bread. Embrace the process, experiment with different flours, and most importantly, enjoy the incredible flavor of homemade sourdough! Happy baking!