
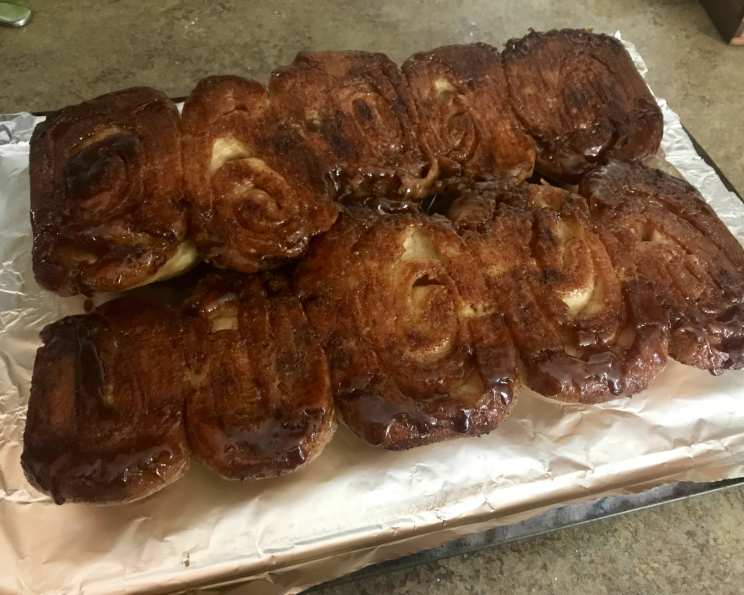
Sourdough Sticky Buns: A Tangy Twist on a Classic
The aroma still lingers in my memory – the sweet, yeasty scent of baking bread mingled with warm cinnamon and caramelized sugar. My grandmother, a woman whose kitchen was a constant source of comfort and deliciousness, used to make cinnamon rolls every holiday. They were pillowy soft clouds of dough, drenched in a sugary glaze that stuck to your fingers long after you’d devoured the last bite. Now, with my own sourdough starter bubbling away on the counter, I’ve found a way to honor her memory with a tangy, updated version of that cherished classic: Sourdough Sticky Buns. The slight tang of the sourdough adds a complexity that elevates the sweet spice, creating a truly unforgettable treat.
Recipe Overview
- Prep Time: 12 hours 5 minutes
- Cook Time: 35 minutes
- Total Time: 12 hours 40 minutes
- Servings: 8
- Yields: 8 large cinnamon rolls
- Dietary Type: Vegetarian
Ingredients
The Sponge
- 1 cup sourdough starter
- ½ cup 2% low-fat milk
- 2 tablespoons olive oil
- 2 cups all-purpose flour
- ¼ cup granulated sugar
The Dough
- 1 cup all-purpose flour
- 1 teaspoon salt
- 1 teaspoon baking soda
The Filling
- 8 tablespoons reduced-fat margarine
- 1 cup firmly packed brown sugar
- 1 teaspoon cinnamon
Equipment Needed
- Mixing Bowl
- 9 x 11-inch Baking Pan
- Rolling Pin
- Measuring Cups and Spoons
Instructions
-
Prepare the Sponge: In a mixing bowl, pour in the sourdough starter. Stir in the milk and olive oil until well combined.
-
Combine the Sponge Ingredients: Gradually blend in the flour and granulated sugar to create a fairly stiff sponge. Ensure there are no lumps.
-
First Rise (Sponge): Cover the bowl with plastic wrap or a damp cloth and let it stand at room temperature overnight (approximately 12 hours). This allows the sourdough to work its magic, developing that characteristic tangy flavor and airy texture.
-
Begin the Dough: The next day, in the same bowl with the sponge, blend ½ cup of the all-purpose flour with the salt and baking soda.
-
Combine the Dough Ingredients: Stir the mixture into the sponge to make a fairly slack dough. The dough will be a bit sticky, which is perfectly fine.
-
Prepare for Kneading: Using the remaining ½ cup of flour, make sure your kneading surface is well-floured. Turn the dough out onto the floured surface.
-
Knead the Dough: Flour your hands and knead the dough for 2 to 3 minutes, just enough to make the dough cohesive and smooth. Sprinkle flour on any sticky spots as needed. Avoid over-kneading, as this can result in a tough bun.
-
Prepare the Baking Pan: Use a 9 x 11-inch baking pan. Grease the sides of the pan thoroughly with butter or cooking spray to prevent sticking.
-
Create the Sticky Base: Melt ¼ cup (4 tablespoons) of the reduced-fat margarine and spread it evenly in the prepared pan.
-
Add Sweetness and Spice: Sprinkle ¼ cup of the brown sugar evenly over the melted margarine, then sprinkle with the cinnamon. This creates the signature sticky, caramelized base for the buns.
-
Roll Out the Dough: On a well-floured surface, roll out the dough with a well-floured rolling pin until it’s approximately 12 x 18 inches in size. Aim for a rectangular shape. While rolling, sprinkle flour on any sticky spots, both on top of and under the dough, to prevent tearing.
-
Add the Filling: Spread the remaining 4 tablespoons of reduced-fat margarine evenly over the rolled-out dough.
-
Sweeten the Filling: Spread the remaining ¾ cup of brown sugar evenly over the margarine-covered dough.
-
Additions (Optional): At this point, you can also add nuts (such as chopped pecans or walnuts) or raisins, spreading them evenly over the brown sugar.
-
Roll the Dough: Starting at the long edge, roll the dough up tightly, jellyroll style. This creates the classic cinnamon roll swirl. Seal the edges by gently pinching them together.
-
Cut the Rolls: Using a sharp knife or unflavored dental floss, cut the roll into ¾- to 1-inch slices.
-
Arrange in the Pan: Arrange the sliced rolls in the prepared pan, placing them close together. This will help them rise and bake evenly.
-
Second Rise (Proofing): Cover the pan with plastic wrap or a damp cloth and let the dough rise in a warm place for about 1 hour. The rolls should nearly double in size.
-
Preheat the Oven: While the rolls are rising, preheat your oven to 400 degrees F (200 degrees C).
-
Bake (Initial): Bake the rolls for 15 minutes at 400 degrees F (200 degrees C).
-
Reduce Heat and Continue Baking: Turn the oven temperature down to 350 degrees F (175 degrees C) and continue baking for approximately another 20 minutes.
-
Ensure Even Browning: Rotate the pan halfway through the baking time to ensure even browning. The rolls should be golden brown and cooked through.
-
Invert and Serve: Remove the buns from the oven. Place a serving plate over the pan and carefully invert the buns onto the plate. Leave the pan in place for a few seconds to ensure all the sticky topping transfers to the plate.
-
Serve Warm: Serve the Sourdough Sticky Buns warm, if possible, for the best flavor and texture.
Expert Tips & Tricks
- Sourdough Starter Strength: A very active and bubbly sourdough starter is crucial for a good rise and flavor. Feed your starter 4-6 hours before making the sponge to ensure it’s at its peak.
- Kneading Technique: Avoid over-kneading the dough. Over-kneading will result in tough buns. Knead just enough to bring the dough together.
- Warm Environment for Rising: A warm environment helps the dough rise faster. You can place the covered dough in a slightly warm oven (turned off) or on top of a warm appliance, like a refrigerator.
- Dental Floss for Cutting: Using unflavored dental floss to cut the rolls prevents them from being squished and keeps their shape. Simply slide the floss under the roll, bring the ends together, and pull to cut.
- Adjust Baking Time: Baking times may vary depending on your oven. Keep an eye on the buns and adjust the baking time accordingly. The buns are done when they are golden brown and cooked through.
- Nut Variation: Consider using toasted nuts for the filling. Toasting them will bring out their flavor and add a nice crunch to the rolls.
Serving & Storage Suggestions
Serve the Sourdough Sticky Buns warm, ideally within a few hours of baking, to enjoy their softest texture and most intense flavors. The caramel-like base is best when still slightly warm and gooey.
- Room Temperature: Sticky buns can be stored at room temperature in an airtight container for up to 2 days. They may become slightly drier, but the flavor will still be delicious.
- Refrigerator: For longer storage, keep them in the refrigerator for up to 4 days.
- Freezer: To freeze, wrap the buns individually in plastic wrap and then place them in a freezer-safe bag or container. They can be frozen for up to 2 months.
- Reheating: Reheat refrigerated or frozen buns in a preheated oven at 350°F (175°C) for about 10-15 minutes, or until warmed through. You can also microwave them in 30-second intervals, but be careful not to overheat them, as they can become tough.
Nutritional Information
| Nutrient | Amount per Serving | % Daily Value |
|---|---|---|
| Calories | 386.4 kcal | N/A |
| Calories from Fat | 87 g | 23% |
| Total Fat | 9.7 g | 14% |
| Saturated Fat | 1.6 g | 8% |
| Cholesterol | 1.2 mg | 0% |
| Sodium | 604.3 mg | 25% |
| Total Carbohydrate | 69.8 g | 23% |
| Dietary Fiber | 1.4 g | 5% |
| Sugars | 33.6 g | 134% |
| Protein | 5.4 g | 10% |
Note: Nutritional information is an estimate and may vary based on specific ingredients and serving sizes.
Variations & Substitutions
- Vegan Sticky Buns: Replace the reduced-fat margarine with a plant-based butter alternative. Use a plant-based milk for the sponge.
- Gluten-Free Sticky Buns: Use a gluten-free all-purpose flour blend for both the sponge and the dough. You may need to adjust the amount of liquid to achieve the correct dough consistency.
- Spiced Sticky Buns: Add a pinch of ground cardamom, nutmeg, or cloves to the cinnamon-sugar mixture for a warmer, more complex flavor.
- Citrus Zest: Add a teaspoon of orange or lemon zest to the dough for a bright, aromatic twist.
- Apple Cinnamon Sticky Buns: Add diced apples to the filling for a fall-inspired treat.
FAQs (Frequently Asked Questions)
Q: Can I use a different type of milk in the sponge?
A: Yes, you can substitute the 2% milk with whole milk, almond milk, or any other milk you prefer. Keep in mind that the fat content of the milk may slightly affect the texture of the buns.
Q: Can I make the dough ahead of time?
A: Yes, you can prepare the dough through step 7, then wrap it tightly in plastic wrap and refrigerate it for up to 24 hours. Allow the dough to come to room temperature for about 30 minutes before rolling it out.
Q: My sticky buns are browning too quickly. What should I do?
A: If the buns are browning too quickly, tent the pan with aluminum foil during the last 10-15 minutes of baking to prevent them from burning.
Q: Can I use honey or maple syrup instead of brown sugar?
A: While you can experiment with using honey or maple syrup, the brown sugar creates a more caramelized and sticky base. If you do substitute, use a similar amount and be mindful of the added moisture.
Q: What’s the best way to reheat sticky buns so they don’t dry out?
A: To prevent drying, wrap the buns in foil before reheating in the oven. You can also place a small dish of water in the oven to create steam.
Final Thoughts
These Sourdough Sticky Buns are more than just a recipe; they’re a connection to cherished memories and a celebration of flavor. The tangy sourdough, the warm spices, and the sweet, gooey base create a symphony of taste that will delight your senses. Don’t be intimidated by the sourdough – it’s easier than you think, and the results are well worth the effort. Gather your ingredients, embrace the process, and create a batch of these unforgettable buns. I encourage you to experiment with different variations and share your experiences with others. Perhaps pair these beauties with a steaming mug of coffee or a scoop of vanilla ice cream for the ultimate treat. Happy baking!