
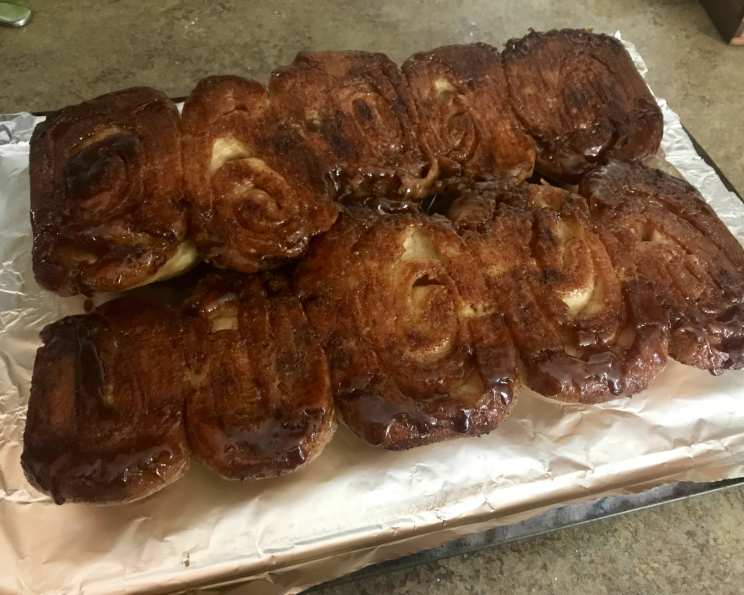
Sourdough Sticky Buns: A Tangy Twist on a Classic Comfort
The aroma of cinnamon and warm dough baking in the oven – it’s a scent that instantly transports me back to my grandmother’s kitchen. She always had a batch of cinnamon rolls rising on the counter, their sweet scent mingling with the yeasty tang of her sourdough starter. While her version was a closely guarded secret (I suspect involving a whole stick of butter!), I’ve been on a years-long quest to recreate that same comforting magic, but with my own sourdough twist. These Sourdough Sticky Buns are the delightful culmination of that journey – a perfect balance of tangy sourdough, sweet cinnamon-sugar filling, and gooey, caramelized topping. Prepare to be transported!
Recipe Overview
- Prep Time: 35 minutes (plus overnight proofing)
- Cook Time: 35 minutes
- Total Time: 12 hours 10 minutes (includes overnight proofing)
- Servings: 8
- Yield: 8 large cinnamon rolls
- Dietary Type: Vegetarian
Ingredients
The Sponge
- 1 cup sourdough starter
- ½ cup 2% low-fat milk
- 2 tablespoons olive oil
- 2 cups all-purpose flour
- ¼ cup granulated sugar
The Dough
- 1 cup all-purpose flour
- 1 teaspoon salt
- 1 teaspoon baking soda
The Filling
- 8 tablespoons reduced-fat margarine, softened
- 1 cup firmly packed brown sugar
- 1 teaspoon cinnamon
Equipment Needed
- Mixing bowls
- Measuring cups and spoons
- 9 x 11-inch baking pan
- Rolling pin
- Pastry brush or spoon
Instructions
-
Prepare the Sponge: In a large mixing bowl, pour the sourdough starter. Stir in the milk and olive oil. Blend in the flour and granulated sugar until a fairly stiff sponge forms. Cover the bowl tightly with plastic wrap or a lid. Let it stand at room temperature overnight (approximately 8-12 hours). This allows the sourdough to work its magic, developing a subtle tang and creating a light and airy crumb.
-
Make the Dough: The next morning, in a separate bowl, blend ½ cup of the all-purpose flour with the salt and baking soda. Stir this mixture into the overnight sponge. The resulting dough will be fairly slack and sticky – this is normal.
-
Knead the Dough: Using the remaining ½ cup of all-purpose flour, generously flour a clean, flat kneading surface. Turn out the sticky dough onto the floured surface. Flour your hands well, and knead the dough for 2 to 3 minutes, or just enough to bring it together into a cohesive ball. Don’t over-knead; the dough should still be slightly tacky. If any spots remain sticky, sprinkle them lightly with more flour.
-
Prepare the Pan(s): You will need one 9 x 11-inch baking pan. Grease the sides of the pan thoroughly with butter or cooking spray to prevent the buns from sticking.
-
Create the Sticky Bottom: Melt ¼ cup (4 tablespoons) of the reduced-fat margarine. Spread the melted margarine evenly in the prepared pan. Sprinkle ¼ cup of the brown sugar evenly over the melted margarine, then sprinkle with the cinnamon. This will create the delicious, caramelized sticky bottom that makes these buns so irresistible.
-
Assemble the Buns: On a lightly floured surface, roll out the dough with a well-floured rolling pin until it forms a rectangle approximately 12 x 18 inches. It’s important to work quickly and keep the dough lightly floured to prevent sticking. While rolling, sprinkle flour on any sticky spots, both on top of and underneath the dough.
-
Add the Filling: Spread the remaining 4 tablespoons of softened reduced-fat margarine evenly over the rolled-out dough. Then, spread the remaining ¾ cup of brown sugar evenly over the margarine. If desired, you can also add nuts or raisins at this stage, scattering them evenly over the brown sugar.
-
Roll and Cut: Starting at one of the long edges, roll the dough up tightly, jellyroll style. Be sure to seal the edge by gently pinching it closed. Using a sharp knife or unflavored dental floss, cut the roll into ¾- to 1-inch thick slices.
-
Arrange and Rise: Arrange the slices, cut-side up, in the prepared pan, placing them close together. Cover the pan loosely with plastic wrap or a clean kitchen towel. Let the dough rise in a warm place for about 1 hour, or until the buns have nearly doubled in size.
-
Bake: Preheat your oven to 400 degrees F (200 degrees C).
-
Bake (Part 1): Bake the rolls for 15 minutes at 400 degrees F.
-
Bake (Part 2): Reduce the oven temperature to 350 degrees F (175 degrees C) and continue baking for another 20 minutes, or until the buns are golden brown and cooked through. Rotate the pan halfway through baking to ensure even browning.
-
Invert and Serve: Remove the buns from the oven. Place a serving plate over the pan, then carefully invert the buns onto the plate. Leave the pan in place for a few moments to allow all the sticky topping to release onto the buns. Serve warm, if possible, for the ultimate sticky bun experience.
Expert Tips & Tricks
- Sourdough Starter Health: A very active and bubbly sourdough starter is key to achieving the right rise and texture. If your starter is sluggish, refresh it a few times before making the sponge.
- Dough Consistency: Sourdough dough can be unpredictable. If your dough seems too wet, add a tablespoon of flour at a time until it is manageable. If it seems too dry, add a teaspoon of milk.
- Even Baking: To prevent the edges of the buns from browning too quickly, you can tent the pan loosely with foil during the last 10 minutes of baking.
- Freezing: These buns freeze beautifully! Once cooled, wrap them individually in plastic wrap and place them in a freezer-safe bag. To reheat, thaw overnight in the refrigerator or microwave briefly until warmed through.
Serving & Storage Suggestions
These Sourdough Sticky Buns are best served warm, straight from the oven. The gooey, caramelized topping is at its most decadent when fresh. You can serve them as a breakfast treat, a brunch addition, or a delightful dessert.
Leftovers can be stored in an airtight container at room temperature for up to 2 days, or in the refrigerator for up to 4 days. To reheat, microwave for 15-30 seconds per bun, or warm in a low oven (300°F) for 5-10 minutes. You can also freeze them for longer storage.
Nutritional Information
| Nutrient | Amount per Serving | % Daily Value |
|---|---|---|
| Calories | 386 kcal | N/A |
| Calories from Fat | 87g | 23% |
| Total Fat | 9.7 g | 14% |
| Saturated Fat | 1.6 g | 8% |
| Cholesterol | 1.2 mg | 0% |
| Sodium | 604.3 mg | 25% |
| Total Carbohydrate | 69.8 g | 23% |
| Dietary Fiber | 1.4 g | 5% |
| Sugars | 33.6 g | N/A |
| Protein | 5.4 g | 10% |
Nutritional information is an estimate and may vary based on specific ingredients and preparation methods.
Variations & Substitutions
- Vegan Sticky Buns: Substitute the low-fat milk with plant-based milk like almond, soy, or oat milk. Use a vegan butter substitute for the margarine.
- Gluten-Free Sticky Buns: Use a high-quality gluten-free all-purpose flour blend for both the sponge and the dough. You may need to adjust the liquid content slightly, as gluten-free flours tend to absorb more moisture.
- Nutty Sticky Buns: Add chopped pecans, walnuts, or almonds to the filling for added texture and flavor.
- Spiced Sticky Buns: Experiment with adding other spices to the filling, such as ground ginger, nutmeg, or cardamom.
- Fruity Sticky Buns: Add dried cranberries, chopped apples, or blueberries to the filling for a fruity twist.
FAQs (Frequently Asked Questions)
Q: Can I use active dry yeast instead of sourdough starter?
A: While this recipe is designed for sourdough, you could try substituting with yeast. You will need to adjust the flour and liquid ratios, and the overnight proofing time will be significantly shorter. The flavor will also be different, lacking the sourdough tang.
Q: What if my dough doesn’t rise enough?
A: Make sure your sourdough starter is active and bubbly. Also, ensure the rising environment is warm and humid, as cold temperatures can inhibit the rise. If the dough still doesn’t rise sufficiently, give it extra time.
Q: Can I make these ahead of time?
A: Yes, you can prepare the buns up to the point of baking, then cover and refrigerate them overnight. Let them come to room temperature for about 30 minutes before baking.
Q: How do I prevent the buns from sticking to the pan?
A: Generously grease the pan with butter or cooking spray, and ensure the sticky bottom is evenly distributed. Inverting the pan while the buns are still warm is also crucial.
Q: Can I use a different type of sugar?
A: While brown sugar is traditional for sticky buns, you can experiment with other sugars like coconut sugar or maple sugar. The flavor and texture of the topping may vary slightly.
Final Thoughts
These Sourdough Sticky Buns are more than just a recipe; they’re an invitation to slow down, savor the process of baking, and share a delicious treat with loved ones. The tangy sourdough beautifully complements the sweet cinnamon-sugar filling, creating a depth of flavor that is simply irresistible. Don’t be intimidated by the overnight proofing – the result is well worth the wait. Give these a try, and let me know what you think! I’d love to hear about your own sourdough sticky bun adventures and any variations you create. Perhaps pair them with a strong cup of coffee or a scoop of vanilla ice cream for the ultimate indulgence. Happy baking!