
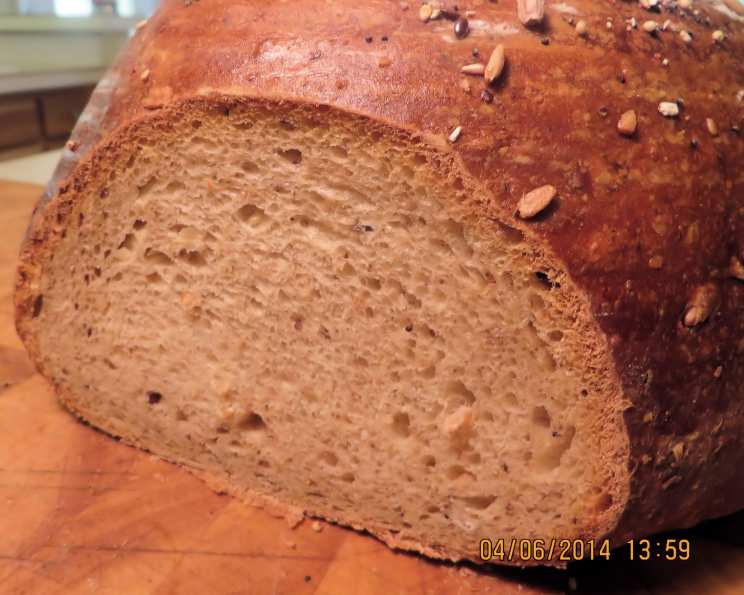
Sourdough Three Grain Bread (ABM)
The scent of freshly baked sourdough always transports me back to my grandmother’s kitchen. She had a knack for transforming simple ingredients into something truly magical, and her sourdough was legendary. Though she baked hers in a traditional oven, I’ve adapted a similar recipe for the bread machine, making it easier than ever to enjoy that warm, comforting taste of homemade bread. This version, packed with flaxseed, wheat flakes, and oatmeal, adds a delightful nutty flavor and hearty texture that elevates the classic sourdough experience. I’m excited to share this updated favorite with you.
Recipe Overview
- Prep Time: 20 minutes
- Cook Time: 30 minutes
- Total Time: 4 hours 50 minutes (includes rising time)
- Servings: Approximately 12 slices
- Yield: 1 loaf
- Dietary Type: Vegetarian
Ingredients
- 1 1/3 cups proofed sourdough starter
- 1 cup evaporated milk
- 4 tablespoons butter or margarine
- 1/4 cup sugar
- 1 1/2 teaspoons salt
- 3 – 3 1/2 cups white bread flour
- 2 tablespoons white bread flour
- 1/4 cup rolled wheat flakes
- 2 tablespoons whole ground flax seed meal
- 1/3 cup rolled oatmeal
- 1/4 cup potato flakes
Equipment Needed
- Bread machine
- Measuring cups and spoons
- Spray oil
- Loaf pan (metal or stoneware) or round stone
- Cornmeal (optional, for stoneware or stone)
- Cooling rack
Instructions
- Place all ingredients in your bread machine in the order recommended by the instructions for your specific machine. Typically, you would add the wet ingredients first, followed by the dry ingredients.
- Select the dough cycle on your bread machine and press start.
- Listen carefully for the end of the first kneading cycle. This is crucial because you don’t want the dough to rise in the machine. Sourdough breads, especially those relying on wild yeast, benefit from a single, carefully controlled rise outside the machine.
- Once the kneading is complete, carefully remove the dough from the bread machine. Because this is a sourdough, the dough will be quite soft, so lightly spray it with cooking spray to prevent sticking and make it easier to handle.
- Shape the dough into your desired loaf shape. You can opt for a traditional oblong loaf, a round boule if you’re using a stone, or any creative shape you prefer.
- Place the shaped dough in your prepared baking vessel. If you’re using a metal loaf pan, grease it thoroughly to prevent sticking. For a stoneware loaf pan, lightly spray it with cooking spray and then sprinkle the sides and bottom with cornmeal. If you’re using a round baking stone, simply sprinkle it generously with cornmeal.
- Let the dough rise until it has doubled in size. Sourdough breads typically take 3 to 4 hours to rise if they don’t have added commercial yeast. The rising time will depend on the temperature of your kitchen. A slightly warm environment will encourage faster rising.
- Preheat your oven to 350 degrees Fahrenheit (175 degrees Celsius).
- Bake the bread for approximately 30 minutes, or until golden brown and the internal temperature reaches around 200-210°F (93-99°C).
- Immediately remove the bread from the pan. While it’s still hot, lightly baste the top of the loaf with butter or margarine. This will add a nice sheen and a touch of extra flavor.
- Place the bread on a cooling rack and allow it to cool completely before slicing. Slicing hot bread can be difficult and can result in a gummy texture. If you absolutely must slice it warm, an electric knife works best.
Expert Tips & Tricks
- Sourdough Starter Health: A vibrant, active sourdough starter is key to a successful loaf. Feed your starter regularly (usually once or twice a day) for several days before baking to ensure it’s at its peak.
- Dough Consistency: Sourdough dough can be sticky. Don’t be tempted to add too much flour during shaping. Use a light touch and keep your hands lightly oiled or floured.
- Oven Spring: To encourage a good “oven spring” (the rapid expansion of the bread in the first few minutes of baking), you can try scoring the top of the loaf with a sharp knife or lame before baking. This allows the bread to expand in a controlled way.
- Steam: Creating steam in the oven during the first 10-15 minutes of baking can also help with oven spring and crust development. You can do this by placing a pan of hot water on the bottom rack of the oven.
- Autolyse: For a more developed gluten structure, consider autolysing the flour and water (evaporated milk in this case) for 30 minutes before adding the sourdough starter and other ingredients. This involves mixing the flour and water and letting it rest, allowing the flour to fully hydrate.
Serving & Storage Suggestions
This Sourdough Three Grain Bread is incredibly versatile. Enjoy it warm with a pat of butter, use it for sandwiches, or toast it for a hearty breakfast. It pairs wonderfully with soups, stews, and salads.
- Storage: Store leftover bread in an airtight container at room temperature for up to 3 days. For longer storage, wrap the bread tightly in plastic wrap and freeze it for up to 2 months.
- Reheating: To reheat frozen bread, thaw it completely at room temperature. You can then warm it in a 350°F (175°C) oven for 5-10 minutes, or toast individual slices.
Nutritional Information
(Note: These values are estimates and may vary based on specific ingredients and serving size.)
| Nutrient | Amount per Serving | % Daily Value |
|---|---|---|
| Calories | 220 kcal | 11% |
| Total Fat | 6g | 8% |
| Saturated Fat | 3g | 15% |
| Cholesterol | 15mg | 5% |
| Sodium | 350mg | 15% |
| Total Carbohydrate | 35g | 13% |
| Dietary Fiber | 3g | 12% |
| Sugars | 5g | N/A |
| Protein | 7g | 14% |
Variations & Substitutions
- Gluten-Free: While this recipe isn’t naturally gluten-free, you can experiment with gluten-free bread flour blends. Be aware that the texture and rise will likely be different, and you may need to adjust the liquid content.
- Dairy-Free: Substitute the evaporated milk with a plant-based milk alternative like almond, soy, or oat milk. Ensure the butter or margarine is also dairy-free.
- Seed Variations: Add other seeds like sunflower seeds, pumpkin seeds, or sesame seeds for added flavor and texture.
- Sweetener Options: Replace the sugar with honey, maple syrup, or agave for a different flavor profile.
- Flour types: Feel free to substitute with whole wheat bread flour for a nuttier taste.
FAQs (Frequently Asked Questions)
Q: Can I use active dry yeast in addition to the sourdough starter?
A: While this recipe is designed to rely solely on the sourdough starter for leavening, you could add a small amount of active dry yeast (about 1/4 teaspoon) to speed up the rising process. However, this may slightly alter the flavor of the bread.
Q: My sourdough starter is very sour. Will this make the bread taste too sour?
A: The sourness of your starter will indeed influence the final bread. To reduce the sourness, use a younger, recently fed starter. Also, a longer bulk fermentation (the first rise) will increase the sourness.
Q: Can I bake this bread in a Dutch oven?
A: Yes, baking in a Dutch oven can create a wonderful crust. Preheat the Dutch oven along with the oven, and then carefully place the shaped dough inside. Bake with the lid on for the first 20 minutes, then remove the lid and bake for another 10-15 minutes, or until golden brown.
Q: What if my dough doesn’t double in size within 4 hours?
A: Rising times can vary depending on the temperature and humidity of your kitchen. If your dough isn’t doubling within 4 hours, give it more time. Be patient!
Q: Can I make this dough ahead of time and bake it the next day?
A: Yes, you can retard the dough in the refrigerator overnight. After shaping the loaf, place it in a greased loaf pan, cover it tightly with plastic wrap, and refrigerate for up to 24 hours. Remove it from the refrigerator about 1-2 hours before baking to allow it to warm up slightly.
Final Thoughts
I truly hope you’ll give this Sourdough Three Grain Bread recipe a try. The combination of the tangy sourdough flavor, the hearty grains, and the satisfying texture is simply irresistible. Don’t hesitate to experiment with different grains or seeds to create your own unique version. And if you do, I’d love to hear about it! Share your feedback and any variations you try – happy baking! Perhaps enjoy your first slice alongside a comforting bowl of tomato soup.