
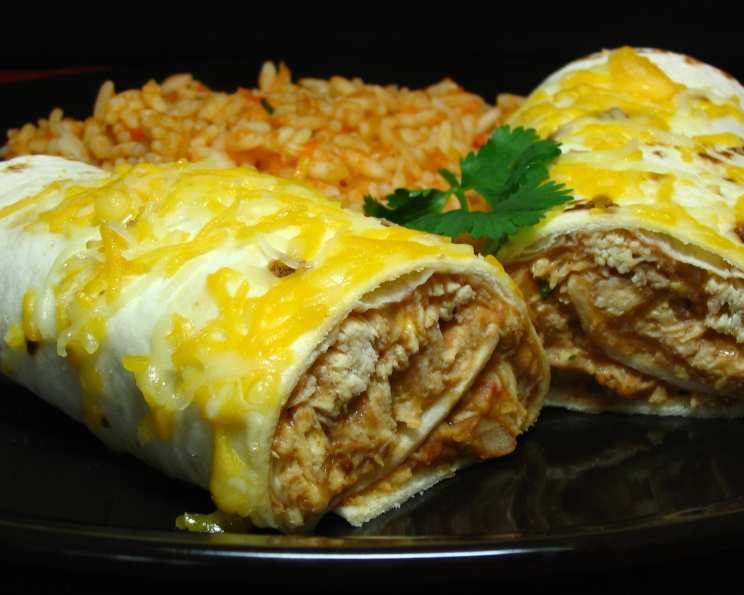
Southwest Roll-Ups: A Fiesta in Every Bite
The first time I tasted something similar to these Southwest roll-ups, it was at a summer potluck hosted by a friend in Santa Fe. The vibrant colors of the dish – the deep red salsa, the bright green cilantro, the creamy white sour cream – mirrored the stunning New Mexican landscape. It was an instant hit, a flavor explosion that had everyone reaching for seconds. I remember thinking, “This is summer on a plate!” Since then, I’ve been experimenting with different variations, trying to capture that same feeling of sunshine and spice in every bite. This version, inspired by a family-favorite, is my go-to for parties and casual weeknight dinners.
Recipe Overview
- Prep Time: 20 minutes
- Cook Time: 20 minutes
- Total Time: 40 minutes
- Servings: 10-12
- Yield: 1 baking dish
- Dietary Type: Adaptable (see Variations)
Ingredients
- 2 tablespoons salsa
- 1-2 jalapeño peppers, seeded
- 1 clove garlic
- 2 tablespoons chopped onions
- 1 (16 ounce) can refried beans
- ½ teaspoon ground cumin
- 1 tablespoon chopped fresh cilantro (optional)
- 1 cup cubed, cooked chicken
- 1 cup shredded cheddar cheese, divided
- 10-12 6-inch flour tortillas
- Sour cream (optional)
- Additional salsa (optional)
Ingredient Notes:
- For a vegetarian option, omit the chicken and add 1/2 cup of cooked corn or black beans.
- Feel free to adjust the amount of jalapeño depending on your spice preference.
- For a dairy-free version, use dairy-free cheddar cheese and sour cream alternatives.
Equipment Needed
- Food processor
- 13x9x2-inch baking dish
- Grease or cooking spray
Instructions
- Preheat your oven to 350°F (175°C). Lightly grease a 13x9x2-inch baking dish.
- In a food processor, combine the salsa, jalapeño pepper(s), garlic, chopped onions, refried beans, ground cumin, and cilantro (if using).
- Blend the ingredients in the food processor until the mixture is smooth and well combined. This will form the flavorful base for your roll-ups.
- Add ½ cup of the shredded cheddar cheese to the food processor with the blended mixture. Pulse a few times to incorporate the cheese. This helps bind the filling together.
- Spread an even layer of the bean mixture onto each of the 6-inch flour tortillas, leaving a small border around the edge.
- Evenly distribute the cubed, cooked chicken over the bean mixture on each tortilla.
- Roll up each tortilla tightly, starting from one edge and rolling towards the opposite edge.
- Place the rolled tortillas seam-side down in the prepared baking dish. This prevents them from unraveling during baking.
- Cover the baking dish with aluminum foil.
- Bake in the preheated oven for 20 minutes, or until the roll-ups are heated through and the tortillas are soft.
- Remove the foil from the baking dish. Sprinkle the remaining shredded cheddar cheese evenly over the tops of the roll-ups.
- Return the baking dish to the oven and bake for another 5 minutes, or until the cheese is melted and bubbly.
- Remove the baking dish from the oven and let the roll-ups stand for a few minutes to allow the cheese to set slightly.
- Serve warm with sour cream and additional salsa (if desired).
Expert Tips & Tricks
- Make-Ahead Magic: You can assemble the roll-ups ahead of time and store them in the refrigerator (covered) for up to 24 hours before baking. Just add a few extra minutes to the baking time to ensure they’re heated through.
- Spice it Up (or Tone it Down): Adjust the amount of jalapeño pepper to control the heat level. For a milder flavor, remove the seeds and membranes completely. For an extra kick, leave some seeds in or add a pinch of cayenne pepper to the filling.
- Prevent Soggy Tortillas: Don’t overfill the tortillas, as this can make them soggy during baking. Also, be sure to place them seam-side down to prevent them from opening up.
- Quick & Easy Shredding: If you’re short on time, buy pre-shredded cheese. However, freshly shredded cheese melts more evenly and has a better flavor.
- Crispy Tortillas: For slightly crispy tortillas, bake the roll-ups uncovered for the last 5 minutes of baking time. Watch them closely to prevent them from burning.
Serving & Storage Suggestions
Serve these Southwest roll-ups warm as an appetizer, a light lunch, or a casual dinner. They pair perfectly with a side of guacamole, Spanish rice, or a simple green salad. Garnish with a dollop of sour cream, a sprinkle of fresh cilantro, or a drizzle of your favorite salsa.
Leftover roll-ups can be stored in an airtight container in the refrigerator for up to 3 days. To reheat, simply microwave them for 1-2 minutes, or bake them in a preheated oven at 350°F (175°C) for 10-15 minutes, until heated through. You can also freeze the assembled (unbaked) roll-ups for up to 2 months. Thaw them overnight in the refrigerator before baking as directed.
Nutritional Information
| Nutrient | Amount per Serving | % Daily Value |
|---|---|---|
| Calories | 185.7 kcal | N/A |
| Calories from Fat | 60 g | 32% |
| Total Fat | 6.7 g | 10% |
| Saturated Fat | 3.2 g | 15% |
| Cholesterol | 15.5 mg | 5% |
| Sodium | 436.6 mg | 18% |
| Total Carbohydrate | 23.4 g | 7% |
| Dietary Fiber | 3.5 g | 14% |
| Sugars | 1.1 g | 4% |
| Protein | 8 g | 15% |
Note: Nutritional information is an estimate and may vary depending on specific ingredients and portion sizes.
Variations & Substitutions
- Spicy Chicken: Use shredded rotisserie chicken that has been tossed with a spicy dry rub or marinade.
- Black Bean & Corn: Omit the chicken and add a can of drained and rinsed black beans and a cup of frozen corn to the filling for a vegetarian option.
- Beefy Roll-Ups: Substitute ground beef for the chicken. Brown the beef with the onions and garlic before adding it to the food processor.
- Green Chile Chicken: Add a can of diced green chiles to the filling for a southwestern twist.
- Gluten-Free: Use gluten-free tortillas to make this recipe gluten-free.
- Creamy Roll-Ups: Add 4 oz of cream cheese to the food processor for a creamier filling.
FAQs (Frequently Asked Questions)
Q: Can I make these roll-ups ahead of time?
A: Yes, you can assemble the roll-ups up to 24 hours in advance and store them in the refrigerator before baking. Add a few extra minutes to the baking time to ensure they are heated through.
Q: Can I freeze these roll-ups?
A: Yes, you can freeze the assembled (unbaked) roll-ups for up to 2 months. Thaw them overnight in the refrigerator before baking as directed.
Q: How can I make these spicier?
A: Add more jalapeño pepper or a pinch of cayenne pepper to the filling. You can also use a spicier salsa.
Q: What can I serve with these roll-ups?
A: These roll-ups are delicious served with guacamole, Spanish rice, a simple green salad, sour cream, and extra salsa.
Q: Can I use a different type of cheese?
A: Yes, you can substitute the cheddar cheese with Monterey Jack, pepper jack, or any other cheese that melts well.
Final Thoughts
I hope you enjoy making and eating these Southwest roll-ups as much as I do! They’re a fantastic way to bring a taste of the Southwest to your table, no matter where you are. Don’t be afraid to experiment with different ingredients and flavors to create your own unique version. Whether you’re serving them as an appetizer for a party or enjoying them as a quick and easy weeknight meal, I’m sure they’ll be a hit. If you try this recipe, please let me know what you think! I’d love to hear about your variations and any serving suggestions you have. Consider pairing them with a refreshing margarita or an ice-cold Mexican beer for the full experience. Happy cooking!