
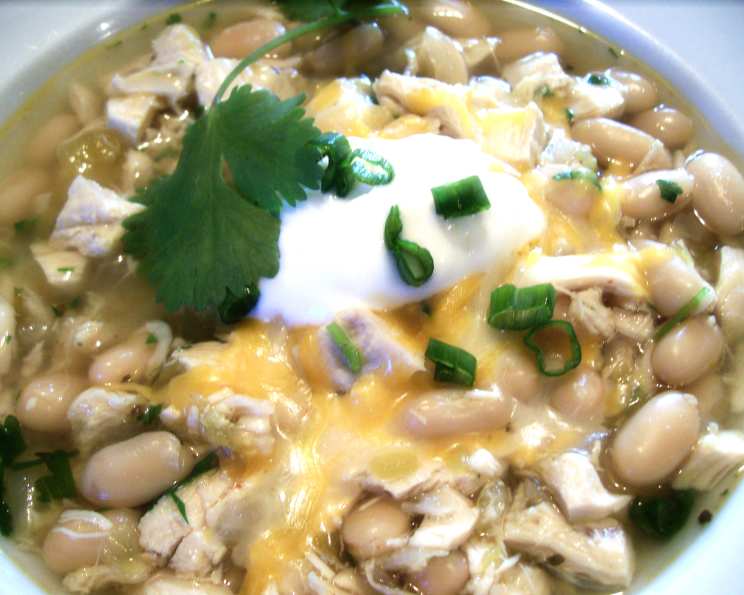
Southwest White Chili: A Culinary Hug in a Bowl
The first time I tasted white chili was at a small, unassuming cafe nestled in the heart of Santa Fe. The air was crisp with the scent of piñon wood burning in nearby fireplaces, and the vibrant colors of the city seemed to seep into every dish. This wasn’t just food; it was an experience. The creamy, comforting warmth of the chili, punctuated by the subtle heat of green chilies and the satisfying bite of tender chicken, was an instant love affair. Ever since, I’ve been chasing that same perfect bowl, adapting and refining my own version, and I’m thrilled to share my interpretation of this Southwestern classic with you.
Recipe Overview
- Prep Time: 15 minutes
- Cook Time: 25 minutes
- Total Time: 40 minutes
- Servings: 4-6
- Yield: About 6 cups
- Dietary Type: Gluten-Free
Ingredients
- 1 lb boneless skinless chicken breast, cut into 1/2 inch cubes
- 1 teaspoon garlic powder
- 1 teaspoon ground cumin
- 1/2 teaspoon oregano
- 1/4 teaspoon cayenne pepper
- 2 tablespoons olive oil, divided
- 1 onion, coarsely chopped
- 1 cup chicken broth (or more, as needed)
- 4 ounces chopped green chilies (1 small can)
- 19 ounces white cannellini beans, drained and rinsed (1 can)
- 1/4 cup fresh cilantro, chopped (optional)
- Grated cheese (optional, for garnish)
- Chopped scallion (optional, for garnish)
Equipment Needed
- 3-quart saucepan
- Small bowl
- Measuring spoons and cups
- Cutting board
- Knife
Instructions
-
Begin by preparing the spice blend. In a small bowl, thoroughly mix the garlic powder, ground cumin, oregano, and cayenne pepper. This aromatic mixture will infuse the chicken and the chili with its distinctive Southwest flavor.
-
Next, prepare the chicken. Heat 1 tablespoon of olive oil in a 3-quart saucepan over medium-high heat. Add the chicken cubes and cook for 4 to 5 minutes, stirring frequently, until they are no longer pink on the outside. It’s crucial not to overcrowd the pan; if necessary, cook the chicken in batches to ensure even browning. Remove the chicken and any accumulated juices from the pan and set aside in a bowl. Don’t discard those flavorful juices – they will add depth to the chili later!
-
Now, build the flavor base. Add the remaining 1 tablespoon of olive oil to the same pan. Add the coarsely chopped onion and sauté until softened, approximately 3 to 5 minutes. Stir frequently to prevent burning and ensure the onions cook evenly.
-
Introduce the liquids and aromatics. Stir in the chicken broth, chopped green chilies, and the reserved spice blend to the pan with the softened onions. Bring the mixture to a gentle simmer and cook for 10 minutes, allowing the flavors to meld and deepen. This simmering process is crucial for developing the chili’s signature taste.
-
Combine all the ingredients. Stir the cooked chicken (along with its juices) and the drained and rinsed cannellini beans into the simmering chili base. Simmer uncovered for another 10 minutes, stirring occasionally. This allows the chili to thicken slightly and the flavors to fully integrate. If the chili becomes too thick during simmering, add a little more chicken broth to reach your desired consistency.
-
Final touches and serving. If desired, stir in fresh cilantro just before serving. Garnish with grated cheese and chopped scallions for added flavor and visual appeal. Serve hot and enjoy!
Expert Tips & Tricks
-
Spice it up (or down): Adjust the amount of cayenne pepper to control the heat level of your chili. For a milder flavor, omit the cayenne entirely. For extra heat, add a pinch of chili flakes or a diced jalapeño pepper along with the onions.
-
Creamy texture: For an even creamier chili, reserve about 1 cup of the cooked cannellini beans. Use an immersion blender to puree them, then stir the puree back into the chili during the final minutes of cooking.
-
Chicken Variations: While chicken breast is used in this recipe, shredded rotisserie chicken or even leftover cooked turkey work wonderfully too.
-
Make-ahead magic: Southwest White Chili is a fantastic make-ahead dish. Prepare it a day or two in advance and store it in the refrigerator. The flavors will deepen and intensify over time.
Serving & Storage Suggestions
Serve the Southwest White Chili hot, garnished with your favorite toppings such as grated cheddar or Monterey Jack cheese, sour cream or Greek yogurt, chopped avocado, a dollop of salsa, or a sprinkle of crispy tortilla strips.
For storage, allow the chili to cool completely before transferring it to an airtight container. It can be stored in the refrigerator for up to 3-4 days. To freeze, divide the cooled chili into freezer-safe containers or bags, leaving some headspace for expansion. It can be frozen for up to 2-3 months.
To reheat, thaw the chili in the refrigerator overnight if frozen. Reheat gently in a saucepan over medium heat, stirring occasionally, until heated through. You may need to add a little chicken broth or water if the chili has thickened too much during storage.
Nutritional Information
| Nutrient | Amount per Serving | % Daily Value |
|---|---|---|
| Calories | 409 kcal | N/A |
| Calories from Fat | 82 kcal | N/A |
| Total Fat | 9.2 g | 14% |
| Saturated Fat | 1.6 g | 7% |
| Cholesterol | 65.8 mg | 21% |
| Sodium | 276.7 mg | 11% |
| Total Carbohydrate | 40.3 g | 13% |
| Dietary Fiber | 9.5 g | 37% |
| Sugars | 3.5 g | N/A |
| Protein | 41.6 g | 83% |
Note: Nutritional information is an estimate and may vary based on specific ingredients and portion sizes.
Variations & Substitutions
-
Vegetarian White Chili: Substitute the chicken with an equal amount of diced sweet potatoes or cauliflower for a vegetarian version.
-
Spicy Vegan Chili: Omit the chicken and use vegetable broth instead of chicken broth. Add a pinch of red pepper flakes or a finely chopped jalapeño for an extra kick.
-
Creamy Coconut Chili: For a richer, creamier flavor, substitute half of the chicken broth with coconut milk. This adds a subtle sweetness and a silky texture to the chili.
-
Bean Variations: Experiment with different types of white beans, such as Great Northern beans or navy beans.
FAQs (Frequently Asked Questions)
Q: Can I use canned chicken instead of fresh chicken breast?
A: While fresh chicken breast is recommended for optimal flavor and texture, canned chicken can be used in a pinch. Be sure to drain the canned chicken well and add it towards the end of the cooking process to prevent it from drying out.
Q: How do I prevent the chicken from drying out?
A: Avoid overcooking the chicken. Cook it just until it’s no longer pink, then remove it from the pan and set it aside. Adding it back to the chili towards the end of cooking will help keep it moist and tender.
Q: Can I make this chili in a slow cooker?
A: Yes! Brown the chicken and sauté the onions as directed in the recipe. Then, transfer everything to a slow cooker and cook on low for 6-8 hours or on high for 3-4 hours.
Q: What’s the best way to thicken the chili if it’s too thin?
A: There are several ways to thicken the chili. You can simmer it uncovered for a longer period of time to allow the liquid to evaporate. Alternatively, you can mash some of the beans or stir in a tablespoon of cornstarch mixed with a little cold water.
Q: Can I freeze this chili?
A: Absolutely! Southwest White Chili freezes very well. Allow it to cool completely before transferring it to freezer-safe containers or bags. It can be frozen for up to 2-3 months.
Final Thoughts
I hope this Southwest White Chili recipe becomes a staple in your kitchen, bringing warmth and comfort to your table. Don’t be afraid to experiment with the ingredients and make it your own. Whether you’re enjoying it on a chilly evening or sharing it with friends and family, I’m confident that this chili will be a crowd-pleaser. I’d love to hear your feedback and any variations you try. Perhaps pair it with a side of warm cornbread or a refreshing margarita for a complete Southwestern feast. Happy cooking!