
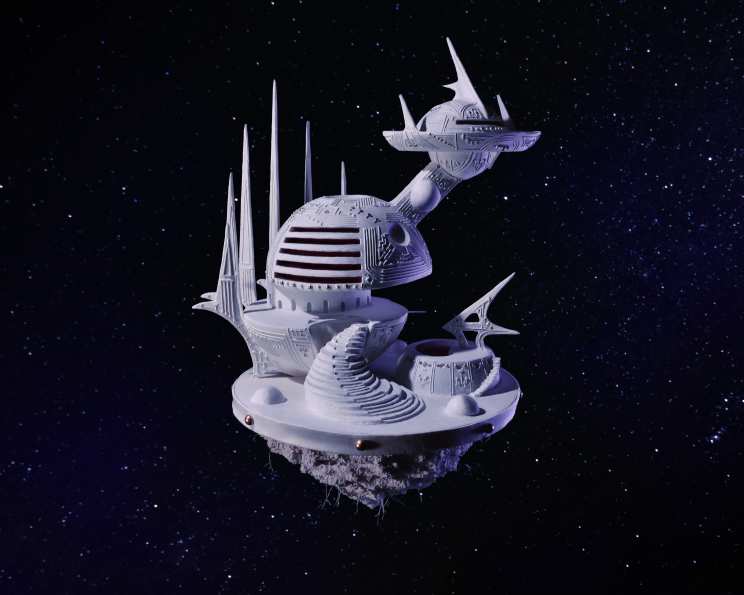
Space Mansion Birthday Cake
The year I turned ten, my best friend’s dad, a structural engineer with a sweet tooth, attempted to build a replica of Hogwarts castle out of gingerbread. It was ambitious, to say the least. The towers leaned precariously, the icing mortar crumbled, and ultimately, a significant chunk collapsed during the party. While the disaster provided endless amusement (and a surprisingly delicious pile of gingerbread rubble), it instilled in me a deep respect for the art of edible architecture. This Space Mansion Birthday Cake, with its gravity-defying design and precarious sugar embellishments, brings back all those hilarious memories – hopefully, with a slightly more stable outcome!
Recipe Overview
- Prep Time: 26 hours
- Cook Time: 1 hour 26 minutes
- Total Time: 27 hours 26 minutes
- Servings: 35
- Yield: 1 cake
- Dietary Type: Not specified
Ingredients
Birthday Cake
- 15 egg whites
- 2 cups whole milk
- 6 teaspoons clear vanilla extract
- 3 cups all-purpose flour
- 3 cups cake flour
- 2 tablespoons baking powder
- 2 teaspoons salt
- 2 cups unsalted butter
- 4 cups granulated sugar
- ½ cup funfetti candy sprinkles
Birthday Cake Buttercream
- 1 cup butter
- 3 cups confectioners’ sugar
- 2 tablespoons heavy whipping cream
- 2 teaspoons clear vanilla
- 1 teaspoon salt
- 2 tablespoons funfetti candy sprinkles
Pink Sugar Cookie Supports and Embellishments
- ¼ teaspoon salt
- 1 cup softened butter
- 1 cup sugar
- 1 large egg
- 1 tablespoon milk
- 3 cups all-purpose flour
- Pink food coloring
- Powdered sugar, for rolling out dough
- Toothpick, for added support (optional)
Royal Icing
- 3 large egg whites
- 4 cups confectioners’ sugar
Equipment Needed
- Cake boards
- Wooden and metal rods
- Toothpicks
- Hot glue gun
- Drill
- Wooden discs for main supports
- Isomalt and pink food coloring (for pool feature, optional)
- Level
- Glass bowl
- Stand mixer
- Two large domed baking pans
- Two smaller domed baking pans
- Parchment paper
- Baking sheet
- Pastry bag
Instructions
-
Assemble the Cake Stand: This is crucial, as it will support the entire structure. Gather your cake boards, wooden and metal rods, toothpicks, hot glue gun, drill, wooden discs, Isomalt (optional), pink food coloring (optional), and a level.
-
Build the Base: Arrange your wooden discs and cake boards in the desired configuration. Cut wooden rods to the appropriate lengths and drill holes to connect the pieces. For the lower stand, which bears the most weight, prioritize using metal rods for stability. Use hot glue sparingly to secure the top parts, but ensure any metal components that might contact the cake are sealed with non-toxic hot glue.
-
Ensure Level and Stability: Use a level to guarantee that the entire structure is straight and balanced. Test the weight-bearing capacity of the platforms by placing books and weights on them to simulate the cake’s weight. This step is essential to prevent collapse later on.
-
Prepare the Cake Batter: Preheat your oven to 350°F (175°C). In a glass bowl, whisk together the egg whites, milk, and clear vanilla extract. In a separate bowl, combine the cake flour, all-purpose flour, salt, and baking powder.
-
Cream Butter and Sugar: In a stand mixer, cream the butter until fluffy. Gradually add the granulated sugar and continue beating until the mixture is light and fully incorporated. Gently fold in the funfetti sprinkles.
-
Combine Wet and Dry Ingredients: Alternately add the wet and dry ingredients to the butter mixture, mixing until just combined after each addition. Be careful not to overmix.
-
Bake the Cakes: Butter and flour two large domed baking pans and two smaller domed baking pans. Pour the batter into the prepared pans, filling them evenly. Bake the larger domes for approximately 50 minutes and the smaller domes for approximately 35 minutes, or until a toothpick inserted into the center comes out clean.
-
Cool and Chill: Allow the cakes to cool in the pans for ten minutes before inverting them onto a wire rack to cool completely. Once cooled, wrap the cakes tightly in plastic wrap and chill in the refrigerator. Chilling the cakes will make them easier to handle and frost.
-
Prepare the Buttercream: In a stand mixer, beat the room temperature butter until fluffy. Gradually add the confectioners’ sugar, one cup at a time, beating well after each addition. Add the heavy whipping cream, salt, and funfetti sprinkles. Whip until the buttercream is light and airy.
-
Frost the Cakes: Once the cakes are thoroughly chilled, frost them with the prepared buttercream.
-
Prepare the Sugar Cookie Dough: In a stand mixer, cream together the softened butter, sugar, and salt. Add the egg and milk and mix until combined. Slowly incorporate the flour until a dough ball forms. Divide the dough into two balls, wrap in plastic wrap, and chill in the refrigerator until ready to use.
-
Cut and Bake Sugar Cookie Decorations: Preheat the oven to 375°F (190°C). Roll out the chilled sugar cookie dough on a parchment-lined baking sheet, using powdered sugar to prevent sticking. Cut out desired shapes using homemade stencils made from cardstock. Save the scraps for the next batch. Bake for 9 to 11 minutes, or until the edges just begin to brown.
-
Smooth the Cookies: Remove the cookies from the oven and immediately smooth them by placing a sheet of parchment paper over the top and pressing down with a slightly smaller baking sheet. This will help create a flat, even surface for decorating.
-
Cool and Prepare Cookies: Once the cookies are cool, place them on paper towels to absorb any excess butter before assembling. Consider adding toothpicks at the base of some cookies for added strength, informing your guests of their presence.
-
Decorate with Royal Icing: Prepare the royal icing by beating the egg whites until frothy. Gradually add the confectioners’ sugar, one cup at a time, until fully incorporated. Transfer the icing to a pastry bag fitted with a small tip.
-
Assemble the Decorations: Use the royal icing as “glue” to attach the sugar cookies to the cake domes. Allow the icing to dry and set for several hours at a time between each layer of decoration. Apply a solid coat of royal icing over the domes and cookies. Add final touches for electronic-looking embellishments, if desired.
-
Optional Isomalt Pool (Advanced): If desired, create a “pool” feature using Isomalt and pink food coloring. Follow the Isomalt manufacturer’s instructions for melting and coloring. Pour the melted Isomalt into a prepared mold or directly onto the cake stand to create a shimmering, edible pool.
Expert Tips & Tricks
- Chill Everything: Cold components are crucial for a stable cake. Work directly from the refrigerator whenever possible.
- Test Your Stand: Don’t skip testing the stand with weights! This is your insurance policy against a cake catastrophe.
- Royal Icing Consistency: Adjust the royal icing consistency by adding a few drops of water at a time to achieve the perfect piping consistency.
- Strengthen Cookies: For delicate cookie shapes, consider adding tylose powder to the sugar cookie dough to make them stronger and less prone to breaking.
- Piping Practice: Before decorating the cake, practice your royal icing piping techniques on a piece of parchment paper.
Serving & Storage Suggestions
Serve the Space Mansion Birthday Cake on its prepared stand, ensuring guests are aware of any structural supports like toothpicks. The cake is best enjoyed within 2-3 days of assembly. Store leftover cake in the refrigerator, covered, for up to 5 days. For longer storage, freeze individual slices wrapped tightly in plastic wrap for up to 2 months. Thaw frozen cake in the refrigerator before serving.
Nutritional Information
| Nutrient | Amount per Serving | % Daily Value |
|---|---|---|
| Calories | 536.2 kcal | N/A |
| Calories from Fat | N/A | 37% |
| Total Fat | 22.3 g | 34% |
| Saturated Fat | 13.9 g | 69% |
| Cholesterol | 63.7 mg | 21% |
| Sodium | 410.5 mg | 17% |
| Total Carbohydrate | 79.2 g | 26% |
| Dietary Fiber | 0.8 g | 3% |
| Sugars | 53 g | 212% |
| Protein | 5.9 g | 11% |
Note: Daily values may vary based on individual needs.
Variations & Substitutions
- Gluten-Free Option: Substitute the all-purpose flour and cake flour with a gluten-free blend. You may need to add a binder like xanthan gum for better structure.
- Dairy-Free Option: Use plant-based milk and butter alternatives. Ensure the chocolate chips (if using) are also dairy-free.
- Flavor Variations: Experiment with different extracts in the cake and buttercream, such as almond, lemon, or coconut.
- Cookie Designs: Get creative with the sugar cookie designs! Use different shapes, colors, and textures to create a truly unique space mansion.
FAQs (Frequently Asked Questions)
Q: Is this cake suitable for beginner bakers?
A: This cake is a more advanced project due to the structural elements and intricate decorations. However, a confident intermediate baker could tackle it with patience and careful planning.
Q: How can I prevent the cake from collapsing?
A: A sturdy stand is crucial. Ensure all support structures are level and strong enough to bear the weight of the cake. Chill the cake layers thoroughly before frosting and assembling.
Q: Can I make the sugar cookies in advance?
A: Yes, the sugar cookies can be made several days in advance and stored in an airtight container at room temperature.
Q: What can I use if I don’t have Isomalt for the pool?
A: You can skip the pool feature entirely, or use a blue-tinted gelatin or a layer of blue-colored buttercream to create a similar effect.
Q: How do I transport this cake?
A: Transporting this cake can be tricky. Ideally, assemble as much as possible at the final destination. If you must transport it assembled, use a sturdy box and drive very carefully!
Final Thoughts
The Space Mansion Birthday Cake may seem like a monumental undertaking, but the look on your loved one’s face when they see this edible masterpiece will make all the effort worthwhile. Don’t be afraid to get creative with the design and personalize it to match their interests. And most importantly, have fun with the process! If a tower leans a little or a cookie crumbles, remember that even the most “imperfect” creations are often the most memorable. Now, go forth and bake a birthday they’ll never forget!