
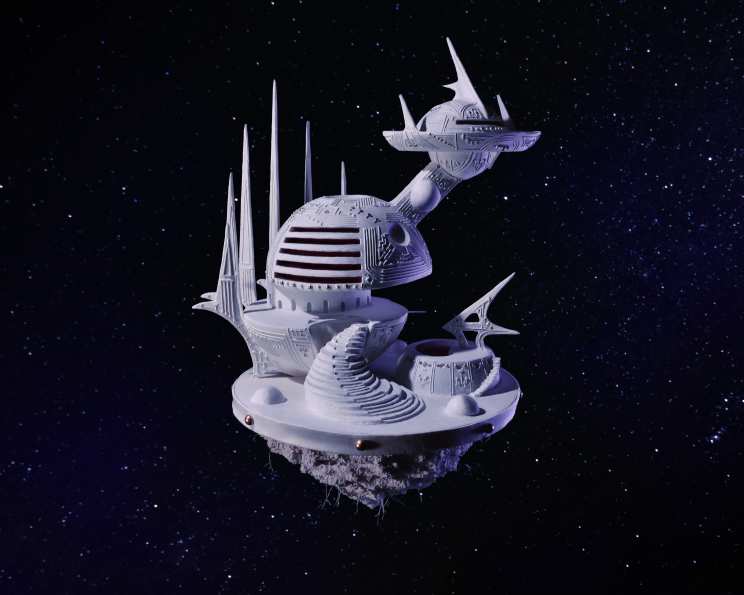
Space Mansion Birthday Cake
I’ll never forget my attempt to build a gingerbread house as a kid. It was less “charming holiday cottage” and more “structural disaster zone.” The roof caved in, the walls leaned precariously, and the whole thing was held together with what felt like an industrial amount of icing. Despite the chaos, the memory of that sugary, sticky afternoon with my family, the laughter and shared determination, is something I treasure. That’s the spirit I bring to creations like this Space Mansion Birthday Cake – a delightful, gravity-defying challenge that’s as fun to make as it is to admire (and devour!).
Recipe Overview
- Prep Time: 26 hours (includes chilling and drying time)
- Cook Time: 1 hour 25 minutes
- Total Time: 27 hours 25 minutes
- Servings: 35
- Yield: 1 cake
- Dietary Type: Not specified
Ingredients
Birthday Cake
- 15 egg whites
- 2 cups whole milk
- 6 teaspoons clear vanilla extract
- 3 cups all-purpose flour
- 3 cups cake flour
- 2 tablespoons baking powder
- 2 teaspoons salt
- 2 cups unsalted butter
- 4 cups granulated sugar
- 1/2 cup funfetti candy sprinkles
Birthday Cake Buttercream
- 1 cup butter
- 3 cups confectioners’ sugar
- 2 tablespoons heavy whipping cream
- 2 teaspoons clear vanilla
- 1 teaspoon salt
- 2 tablespoons funfetti candy sprinkles
Pink Sugar Cookie Supports and Embellishments
- 1/4 teaspoon salt
- 1 cup softened butter
- 1 cup sugar
- 1 large egg
- 1 tablespoon milk
- 3 cups all-purpose flour
- pink food coloring
- powdered sugar, for rolling out dough
- toothpick, for added support
Royal Icing
- 3 large egg whites
- 4 cups confectioners’ sugar
Other
- Isomalt
- Pink food coloring
Equipment Needed
- Cake boards
- Wooden and metal rods
- Toothpicks
- Hot glue gun
- Drill
- Wooden discs for main supports
- Level
- Stand mixer
- Two large domed baking pans
- Two smaller domed baking pans
- Parchment paper
- Pastry bag
Instructions
- Constructing the Cake Stand: This is where the “mansion” part really begins. Assemble your cake stand, using cake boards, wooden and metal rods, toothpicks, a hot glue gun, a drill, and wooden discs for the main supports. This stand needs to be sturdy!
- Planning the Structure: Arrange your discs and boards to create the desired multi-tiered, mansion-like structure. Cut wooden rods to the appropriate lengths and drill corresponding holes in the discs. Secure the structure primarily with metal rods, as these offer superior support. Use hot glue to stabilize the top parts of the stand, but minimize its use on the lower levels that bear the most weight.
- Food Safety: Seal any metal components that might come into contact with the cake using non-toxic hot glue. This is crucial for ensuring the cake’s safety.
- Leveling and Testing: Use a level to ensure that the entire structure is straight and balanced. This is essential for preventing a leaning tower of cake! Test the weight-bearing capacity of the platforms by placing books or weights on them to simulate the cake’s weight. Make sure your completed stand can fit easily in your refrigerator.
- Preheating the Oven: Preheat your oven to 350°F (175°C).
- Preparing the Wet Ingredients: In a glass bowl, whisk together the egg whites, whole milk, and clear vanilla extract.
- Preparing the Dry Ingredients: In a separate bowl, whisk together the cake flour, all-purpose flour, salt, and baking powder.
- Creaming the Butter and Sugar: In a stand mixer, cream together the unsalted butter and granulated sugar until the mixture is light and fluffy.
- Adding the Sprinkles: Gently fold in the funfetti candy sprinkles into the creamed butter and sugar mixture.
- Combining Wet and Dry: Gradually alternate adding the wet and dry ingredients to the butter mixture, mixing until everything is fully incorporated. Be careful not to overmix.
- Preparing the Baking Pans: Butter and flour two large domed baking pans and two smaller domed baking pans. The domed shape is essential for creating the mansion’s architecture.
- Baking the Cakes: Divide the batter evenly between the prepared pans. Bake the larger domes for about 50 minutes and the smaller domes for about 35 minutes, or until a toothpick inserted into the center comes out clean.
- Cooling and Chilling: Let the cakes cool in the pans for ten minutes before inverting them onto a wire rack to cool completely. Once cooled, wrap them tightly in plastic wrap and chill in the refrigerator. Chilling helps to firm up the cakes, making them easier to handle and frost.
- Making the Buttercream: In a stand mixer, beat the room-temperature butter until fluffy.
- Adding Sugar and Cream: Gradually add the confectioners’ sugar, one cup at a time, beating well after each addition. Then, add the heavy whipping cream, salt, and funfetti / birthday confetti. Whip until the buttercream is light and smooth.
- Frosting the Cakes: Use the prepared buttercream to frost the chilled cakes.
- Making the Sugar Cookie Dough: In a stand mixer, beat together the butter, sugar, salt, egg, and milk.
- Adding Flour and Chilling: Slowly incorporate the flour until a dough ball forms. Divide the dough into two balls, wrap them in plastic wrap, and chill in the refrigerator. Chilling the dough prevents it from spreading too much during baking.
- Preheating for Cookies: Preheat your oven to 375°F (190°C).
- Rolling and Cutting Cookies: Roll out the chilled cookie dough onto a parchment-lined baking sheet, using powdered sugar to prevent sticking. Cut out your desired shapes using homemade stencils made out of card stock. Save any scraps of dough for the next batch.
- Baking the Cookies: Bake the cookies for 9 to 11 minutes, or until the edges just begin to brown.
- Smoothing the Cookies: Remove the cookies from the oven and immediately smooth them by placing a fresh sheet of parchment paper over the top and pressing down with a slightly smaller baking sheet. This will give them a clean, even surface.
- Cooling the Cookies: Once cool, place the cookies on a paper towel to absorb any excess butter.
- Adding Toothpick Supports: For added strength, insert toothpicks at the base of some of the sugar cookies. Be sure to inform your guests of this beforehand.
- Attaching Cookies with Royal Icing: Attach the sugar cookies to the cake using royal icing. Allow the icing to dry and set for several hours at a time between additions for maximum stability.
- Making the Royal Icing: Beat the egg whites until frothy.
- Adding Sugar to Royal Icing: Add the powdered sugar one cup at a time until fully incorporated and the icing is stiff enough to pipe.
- Piping the Royal Icing: Place the royal icing in a pastry bag and pipe it onto the cookies and cake to act as ‘glue’. You can also apply a solid coat of royal icing over the domes and cookies, and use it as a final touch for electronic-looking embellishments, like antennas or satellite dishes.
- Creating the Pool (Optional): Heat isomalt according to package directions. Tint with pink food coloring to create a “pool” feature on your cake stand. Pour the isomalt into a suitable mold or depression on your cake stand and let it harden.
Expert Tips & Tricks
- Cold is Key: Working with very cold components (cakes, buttercream, cookie dough) is crucial for maintaining the structure and preventing the cake from collapsing.
- Stable Base: The stability of your cake stand is paramount. Don’t skimp on the support structure.
- Royal Icing Consistency: Adjust the amount of confectioners’ sugar in the royal icing to achieve the desired consistency for piping and gluing. A thicker consistency is best for holding cookies in place, while a thinner consistency is better for detailed decorations.
- Cookie Placement: When attaching sugar cookies with royal icing, work in stages. Apply a small amount of icing to the back of the cookie, press it gently onto the cake, and hold it in place for a few seconds until the icing begins to set.
- Planning your design Sketch out the design for your mansion cake beforehand to ensure you have a clear plan for the size and placement of the components. This will also help you determine how much of each component you need to make.
Serving & Storage Suggestions
Serve this Space Mansion Birthday Cake on a sturdy, level surface. Due to its complex structure, it’s best to cut and serve individual slices rather than attempting to cut through the entire cake at once. Because of its buttercream frosting and royal icing decorations, this cake is best stored in the refrigerator. It will last for up to 3-4 days. Keep in mind that the sugar cookies may soften slightly over time. It is not recommended to freeze this cake due to the decorations and the delicate nature of the sugar cookies and royal icing.
Nutritional Information
Please note that these values are estimates and may vary depending on specific ingredients and portion sizes.
| Nutrient | Amount per Serving | % Daily Value |
|---|---|---|
| Calories | 536 kcal | N/A |
| Calories from Fat | N/A | N/A |
| Total Fat | 22.3 g | 34% |
| Saturated Fat | 13.9 g | 69% |
| Cholesterol | 63.7 mg | 21% |
| Sodium | 410.5 mg | 17% |
| Total Carbohydrate | 79.2 g | 26% |
| Dietary Fiber | 0.8 g | 3% |
| Sugars | 53 g | N/A |
| Protein | 5.9 g | 11% |
Variations & Substitutions
- Gluten-Free: Substitute gluten-free all-purpose flour and cake flour blends for the regular flours in both the cake and cookie recipes.
- Dairy-Free: Use a dairy-free butter substitute and dairy-free milk alternatives (such as almond, soy, or oat milk) in the cake, buttercream, and cookie recipes.
- Flavor Variations: Experiment with different flavor extracts in the cake and buttercream. Almond, lemon, or coconut extract would be delicious additions.
- Color Palette: Use different food colorings to create a unique color scheme for the cake, cookies, and decorations. A pastel palette would be perfect for a spring birthday, while a bold, vibrant palette would be great for a summer celebration.
FAQs (Frequently Asked Questions)
Q: How do I prevent the cake layers from sliding?
A: Ensure the cake layers are well-chilled before frosting. Use a generous amount of buttercream as “glue” between the layers and insert dowels into the cake to provide structural support.
Q: Can I make the sugar cookies ahead of time?
A: Yes, the sugar cookies can be made up to 3 days in advance and stored in an airtight container at room temperature.
Q: What if my royal icing is too thick?
A: Add a few drops of water at a time until you reach the desired consistency.
Q: Can I use pre-made fondant instead of royal icing for decorations?
A: Yes, pre-made fondant can be used as an alternative to royal icing for creating decorations.
Q: How do I transport this cake?
A: Transporting this cake is tricky due to its size and complexity. It is best to transport the components separately and assemble the cake on-site if possible. If you must transport the assembled cake, use a sturdy box and drive very carefully!
Final Thoughts
Creating this Space Mansion Birthday Cake is definitely a labor of love, but the wow factor it brings is absolutely worth it. Don’t be intimidated by the complexity; embrace the challenge and let your creativity shine. Feel free to adapt the design and decorations to match your personal style and the birthday celebrant’s interests. And don’t forget to share your masterpiece with friends and family! The oohs and aahs will make all the effort worthwhile.