
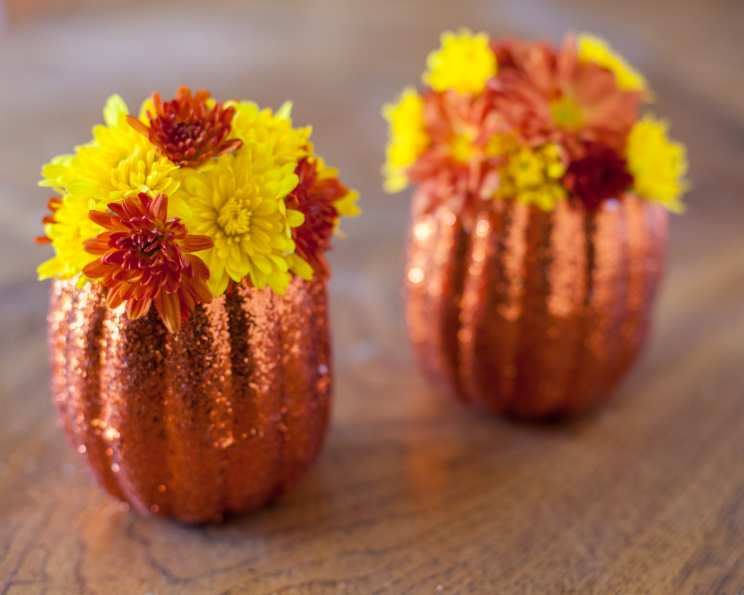
Sparkling Pumpkin Flower Holder Centerpiece
I’ll never forget the Thanksgiving my grandmother decided to forgo the traditional floral arrangements and instead presented us with a table adorned with tiny, glittering pumpkins overflowing with vibrant blooms. As a child, I was absolutely captivated. The way the candlelight danced on the glitter, reflecting the colors of the autumn leaves outside, felt magical. It wasn’t just a centerpiece; it was a conversation starter, a testament to her creativity, and a memory I’ve cherished ever since. Now, I love recreating that same sense of wonder for my own family.
Recipe Overview
- Prep Time: 30 minutes
- Cook Time: 0 minutes (drying time varies)
- Total Time: 1 hour (plus drying time)
- Yields: 6 Mini Pumpkins
- Dietary Type: Vegetarian
Ingredients
- 6 tiny pumpkins
- 6 empty and dry milk cartons (or 6 empty and dry plastic bottles)
- 4 cups glitter (choose your favorite colors or an autumnal blend)
- 1 (32 fluid ounce) bottle glue (Mod Podge)
- 2 bouquets fresh edible flowers, trimmed to the correct length
Equipment Needed
- Sharp knife
- Spoon (for scooping pumpkin seeds)
- Paper towels
- Paintbrush
- Bowl (for glitter)
- Scissors or utility knife (for cartons/bottles)
- Wooden tray (optional)
Instructions
- Begin by preparing your pumpkins. Using a sharp knife, carefully cut off the top of each of the six tiny pumpkins. Aim for a circular cut that’s wide enough to easily scoop out the insides. Remember, safety first! Go slowly and use a sawing motion if needed.
- Next, remove the insides of each pumpkin. Use a spoon to scrape out the seeds and stringy pulp. Discard the pulp (or save the seeds for roasting!).
- Now, it’s crucial to dry out each pumpkin thoroughly. Use paper towels to wipe the inside clean and remove any excess moisture. A dry surface is essential for the glue to adhere properly. Let them air dry for an hour or two to ensure no moisture remains.
- While the pumpkins are drying, prepare the containers for your floral arrangements. Cut off the base of each milk carton or plastic bottle approximately 3 inches from the bottom (or small enough so that the base of the carton will invisibly fit into the pumpkin). Use scissors or a utility knife for this step. The containers will hold water for the flowers, so make sure they’re tall enough to provide ample support.
- Once the pumpkins are completely dry, it’s time to get sparkly! Cover the outside of each pumpkin with Mod Podge using a paintbrush. Apply a generous, even layer, ensuring you reach all the nooks and crannies.
- Place the glitter in a bowl. Generously roll each pumpkin around in the glitter until it is completely and sufficiently covered in sparkle. You can also sprinkle glitter over the pumpkin for better coverage. Gently press the glitter into the Mod Podge to help it adhere. This can get messy, so protect your work surface!
- Allow the pumpkins to dry completely. This may take several hours, depending on the humidity. Once dry, gently tap off any excess glitter.
- Once the pumpkins are dry and the glitter is set, place a cut carton or bottle into the each pumpkin. This will act as a vase.
- Finally, place a bundle of cropped flowers in the middle of each pumpkin. Use fresh, edible flowers that are trimmed to the appropriate length. Experiment with different flower types and colors to create unique and eye-catching arrangements.
- Stagger the pumpkins in the center of your table, or arrange them down the center of a wooden tray for a more formal presentation.
Expert Tips & Tricks
- Glitter Selection: Don’t be afraid to experiment with different types of glitter! Chunky glitter will create a bolder, more textured look, while fine glitter will provide a more subtle shimmer. Consider using a mix of sizes for added dimension.
- Mod Podge Application: For a smoother finish, apply a thin layer of Mod Podge, let it dry slightly, and then apply a second coat before adding the glitter. This helps to prevent the glitter from clumping.
- Flower Choice: Edible flowers are a beautiful and unexpected touch, but you can also use any flowers that complement your table setting. Consider using a mix of textures and colors for a more dynamic arrangement. Popular choices include roses, carnations, chrysanthemums, and sunflowers.
- Protecting Your Table: Before placing the pumpkins on your table, consider using placemats or a tablecloth to protect the surface from any stray glitter or moisture.
- Longer Lasting Flowers: To help your flowers last longer, change the water in the containers every day or two. You can also add a floral preservative to the water.
Serving & Storage Suggestions
These sparkling pumpkin flower holders are best served as a centerpiece for your Thanksgiving or autumn-themed table. They can also be used as decorative accents on a buffet table or mantel. Since the flowers are fresh, they will only last for a few days. To prolong their life, keep the pumpkin vases in a cool, dark place when not in use. The glittered pumpkins themselves can be stored for reuse next year. Simply remove the dried flowers and store the pumpkins in a dry, cool place. If necessary, you can touch up the glitter with a fresh coat of Mod Podge and glitter.
Nutritional Information
Since this centerpiece primarily uses inedible decorative items, nutritional information is not applicable. However, if you use edible flowers, their nutritional content will vary depending on the type of flower.
| Nutrient | Amount per Serving (Flowers) | % Daily Value |
|---|---|---|
| Calories | Varies | Varies |
| Total Fat | Varies | Varies |
| Saturated Fat | Varies | Varies |
| Cholesterol | 0mg | 0% |
| Sodium | Varies | Varies |
| Total Carbohydrate | Varies | Varies |
| Dietary Fiber | Varies | Varies |
| Sugars | Varies | Varies |
| Protein | Varies | Varies |
Variations & Substitutions
- Different Pumpkins: If you can’t find tiny pumpkins, you can use larger pumpkins and adjust the size of the milk cartons or plastic bottles accordingly.
- Alternative Adhesives: If you don’t have Mod Podge, you can use other craft glues, but make sure they are non-toxic and dry clear.
- Glitter Alternatives: For a more natural look, you can use dried flowers, leaves, or other natural materials instead of glitter.
- Seasonal Adaptations: Adapt the colors of the glitter and flowers to suit the season. For example, use pastel colors and spring flowers for Easter, or red and green glitter and evergreen branches for Christmas.
- Container Alternatives: Instead of using plastic bottles, small mason jars or other decorative containers can be used.
FAQs (Frequently Asked Questions)
Q: Can I use fake flowers instead of fresh flowers?
A: Absolutely! Fake flowers are a great option if you want a centerpiece that will last longer. Just make sure to choose flowers that are the right size and style for your pumpkins.
Q: How do I prevent the glitter from falling off?
A: Applying a generous and even layer of Mod Podge and pressing the glitter firmly into the glue will help to prevent it from falling off. You can also apply a sealant spray after the Mod Podge has dried.
Q: Can I make these ahead of time?
A: Yes, you can make the glittered pumpkins ahead of time. Just store them in a dry, cool place until you’re ready to add the flowers. However, you’ll want to add the fresh flowers as close to the event as possible to ensure they look their best.
Q: What if I don’t have milk cartons or plastic bottles?
A: You can use any small, waterproof container to hold the flowers. Small vases, mason jars, or even small plastic cups will work.
Q: Is it safe to use glitter around food?
A: While the glitter is on the outside of the pumpkin, and the flowers aren’t consumed, it’s best to use non-toxic glitter, especially when using edible flowers. This minimizes any risk of contamination.
Final Thoughts
Creating these sparkling pumpkin flower holders is more than just a craft project; it’s a way to infuse your celebrations with a touch of whimsy and personalized charm. Whether you’re hosting a grand Thanksgiving feast or simply want to add a bit of autumn magic to your home, these centerpieces are sure to delight. Don’t be afraid to experiment with different colors, textures, and flower combinations to create a unique arrangement that reflects your own style. And most importantly, have fun! I hope this recipe inspires you to create something beautiful and memorable. I’d love to hear your experiences and see your creations – feel free to share your photos and feedback! Perhaps pair these with a warm apple cider or pumpkin spice latte to complete the autumnal ambiance.