
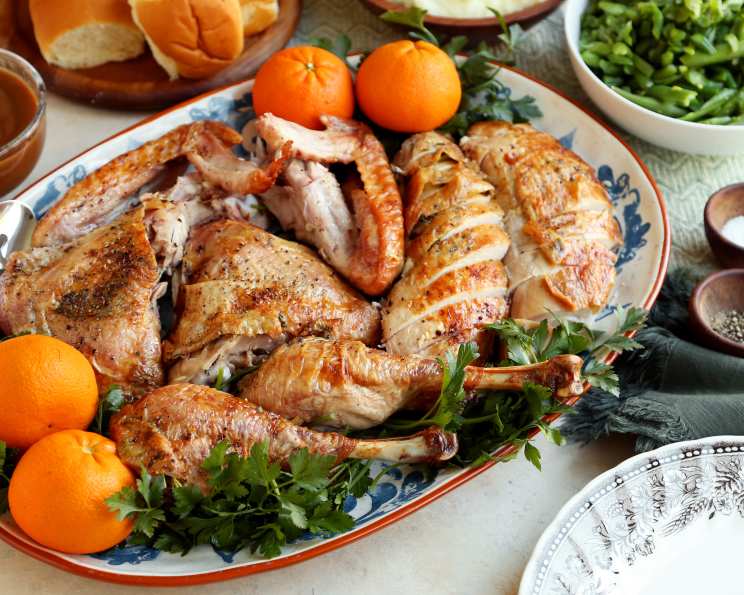
The Ultimate Spatchcock Turkey: A Chef’s Guide
My earliest Thanksgiving memories aren’t of parades or football games, but of the almost frantic energy in my grandmother’s kitchen. The centerpiece, always, was the turkey. I remember the sheer anticipation, the tantalizing aromas that seemed to cling to everything, and the slightly hushed reverence when the perfectly browned bird was finally brought to the table. While my grandmother’s classic roast turkey was amazing, I’ve found that spatchcocking offers a faster route to juicy, flavorful perfection, without sacrificing any of the holiday magic. It’s a technique that’s become a tradition in my own home, ensuring a stress-free and delicious Thanksgiving feast.
Recipe Overview
- Prep Time: 25 minutes + 24-36 hours chilling
- Cook Time: Approximately 1 hour 30 minutes, depending on size
- Total Time: Approximately 25-36 hours
- Servings: 8-10
- Yield: 1 Turkey
- Dietary Type: Gluten-Free, Dairy-Free
Ingredients
- 1 (12-14 lb) turkey
- 2 ½ tablespoons kosher salt
- 8 sprigs fresh thyme
- 4 sprigs fresh rosemary
- 8 tablespoons softened unsalted butter
- 1 teaspoon black pepper
Equipment Needed
- Large cutting board
- Poultry shears or very sharp large knife
- Wire rack
- Large and sturdy baking sheet
- Paper towels
- Plastic wrap
- Meat thermometer
- Aluminum Foil
Instructions
- Begin by removing the turkey from its packaging. Make sure to remove the neck and giblets from the cavity. These can be saved for making gravy later!
- Place the turkey on a large cutting board and pat it completely dry with a few paper towels. This step is crucial for achieving crispy skin.
- Flip the turkey over so the breast side is down. Using large poultry shears or a very sharp large knife, cut through the bones on either side of the spine. Start at the tail end and work your way up to the neck. Applying steady pressure is key. You can ask your butcher to do this for you if you’re not comfortable doing it yourself.
- Discard the spine or use it to make a flavorful stock for gravy. The spine adds depth and richness to the gravy.
- Flip the turkey over again and lay it flat so the breast side is up. Place the palms of your hands directly on top of the turkey in the center and then firmly press down on the breast bone to flatten out the turkey as much as possible. You might hear a few cracks – this is normal!
- Place a wire rack over a large and sturdy baking sheet. This allows for even air circulation and helps the turkey skin crisp up beautifully.
- Transfer the flattened turkey onto the rack, laying it flat, breast side up.
- Use your fingers to gently loosen the skin from the breast and the thighs, creating pockets. Be careful not to tear the skin.
- Sprinkle salt in those pockets and all throughout the underside of the turkey and finally on top of the skin as well. This dry brining method is essential for a flavorful and juicy turkey.
- Stuff the thyme and rosemary sprigs under the skin of the breasts and the thighs. The herbs infuse the meat with their aromatic oils.
- Cover the turkey loosely with plastic wrap and chill in the fridge for 24 hours or up to 36 hours. This allows the salt to penetrate the meat and tenderize it.
- Preheat oven to 425°F (220°C). Make sure your oven rack is in the center position.
- Remove the turkey from the fridge for 1 hour before cooking. This allows the turkey to come closer to room temperature, promoting more even cooking.
- Place bits of the softened butter underneath the skin of the breasts and thighs. This adds richness and helps the skin brown beautifully.
- Rub the remaining butter all over the top of the turkey.
- Sprinkle with black pepper.
- Roast in the preheated oven until golden and crispy and the internal temperature reaches 150°F (66°C). Rotate the pan halfway through cooking for even brownness, usually after about 45 minutes. The total cooking time will vary depending on the size of your turkey.
- Insert a meat thermometer into the thickest part of the thigh, being careful not to touch the bone.
- Once the turkey reaches 150°F, remove it from the oven. It will continue to cook to 165°F (74°C) when you remove it from the oven and let it rest, tented with foil.
- Transfer the turkey to a large cutting board and let it rest under tented foil for 30 minutes before carving. This is crucial! Resting allows the juices to redistribute throughout the meat, resulting in a more tender and flavorful turkey. If you skip this step, the juices will simply run out when you carve it, leaving you with dry meat.
- Carve and serve immediately.
Expert Tips & Tricks
- Dry Brining is Key: Don’t skip the dry brining step! It’s essential for a juicy and flavorful turkey.
- Crispy Skin Secret: Pat the turkey completely dry before seasoning and roasting. This helps the skin crisp up beautifully.
- Butter Boost: Placing butter under the skin ensures extra moistness and flavor in the breast meat.
- Temperature is Everything: Use a reliable meat thermometer to ensure your turkey is cooked to a safe internal temperature.
- Don’t Overcrowd the Oven: Make sure there’s enough space in your oven for the heat to circulate properly. If you’re cooking multiple dishes, you may need to adjust cooking times accordingly.
Serving & Storage Suggestions
Serve your perfectly spatchcocked turkey immediately after carving. It’s delicious with classic Thanksgiving sides like mashed potatoes, stuffing, cranberry sauce, and green bean casserole.
Leftover turkey should be stored in an airtight container in the refrigerator for up to 3-4 days. You can also freeze leftover turkey for up to 2-3 months. Thaw frozen turkey in the refrigerator overnight before reheating.
To reheat, you can slice the turkey and warm it gently in a skillet with a little broth, or reheat larger portions in the oven at a low temperature (around 325°F/160°C) until warmed through. Be careful not to overcook it, or it will dry out.
Nutritional Information
| Nutrient | Amount per Serving | % Daily Value |
|---|---|---|
| Calories | 1192 kcal | N/A |
| Calories from Fat | 595 kcal | 50% |
| Total Fat | 66.1 g | 101% |
| Saturated Fat | 22.7 g | 113% |
| Cholesterol | 493.6 mg | 164% |
| Sodium | 2624.4 mg | 109% |
| Total Carbohydrate | 0.2 g | 0% |
| Dietary Fiber | 0.1 g | 0% |
| Sugars | 0 g | 0% |
| Protein | 139.2 g | 278% |
Note: Nutritional information is an estimate and may vary based on specific ingredients and portion sizes.
Variations & Substitutions
- Herb Variations: Feel free to experiment with different herbs. Sage, oregano, or marjoram would all be delicious additions or substitutions for the thyme and rosemary.
- Citrus Infusion: Add slices of lemon or orange under the skin for a bright, citrusy flavor.
- Spice Rub: Create a spice rub using paprika, garlic powder, onion powder, and chili powder for a smoky and savory turkey.
- Garlic Butter: Infuse the softened butter with minced garlic for extra flavor.
- Maple Glaze: Brush the turkey with a maple glaze during the last 30 minutes of cooking for a sweet and sticky finish.
FAQs (Frequently Asked Questions)
Q: What does “spatchcock” mean?
A: Spatchcocking involves removing the backbone of the turkey and flattening it out, which allows it to cook more evenly and quickly.
Q: Why should I dry brine the turkey?
A: Dry brining, by salting the turkey 24-36 hours in advance, helps to season the meat throughout and retain moisture during cooking, resulting in a juicier turkey.
Q: How do I know when the turkey is done?
A: Use a meat thermometer to check the internal temperature. The turkey is done when the thickest part of the thigh reaches 150°F (66°C) while in the oven. It will continue to cook to 165°F (74°C) as it rests.
Q: Can I spatchcock a frozen turkey?
A: No, you should not spatchcock a frozen turkey. It needs to be fully thawed before attempting to remove the backbone.
Q: Can I make this recipe without the wire rack?
A: While a wire rack is recommended for optimal crisping, you can still roast the turkey directly on the baking sheet. However, the skin may not be as evenly crispy.
Final Thoughts
This spatchcock turkey recipe is a game-changer for any Thanksgiving feast. It’s easier than you might think, significantly reduces cooking time, and delivers a beautifully browned, incredibly juicy, and flavorful bird every time. Don’t be intimidated – grab those poultry shears, gather your ingredients, and get ready to impress your family and friends with this Thanksgiving masterpiece. I encourage you to experiment with different herbs and spices to create your own signature flavor. Happy cooking, and happy Thanksgiving!