
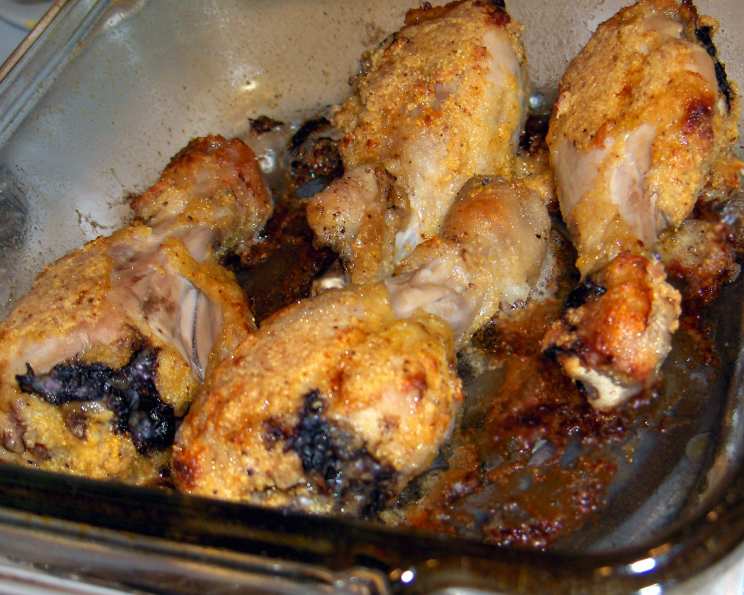
Spicy Chicken Drumsticks: A Flavorful Kick to a Classic
The aroma alone transports me back to my grandmother’s kitchen. Every summer, she’d make a huge batch of crispy, spicy drumsticks for our family picnics. The air would be thick with the scent of cumin and chili powder, and the first bite was always a revelation – a perfect balance of savory, spicy, and just a hint of comfort. This recipe is my homage to those sunny afternoons and the love she poured into every meal. These aren’t just chicken drumsticks; they are a taste of nostalgia, a celebration of family, and a reminder that the simplest dishes are often the most memorable.
Recipe Overview
- Prep Time: 15 minutes
- Cook Time: 40-45 minutes
- Total Time: 55-60 minutes
- Servings: 4
- Dietary Type: Gluten-Free Optional, Dairy-Free Possible
Ingredients
- 2 lbs chicken drumsticks, skin removed and fat trimmed
- 1/3 cup all-purpose flour (or gluten-free flour blend)
- 1/3 cup yellow cornmeal
- 1/2 teaspoon ground cumin
- 1/2 teaspoon chili powder
- 1/4 teaspoon salt
- 1/3 cup buttermilk (see substitutions below)
- 1/4 teaspoon red pepper sauce (like Tabasco)
- Cooking spray
Ingredient Notes:
- For a gluten-free version, substitute the all-purpose flour with a good quality gluten-free all-purpose flour blend.
- If you don’t have buttermilk, you can make a quick substitute by adding 1 teaspoon of lemon juice or white vinegar to regular milk and letting it sit for 5 minutes until slightly thickened.
- Adjust the amount of red pepper sauce to control the spice level. Start with a smaller amount and add more to taste.
Equipment Needed
- 13×9 inch baking pan
- Large heavy-duty zip-lock plastic bag
- Small bowl
- Measuring cups and spoons
Instructions
- Preheat your oven to 400°F (200°C). Lightly spray a 13×9 inch baking pan with cooking spray. This will prevent the drumsticks from sticking and help them crisp up nicely.
- Prepare the chicken: Remove the skin and any excess fat from the chicken drumsticks. This step is crucial for achieving a healthier and crispier result. Pat the drumsticks dry with paper towels; this helps the coating adhere better.
- Combine the dry ingredients: In a large, heavy-duty zip-lock plastic bag, combine the all-purpose flour, yellow cornmeal, ground cumin, chili powder, and salt. Seal the bag tightly and shake well to ensure all the ingredients are evenly distributed. This mixture forms the flavorful coating for the chicken.
- Prepare the wet ingredients: In a small bowl, whisk together the buttermilk and red pepper sauce. This creates a flavorful marinade that helps the dry coating adhere to the chicken and adds a touch of tanginess and spice.
- Dip the chicken: Dip each chicken drumstick into the buttermilk mixture, ensuring it’s fully coated. Let any excess buttermilk drip off before placing the drumstick into the zip-lock bag with the dry ingredients.
- Coat the chicken: Seal the zip-lock bag, leaving some air inside. Shake the bag vigorously until all the chicken drumsticks are evenly coated with the flour mixture. Make sure every nook and cranny is covered for maximum flavor and crispiness.
- Arrange on the baking pan: Place the coated drumsticks in the prepared baking pan, ensuring they are not overcrowded. Overcrowding can lead to steaming instead of baking, preventing them from becoming crispy.
- Spray with cooking spray: Lightly spray the chicken drumsticks with cooking spray. This extra layer of fat helps them achieve a beautiful golden-brown color and extra crispy skin (even though the skin was removed earlier).
- Bake: Bake the chicken drumsticks uncovered for 40-45 minutes, or until the juices run clear when pierced with a fork or a meat thermometer inserted into the thickest part registers 165°F (74°C). If the drumsticks start to brown too quickly, you can loosely tent the pan with foil during the last 10-15 minutes of baking.
Expert Tips & Tricks
- Double Coating: For an extra crispy crust, dip the chicken in the buttermilk, then the flour mixture, then back into the buttermilk, and finally back into the flour mixture.
- Spice It Up: Add a pinch of cayenne pepper to the flour mixture for an even spicier kick.
- Even Cooking: Turn the drumsticks halfway through baking to ensure even browning and cooking on all sides.
- Brining: For extra juicy drumsticks, brine them in a salt and sugar solution for 30 minutes before coating. This helps to tenderize the meat and lock in moisture.
Serving & Storage Suggestions
Serve these spicy chicken drumsticks hot, straight from the oven. They are delicious on their own or paired with classic sides like coleslaw, mashed potatoes, corn on the cob, or a simple green salad. For a complete meal, consider serving them with rice and steamed vegetables.
Storage:
-
Room Temperature: Do not leave cooked chicken at room temperature for more than 2 hours.
-
Refrigerator: Store leftover chicken drumsticks in an airtight container in the refrigerator for up to 3-4 days.
-
Freezer: For longer storage, wrap the drumsticks individually in plastic wrap and then place them in a freezer-safe bag or container. They can be frozen for up to 2-3 months.
Reheating: -
Oven: Preheat oven to 350°F (175°C). Place the drumsticks on a baking sheet and bake for 15-20 minutes, or until heated through.
-
Microwave: Microwave on medium power for 2-3 minutes, or until heated through. Note that the skin will not be as crispy when reheated in the microwave.
-
Air Fryer: Reheat in the air fryer at 350°F (175°C) for 5-7 minutes for a crispy result.
Nutritional Information
| Nutrient | Amount per Serving | % Daily Value |
|---|---|---|
| Calories | 451 kcal | |
| Calories from Fat | 184 g | 41% |
| Total Fat | 20.5 g | 31% |
| Saturated Fat | 5.6 g | 28% |
| Cholesterol | 185.1 mg | 61% |
| Sodium | 373.1 mg | 15% |
| Total Carbohydrate | 17 g | 5% |
| Dietary Fiber | 1.2 g | 4% |
| Sugars | 1.1 g | |
| Protein | 46.5 g | 93% |
Note: Nutritional information is an estimate and may vary based on specific ingredients and preparation methods.
Variations & Substitutions
- Lemon Pepper Drumsticks: Add 1 tablespoon of lemon zest and 1 teaspoon of black pepper to the flour mixture.
- Honey Garlic Drumsticks: Brush the baked drumsticks with a mixture of honey and minced garlic during the last 5 minutes of baking.
- Herb-Crusted Drumsticks: Add 1 tablespoon of dried herbs (such as thyme, rosemary, or oregano) to the flour mixture.
- Spicy BBQ Drumsticks: After baking, toss the drumsticks in your favorite BBQ sauce and bake for an additional 5 minutes.
- Dairy-Free Option: Substitute the buttermilk with non-dairy buttermilk. Mix 1/3 cup of unsweetened almond or soy milk with 1 teaspoon of lemon juice or white vinegar and let it sit for 5 minutes.
FAQs (Frequently Asked Questions)
Q: Can I use bone-in, skin-on chicken thighs instead of drumsticks?
A: Yes, you can absolutely use chicken thighs. Adjust the baking time accordingly; they may require a slightly longer cooking time (around 50-55 minutes) to ensure they are fully cooked.
Q: How do I know when the chicken is fully cooked?
A: The best way to ensure the chicken is cooked through is to use a meat thermometer. Insert it into the thickest part of the drumstick, avoiding the bone. The internal temperature should reach 165°F (74°C).
Q: Can I prepare the chicken ahead of time?
A: You can prepare the chicken up to the point of baking. Coat the drumsticks with the flour mixture, place them in a baking pan, cover tightly, and refrigerate for up to 24 hours. Bring them to room temperature for about 30 minutes before baking.
Q: My drumsticks are burning on the outside but not cooked on the inside. What should I do?
A: If the drumsticks are browning too quickly, loosely tent the pan with aluminum foil during the last 10-15 minutes of baking. This will help to prevent burning while ensuring the chicken cooks through.
Q: Can I use a different type of pepper sauce?
A: Absolutely! Feel free to experiment with different types of pepper sauce, such as sriracha or a milder chili garlic sauce, to achieve your desired level of spice.
Final Thoughts
Don’t be intimidated by the word “spicy”! This recipe is easily customizable to your preferred heat level. So, gather your ingredients, preheat your oven, and prepare to enjoy a batch of deliciously crispy and flavorful chicken drumsticks. I encourage you to experiment with the spices and seasonings to create your own unique version of this classic dish. And most importantly, share your culinary creation with friends and family!