
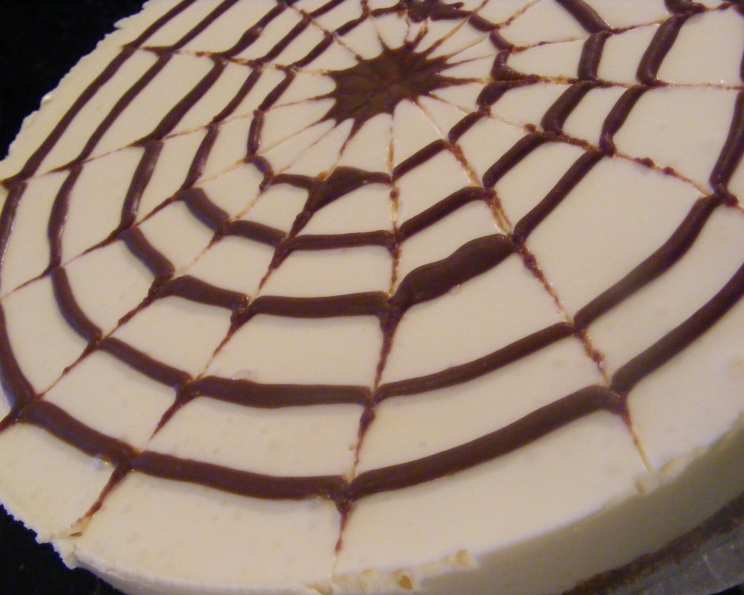
Spiderweb Cheesecake: A Spooktacularly Delicious Treat
The aroma of chocolate always takes me back to Halloween nights as a child. We’d return from trick-or-treating, costumes slightly askew, bags overflowing with candy. While my siblings dove headfirst into their bounty, I always saved the chocolate bars, dreaming of crafting something special. This Spiderweb Cheesecake captures that same nostalgic magic – the rich chocolate, the creamy sweetness, and a touch of playful artistry that makes it perfect for any celebration, especially those with a spooky theme. It’s a guaranteed crowd-pleaser and a fun way to get creative in the kitchen.
Recipe Overview
- Prep Time: 20 minutes
- Cook Time: 0 minutes
- Total Time: 20 minutes (plus 2 hours chilling)
- Servings: 6-8
- Yield: 1 cheesecake
- Dietary Type: Not Gluten-Free
Ingredients
- 1 (1/4 ounce) envelope unflavored gelatin
- 1/4 cup cold water
- 2 (8 ounce) packages cream cheese, softened
- 1/2 cup sugar
- 1/2 cup whipping cream
- 1 teaspoon vanilla extract
- 1 (8-9 inch) chocolate crumb crust
- 4 tablespoons semi-sweet chocolate chips
- 2 tablespoons butter
Equipment Needed
- Small saucepan
- Mixing bowl
- Electric mixer
- Heavy-duty resealable plastic bag
- Toothpick
- Microwave
Instructions
-
In a small saucepan, sprinkle the unflavored gelatin over the cold water. Let it stand for 1 minute to soften. This process is crucial for properly dissolving the gelatin and ensuring a smooth cheesecake filling.
-
Heat the gelatin mixture over low heat, stirring constantly until the gelatin is completely dissolved. Be careful not to boil the mixture, as this can affect the gelatin’s setting properties.
-
Remove the saucepan from the heat and allow the gelatin mixture to cool slightly. This prevents the hot gelatin from curdling the cream cheese in the next step.
-
In a mixing bowl, beat the softened cream cheese and sugar together using an electric mixer until the mixture is smooth and creamy. Ensure that the cream cheese is properly softened to avoid any lumps in the final product.
-
Gradually beat in the whipping cream, vanilla extract, and the slightly cooled gelatin mixture until everything is well combined and the mixture is smooth. Mixing gradually prevents the cream from splattering and ensures an even incorporation of all the ingredients.
-
Pour the cream cheese mixture evenly into the prepared chocolate crumb crust. Use a spatula to smooth the surface for a professional finish.
-
In a microwave-safe bowl, melt the semi-sweet chocolate chips and butter together. Microwave in 30-second intervals, stirring in between, until the mixture is completely smooth and melted. Alternatively, you can melt the chocolate and butter in a double boiler over simmering water.
-
Transfer the melted chocolate mixture to a heavy-duty resealable plastic bag. Cut a very small hole in one corner of the bag. This will serve as your piping bag for creating the spiderweb design.
-
Pipe a small, approximately 1/2 inch circle of chocolate in the center of the cheesecake. Then, fill in the entire top of the cheesecake with chocolate.
-
Pipe evenly spaced, thin, concentric circles about 1/2 inch apart over the filling. Aim for consistent spacing to create a visually appealing spiderweb effect.
-
Beginning with the center circle, gently pull a toothpick through the chocolate circles toward the outer edge of the cheesecake.
-
Wipe the toothpick clean after each pull. This prevents the colors from mixing and ensures sharp, defined lines in your web design.
-
Repeat this process around the entire cheesecake to complete the spiderweb pattern. Work with a steady hand and even pressure for best results.
-
Cover the cheesecake and refrigerate for at least 2 hours, or preferably overnight, before cutting and serving. This allows the gelatin to set completely, resulting in a firm and sliceable cheesecake.
Expert Tips & Tricks
- For an even smoother cheesecake filling, use a stand mixer with the paddle attachment to beat the cream cheese and sugar.
- If you don’t have a chocolate crumb crust, you can easily make your own by crushing chocolate cookies and mixing them with melted butter.
- To prevent the chocolate from hardening too quickly while piping, keep the plastic bag in a bowl of warm water.
- If you prefer a more intense chocolate flavor, use dark chocolate chips instead of semi-sweet.
- Get creative with your spiderweb design! Experiment with different patterns and spacing of the chocolate circles.
Serving & Storage Suggestions
Serve the Spiderweb Cheesecake chilled for the best texture and flavor. Garnish with a dusting of cocoa powder or a few fresh berries for an extra touch of elegance. Leftover cheesecake can be stored in the refrigerator for up to 3 days. Cover tightly with plastic wrap to prevent it from drying out. While freezing is not recommended due to potential texture changes, it can be done for longer storage, but expect some loss of creaminess.
Nutritional Information
| Nutrient | Amount per Serving | % Daily Value |
|---|---|---|
| Calories | 637.3 kcal | N/A |
| Calories from Fat | 449 g | 70% |
| Total Fat | 49.9 g | 76% |
| Saturated Fat | 27.1 g | 135% |
| Cholesterol | 120.8 mg | 40% |
| Sodium | 483.9 mg | 20% |
| Total Carbohydrate | 41.7 g | 13% |
| Dietary Fiber | 0.9 g | 3% |
| Sugars | 28 g | N/A |
| Protein | 9.1 g | 18% |
Note: Nutritional information is an estimate and may vary based on specific ingredients and serving sizes.
Variations & Substitutions
- Gluten-Free: Use a gluten-free chocolate crumb crust or make your own using gluten-free chocolate cookies.
- Dairy-Free: Substitute the cream cheese with a dairy-free cream cheese alternative, and use a dairy-free whipping cream.
- Crust Flavor: Experiment with different crust flavors, such as graham cracker or even an Oreo crust for an extra chocolatey twist.
- Extract: Instead of Vanilla, consider using Almond, Coconut, or Peppermint extract for different flavor experiences.
FAQs (Frequently Asked Questions)
Q: Can I use a different type of crust?
A: Absolutely! While a chocolate crumb crust complements the chocolate topping nicely, you can use a graham cracker crust or any other type of crust you prefer.
Q: How do I prevent cracks from forming on the surface of my cheesecake?
A: Since this is a no-bake cheesecake, cracks aren’t usually an issue. However, ensuring the cream cheese is properly softened and avoiding over-mixing the filling will help maintain a smooth texture.
Q: Can I make this cheesecake ahead of time?
A: Yes, this cheesecake is perfect for making ahead! In fact, it benefits from chilling in the refrigerator for several hours or even overnight, allowing the flavors to meld and the filling to set completely.
Q: What if my gelatin doesn’t dissolve properly?
A: Ensure that the water is cold when you sprinkle the gelatin over it. Also, heat the mixture gently over low heat, stirring constantly until the gelatin is fully dissolved. Avoid boiling the gelatin, as this can affect its setting properties.
Q: Can I add other flavors to the filling?
A: Absolutely! Feel free to add a splash of coffee liqueur, a few drops of peppermint extract, or some finely grated orange zest to the filling for added flavor complexity.
Final Thoughts
I hope this Spiderweb Cheesecake brings as much joy to your table as it does to mine. It’s a delightful treat that’s both visually stunning and incredibly delicious. Don’t be intimidated by the spiderweb design; it’s easier than it looks, and the results are truly impressive. So gather your ingredients, put on some spooky tunes, and get ready to create a memorable dessert that your friends and family will rave about. And don’t forget to share your creations with me – I’d love to see your artistic spiderwebs!