
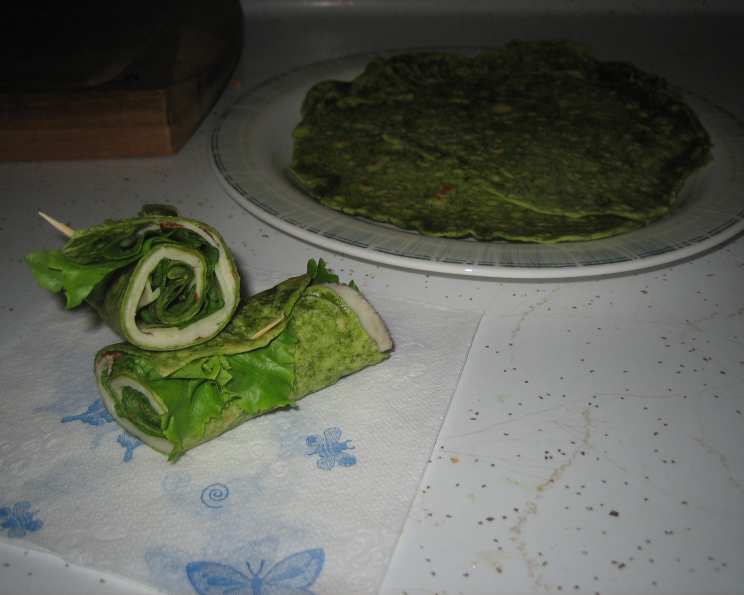
Spinach Tortillas – Green and Yummy!
I remember the first time I ever made homemade tortillas. It was a sweltering summer afternoon, and my grandmother, her hands dusted with flour, guided me through the simple process. The smell of warm, toasted corn filled the air, and the feeling of pressing and shaping the dough was incredibly satisfying. While those were classic corn tortillas, I soon began experimenting, and I love adding spinach for a vibrant green color and a subtle earthy flavor that elevates them from a simple staple to something truly special. These spinach tortillas are not only delicious but also a healthy and fun way to sneak in some extra greens!
Recipe Overview
- Prep Time: 15 minutes
- Cook Time: 30 minutes
- Total Time: 45 minutes
- Servings: 6-8
- Yield: 6-8 tortillas
- Dietary Type: Vegetarian
Ingredients
- 1 1/2 cups flour
- 1 cup fresh spinach
- 1/4 teaspoon salt
- 1 tablespoon unsalted butter
- 1/2 tablespoon olive oil
- 1/3 cup water
Equipment Needed
- Food processor
- Mixing bowl
- Damp cloth or paper towel
- Wax paper
- Griddle or skillet
Instructions
-
Begin by melting the butter and heating the water and olive oil. In a microwave-safe cup, combine the water, butter, and olive oil. Microwave for 1-2 minutes, or until the butter is completely melted. The mixture should be warm, but not boiling.
-
Prepare the spinach and flour mixture. In a food processor, place the flour and sprinkle with salt. Add the fresh spinach leaves. Process until the flour turns a vibrant green color and the spinach is finely chopped, with no large leaf pieces remaining. This step is crucial to ensure even color distribution and prevent any stringy spinach textures in the final tortillas.
-
Combine wet and dry ingredients. Transfer the green flour mixture to a mixing bowl. Pour the warm water mixture over the top.
-
Knead the dough. Using your hands, knead the dough until it forms a smooth ball. If the dough seems too dry, gradually add a little more water, one tablespoon at a time. If the dough is too wet, add a little more flour, one tablespoon at a time. However, with the specified measurements, this shouldn’t be necessary. The dough should be soft and pliable, not sticky.
-
Shape the dough. Divide the dough into 6-8 equal-sized pieces. Roll each piece into a small ball and place them back in the bowl.
-
Rest the dough. Cover the bowl with a damp cloth or paper towel to prevent the dough from drying out. Let the dough rest for 15-30 minutes. This allows the gluten to relax, making the tortillas easier to roll out and preventing them from shrinking back during cooking.
-
Roll out the tortillas. On a lightly floured surface or between two sheets of wax paper, roll out each ball of dough as thinly as possible into a circular shape. Aim for a tortilla that is approximately 6-8 inches in diameter. The thinner the tortilla, the more tender it will be.
-
Heat the griddle or skillet. Heat a griddle or skillet over low heat. It is important to use low heat to prevent the tortillas from burning before they are fully cooked. Do not grease the griddle or skillet.
-
Cook the tortillas. Carefully peel the rolled-out tortilla from the wax paper and place it onto the hot griddle or skillet.
-
Flip and cook repeatedly. Flip the tortilla repeatedly, about every 5-8 seconds per side, to prevent burning. Cook until golden bubbles appear on the tortilla, indicating that it is cooked through. This process usually takes about 1-2 minutes per tortilla.
-
Remove from heat. Once the tortillas are cooked, remove them from the heat and stack them on a plate.
-
Enjoy! Serve the spinach tortillas warm or let them cool completely. They can be used immediately for your favorite wraps, tacos, quesadillas, or any other dish that calls for tortillas.
-
Storing leftovers. Store leftover tortillas in an airtight bag in the refrigerator. They can be stored for up to 3-4 days. If the tortillas seem too stiff after being refrigerated, microwave them for a few seconds to soften them again.
Expert Tips & Tricks
- Don’t skip the resting time: Allowing the dough to rest is crucial for achieving tender tortillas. It allows the gluten to relax, making the tortillas easier to roll out and preventing them from shrinking during cooking.
- Roll them thin: The thinner you roll the tortillas, the more tender and pliable they will be.
- Low and slow: Cooking the tortillas over low heat is key to preventing them from burning before they are cooked through.
- Keep them warm: As you cook the tortillas, stack them on a plate and cover them with a clean kitchen towel to keep them warm and pliable.
- Experiment with flavors: Feel free to add other herbs or spices to the dough, such as garlic powder, onion powder, or chili powder, for added flavor.
Serving & Storage Suggestions
These vibrant green tortillas are incredibly versatile. Serve them warm with your favorite fillings for tacos, burritos, or quesadillas. They are also delicious as wraps for sandwiches or salads. Leftover tortillas can be stored in an airtight bag in the refrigerator for up to 3-4 days. To reheat, simply microwave them for a few seconds, or warm them in a dry skillet over low heat. You can also freeze the tortillas for longer storage. To freeze, stack the tortillas with a piece of wax paper between each one, then wrap them tightly in plastic wrap and place them in a freezer bag. They can be stored in the freezer for up to 2-3 months. Thaw them in the refrigerator before reheating.
Nutritional Information
| Nutrient | Amount per Serving | % Daily Value |
|---|---|---|
| Calories | 106.4 kcal | N/A |
| Calories from Fat | 22 g | 21% |
| Total Fat | 2.5 g | 3% |
| Saturated Fat | 1.1 g | 5% |
| Cholesterol | 3.8 mg | 1% |
| Sodium | 86.5 mg | 3% |
| Total Carbohydrate | 18 g | 6% |
| Dietary Fiber | 0.7 g | 2% |
| Sugars | 0.1 g | 0% |
| Protein | 2.5 g | 5% |
Variations & Substitutions
- Gluten-free: Substitute the all-purpose flour with a gluten-free blend for a gluten-free version. Be sure to use a blend that is specifically designed for baking, as some gluten-free flours can be quite dry. You may need to adjust the amount of water depending on the blend you use.
- Whole wheat: Use whole wheat flour instead of all-purpose flour for a more nutritious tortilla. The tortillas will have a slightly heartier texture and a nuttier flavor.
- Different greens: Experiment with other greens, such as kale or chard, instead of spinach. Just be sure to remove any tough stems or ribs before adding the greens to the food processor.
- Spicy: Add a pinch of chili powder or a finely chopped jalapeño pepper to the dough for a spicy kick.
- Herbed: Add fresh herbs, such as cilantro or parsley, to the dough for added flavor and visual appeal.
FAQs (Frequently Asked Questions)
Q: Can I use frozen spinach instead of fresh spinach?
A: Yes, you can use frozen spinach. Be sure to thaw it completely and squeeze out any excess water before adding it to the food processor.
Q: Can I make the dough ahead of time?
A: Yes, you can make the dough ahead of time and store it in the refrigerator for up to 24 hours. Be sure to wrap it tightly in plastic wrap to prevent it from drying out.
Q: How do I prevent the tortillas from sticking to the griddle?
A: Make sure your griddle is hot enough before adding the tortillas. If the tortillas are sticking, try using a non-stick griddle or lightly greasing the griddle with oil.
Q: My tortillas are tearing when I roll them out. What am I doing wrong?
A: This usually happens when the dough is too dry or hasn’t rested long enough. Try adding a little more water to the dough or letting it rest for a longer period of time.
Q: How do I store the tortillas to keep them from drying out?
A: Store the tortillas in an airtight bag or container in the refrigerator to keep them from drying out. You can also wrap them in a damp paper towel before placing them in the bag or container.
Final Thoughts
I hope this recipe inspires you to create your own batch of delicious and vibrant spinach tortillas! The process is simple, rewarding, and the result is a healthier and tastier alternative to store-bought options. Feel free to experiment with different flavors and fillings to create your own signature tortillas. Don’t be afraid to share your creations and feedback – I’d love to hear about your experiences! These tortillas pair perfectly with a zesty lime crema and your favorite grilled vegetables for a satisfying and nutritious meal. Happy cooking!