
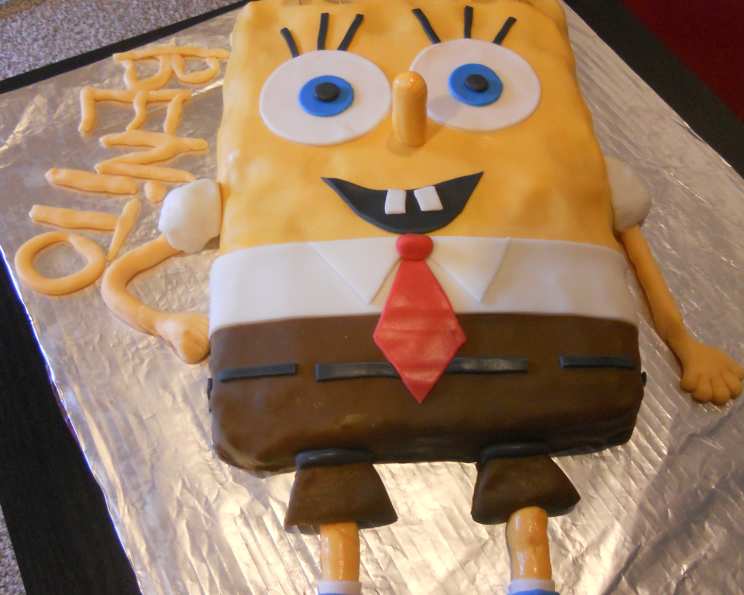
Spongebob Cake: A Culinary Adventure Under the Sea
My first encounter with Spongebob Squarepants wasn’t on TV, but at a childhood birthday party. A glorious, slightly lopsided yellow cake, undeniably resembling the porous sea sponge, sat proudly on the table. The slightly imperfect fondant details only added to its charm. Each bite was a burst of joy and a reminder that even the most ordinary day could be an adventure, just like an episode of Spongebob. Now, years later, I’m thrilled to share a recipe that captures that same spirit of fun and deliciousness!
Recipe Overview
- Prep Time: Several hours
- Cook Time: Varies depending on cake mix
- Total Time: 26 hours
- Servings: 12 slices
- Yield: 1 cake
- Dietary Type: Not specified (contains dairy and eggs)
Ingredients
- 1 (8 ounce) box cake mix (chocolate recommended)
- 500 ml milk
- Sugar, to taste
- 4 tablespoons flour
- 5 egg yolks
- 3 tablespoons cocoa
- 100 g unsalted almonds
- 200 g butter
- 100 g caster sugar
- 3 tablespoons of classic caramel ice cream topping
- Fondant
- Food coloring
Equipment Needed
- Rectangular baking pan
- Thread or knife
- Saucepan
- Mixer
- Refrigerator
Instructions
-
Prepare the Cake: Begin by baking the cake mix according to the package instructions in a rectangular pan. Using a chocolate cake mix will provide a rich flavor that complements the creamy filling. Once baked, allow the cake to cool completely on a wire rack. This prevents the cream from melting later.
-
Divide the Cake: Once the cake is completely cooled, carefully cut it in half horizontally to create two equal layers. The most accurate way to do this is to use a long piece of thread or unwaxed dental floss, sawing gently back and forth. Alternatively, a long, serrated knife can be used with a gentle sawing motion.
-
Prepare the Cream Filling: In a saucepan, combine the milk, sugar (to taste – start with a few tablespoons and adjust as needed), flour, egg yolks, and cocoa. Whisk all ingredients together thoroughly to avoid lumps.
-
Cook the Cream Filling: Place the saucepan over low heat and cook, stirring constantly, until the mixture thickens. This process requires patience to ensure that the cream becomes smooth and doesn’t burn. The mixture should coat the back of a spoon. Remove from heat and let it cool completely.
-
Prepare the Almonds: Roughly chop the unsalted almonds. You can toast them lightly in a dry pan for a few minutes to enhance their flavor. Let them cool before using.
-
Assemble the Cake: Place one cake layer on a serving plate. Spread the cooled cream filling evenly over the cake layer. Sprinkle the chopped almonds over the cream.
-
Add the Second Layer: Carefully place the second cake layer on top of the cream and almond layer.
-
Chill the Cake: Cover the cake and place it in the refrigerator for several hours (at least 4 hours, or preferably overnight). This allows the flavors to meld together and the cake to become more stable for frosting.
-
Prepare the Buttercream: In a large bowl, beat the butter with a mixer until light and fluffy. Gradually add the caster sugar, beating continuously until the mixture is smooth and creamy.
-
Add Caramel: Add the caramel ice cream topping to the buttercream and mix until well combined. This will give the buttercream a delicious caramel flavor and a slightly golden hue.
-
Frost the Cake: Remove the cake from the refrigerator. Spread the buttercream evenly over the top and sides of the cake.
-
Chill Again: Return the frosted cake to the refrigerator for several hours to allow the buttercream to firm up. This makes the cake easier to decorate with fondant.
-
Decorate with Fondant: Divide the fondant into portions and use food coloring to tint it in Spongebob’s signature yellow, plus brown, white, blue, and any other colours you desire for the details. Roll out the fondant and use it to cover the cake, shaping it to resemble Spongebob Squarepants. Add details such as his eyes, mouth, tie, and porous texture using fondant tools or a sharp knife.
Expert Tips & Tricks
- Cake Leveling: For perfectly even cake layers, use a cake leveler or a long serrated knife to trim the tops of the cakes before assembling. This ensures that the filling is evenly distributed and the cake sits flat.
- Preventing a Soggy Cake: To prevent the cake layers from becoming soggy, consider brushing them with a simple syrup before adding the cream filling. This adds moisture without making the cake too wet.
- Homemade Fondant: While store-bought fondant is convenient, you can also make your own using marshmallows, powdered sugar, and a little water.
- Buttercream Consistency: If the buttercream is too soft, chill it in the refrigerator for a few minutes before frosting the cake. If it’s too stiff, add a tablespoon of milk or cream at a time until it reaches the desired consistency.
- Achieving Vibrant Fondant Colors: Use gel food coloring instead of liquid food coloring for more intense and vibrant colors without altering the consistency of the fondant.
- Almond Alternatives: If you have an allergy to almonds, you can use a different nut of your choice. Walnuts or hazelnuts would be a suitable substitute. You can even opt for chocolate chips.
Serving & Storage Suggestions
Serve the Spongebob cake chilled. Slice it carefully with a sharp knife to maintain its shape. Leftover cake should be stored in an airtight container in the refrigerator for up to 3 days. The cake is best enjoyed within this time frame, as the fondant may start to soften after a few days. Freezing is not recommended, as it can affect the texture of the fondant and buttercream.
Nutritional Information
| Nutrient | Amount per Serving | % Daily Value |
|---|---|---|
| Calories | 356.5 kcal | N/A |
| Calories from Fat | 211 g | 59% |
| Total Fat | 23.4 g | 36% |
| Saturated Fat | 10.7 g | 53% |
| Cholesterol | 110.5 mg | 36% |
| Sodium | 285.5 mg | 11% |
| Total Carbohydrate | 32.8 g | 10% |
| Dietary Fiber | 1.4 g | 5% |
| Sugars | 19.1 g | 76% |
| Protein | 5.7 g | 11% |
Note: Nutritional information is an estimate and may vary based on specific ingredients and portion sizes.
Variations & Substitutions
- Gluten-Free Option: Use a gluten-free cake mix and ensure all other ingredients are gluten-free.
- Dairy-Free Option: Substitute the milk with a plant-based alternative like almond or soy milk. Use a dairy-free butter substitute for the buttercream.
- Different Flavors: Experiment with different cake flavors, such as vanilla or lemon, to create a unique twist.
- Filling Variations: Try different fillings, such as fruit preserves, chocolate ganache, or a peanut butter cream.
- Seasonal Adaptations: Add seasonal fruits or spices to the cake or filling to create a festive variation. For example, add pumpkin spice to the cake in the fall or berries to the filling in the summer.
FAQs (Frequently Asked Questions)
Q: Can I make the cream filling ahead of time?
A: Yes, the cream filling can be made up to 2 days in advance and stored in the refrigerator. Ensure it’s covered tightly to prevent a skin from forming.
Q: Can I use store-bought buttercream frosting instead of making my own?
A: Yes, store-bought buttercream frosting can be used. Simply add the caramel ice cream topping to it as per the recipe instructions.
Q: How do I prevent the fondant from cracking?
A: Knead the fondant well before rolling it out to make it more pliable. Avoid rolling it too thin, and keep it covered with plastic wrap to prevent it from drying out.
Q: Can I simplify the decoration?
A: Absolutely! You can create a simpler Spongebob design using buttercream frosting and food coloring instead of fondant.
Q: What is caster sugar?
A: Caster sugar is a very fine granulated sugar that dissolves easily. If you can’t find it, you can pulse granulated sugar in a food processor until it’s finely ground.
Final Thoughts
Crafting this Spongebob cake is more than just baking; it’s about bringing a slice of childhood joy to life. It may seem daunting at first, but with a little patience and a dash of creativity, you can create a cake that’s both delicious and memorable. So, dive into the kitchen, embrace the imperfections, and have fun creating your own edible masterpiece. Don’t forget to share your creations and experiences – and maybe even pair it with a Krabby Patty (or a veggie burger!) for the ultimate Spongebob experience!