
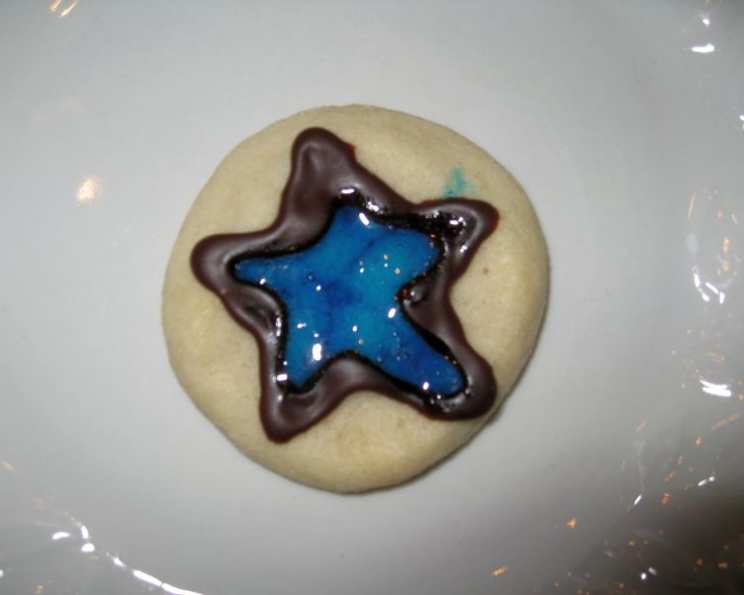
Stained Glass Cookie Magic: An Edible Art Project
I’ll never forget one Christmas when, determined to create the perfect holiday cookies, I spent hours attempting to flood cookies with royal icing, only to end up with a sticky, uneven mess. My piping skills resembled something more akin to abstract expressionism than festive artistry. That’s why, when I stumbled upon this incredibly simple “stained glass” paint recipe, I felt like I’d discovered a culinary secret weapon. It’s a delightful way to achieve a beautiful, almost ethereal effect on your cookies without the fuss of intricate icing work. The best part? It’s completely edible and endlessly customizable with different colors.
Recipe Overview
- Prep Time: 5 minutes
- Cook Time: 2 minutes (cookie baking time – actual “paint” requires no cooking)
- Total Time: 12 hours 7 minutes (includes drying time)
- Yields: 12 cookies
- Serves: 12
- Dietary Type: Vegetarian
Ingredients
- 1 tablespoon light corn syrup
- Food coloring, any type
Equipment Needed
- Small bowls
- Paint brushes
- Cookies, baked and cooled (recipe not included)
- Royal icing (optional, for outlining)
- Piping bag (optional, for royal icing)
Instructions
- Begin by preparing your canvases: bake your favorite sugar cookies or gingerbread cookies using your tried and true recipe and allow them to cool completely. Ensure they have a smooth surface for optimal “painting.”
- If you desire defined sections for your stained glass effect, use royal icing to pipe outlines onto your cooled cookies. Let the icing set completely before proceeding. This provides a border for your “stained glass” and adds a professional touch. If you prefer a more free-form, whimsical look, you can skip this step and apply the paint directly to the cookie surface.
- Next, it’s time to prepare your edible paints. In separate small bowls, mix 1 tablespoon of light corn syrup with a few drops of your chosen food coloring. Remember, a little goes a long way! Start with a drop or two and add more until you achieve the desired intensity. You can use gel, liquid, or powder food coloring – they all work well. Use a different bowl for each color you intend to create.
- Now, the fun begins: painting! Using a clean paint brush, apply a thin, even coat of the corn syrup mixture to the designated areas on your cookies. Start with a light coat to avoid the color running or bleeding. Allow the first coat to dry completely. This initial layer acts as a base and helps to seal the cookie surface.
- After the first coat is thoroughly dry, usually after an hour or two, apply a second coat. This time, you can daub on the paint to fill up to your icing lines for a thicker, more vibrant coat. Be careful not to apply too much at once, as it may drip. Layering is key to achieving a rich, saturated color.
- Finally, allow the painted cookies to dry completely overnight (or approximately 12 hours). This is crucial for the “stained glass” effect to set and harden. The corn syrup will dry to a smooth, translucent finish, resembling stained glass.
- Store in an airtight container in a cool, dry place to maintain freshness.
Expert Tips & Tricks
- Control the color: For a lighter, pastel effect, add a tiny amount of white food coloring to your corn syrup mixtures. This will soften the intensity of the colors and create a more delicate look.
- Air bubbles: Gently tap the cookie after painting to remove any air bubbles that may form in the corn syrup. This will ensure a smooth, even finish.
- Preventing Sticky Cookies: Ensure the cookies are completely cool before applying the paint. Warm cookies can cause the corn syrup to become sticky and difficult to work with.
- Add shimmer: Mix a pinch of edible glitter or luster dust into your corn syrup paint for a dazzling, eye-catching effect. This is especially lovely for holiday-themed cookies.
- Variety is Key: Experiment with different shapes and sizes of cookies. Cut-out cookies in festive shapes like stars, snowflakes, or gingerbread men are perfect for this technique. You can even use a variety of cookie cutters to create a whole stained glass cookie gallery!
- Make Ahead: Bake and decorate the cookies a day or two in advance. This allows ample drying time and makes your holiday baking less stressful.
Serving & Storage Suggestions
These stained glass cookies are perfect for serving at holiday parties, gifting to friends and family, or simply enjoying as a sweet treat. Arrange them artfully on a platter for a stunning presentation, or package them individually in cellophane bags tied with ribbon. They can also be used as edible decorations on cakes or cupcakes.
Store the completely dried cookies in an airtight container at room temperature. They will generally last for several days, maintaining their color and shine. Avoid storing them in the refrigerator, as the humidity can cause the corn syrup to become sticky. The cookies are best consumed within a week for optimal freshness.
Nutritional Information
Please note that this is an estimation and will vary based on the specific food coloring and cookie recipe used.
| Nutrient | Amount per Serving | % Daily Value |
|---|---|---|
| Calories | 15 kcal | 1% |
| Total Fat | 0g | 0% |
| Saturated Fat | 0g | 0% |
| Cholesterol | 0mg | 0% |
| Sodium | 0.1mg | 0% |
| Total Carbohydrate | 4g | 1% |
| Dietary Fiber | 0g | 0% |
| Sugars | 3g | 6% |
| Protein | 0g | 0% |
Variations & Substitutions
- Flavor Infusion: Add a drop of extract, such as vanilla, almond, or lemon, to the corn syrup for a subtle flavor enhancement. Match the extract to the flavor of your cookies for a complementary taste.
- Natural Food Coloring: Experiment with natural food coloring derived from fruits and vegetables for a more wholesome option. Beet juice can create a vibrant red, while spinach juice can produce a subtle green. Keep in mind that natural food colorings may not be as intense as artificial ones.
- Corn Syrup Alternative: While corn syrup is ideal for its clear, glossy finish, you can try using honey or agave nectar as a substitute. However, these alternatives may affect the color and transparency of the “stained glass.”
FAQs (Frequently Asked Questions)
Q: Can I use dark corn syrup instead of light corn syrup?
A: It is not recommended to use dark corn syrup as it will tint the colors of your food coloring, making them appear muddy and less vibrant. Light corn syrup provides the clearest base for your edible paints.
Q: How can I prevent the colors from bleeding together?
A: Ensure that your royal icing outlines (if using) are completely set before applying the corn syrup paint. Also, apply thin coats of paint and allow each coat to dry thoroughly before adding another.
Q: My “stained glass” is sticky even after drying overnight. What did I do wrong?
A: This usually indicates that too much corn syrup was applied. Next time, use thinner coats and ensure proper drying time in a well-ventilated area. A fan can help speed up the drying process.
Q: Can I use this technique on other baked goods besides cookies?
A: Absolutely! This technique can also be used on cakes, cupcakes, or even bread to create a unique decorative effect. Just make sure the surface is smooth and dry before applying the paint.
Q: How long do these cookies last?
A: When stored properly in an airtight container at room temperature, these cookies can last for up to a week.
Final Thoughts
This stained glass cookie technique is more than just a recipe; it’s an invitation to unleash your inner artist and create edible masterpieces. Don’t be afraid to experiment with different colors, shapes, and designs. Gather your family and friends, put on some festive music, and transform your kitchen into a creative studio. I hope this recipe inspires you to create beautiful, delicious cookies that bring joy and wonder to your holiday celebrations. I would love to hear about your experience – share your cookie creations and tips!