
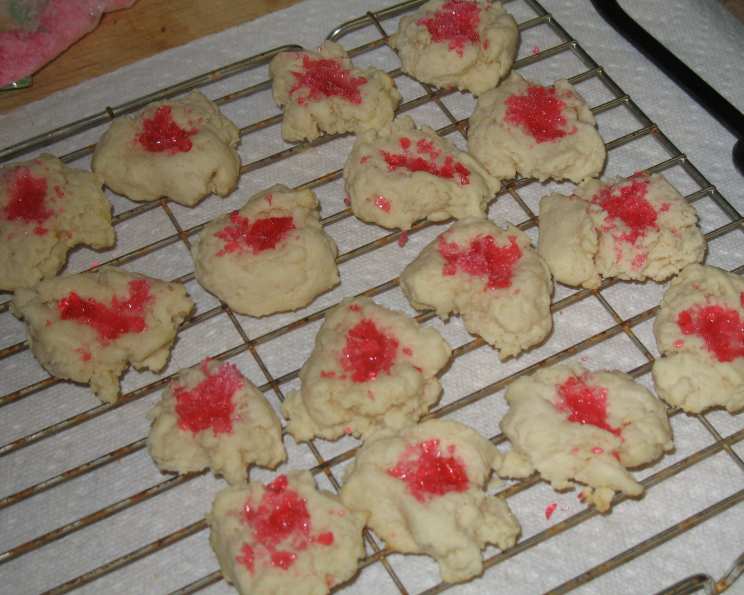
Sparkling Stained Glass Sugar Cookies: A Holiday Tradition
I remember being utterly mesmerized the first time I saw stained glass cookies. It was at my grandmother’s house during the holidays, and the way the light shone through the colorful candy centers, casting vibrant hues on the snowy white tablecloth, was pure magic. They looked like miniature works of art, almost too beautiful to eat. Of course, that didn’t stop me – the buttery, melt-in-your-mouth cookie combined with the sweet, hard candy was an irresistible treat that immediately became a cherished part of our family’s Christmas tradition. To this day, baking these cookies brings back the warmth and joy of those childhood memories, and I love sharing that magic with my own family.
Recipe Overview
- Prep Time: 45 minutes
- Cook Time: 10-12 minutes
- Total Time: 1 hour 15 minutes (includes chilling time)
- Yields: 3 1/2 dozen cookies
- Dietary Type: Not specified, but easily adaptable to gluten-free
Ingredients
- 1 (8 ounce) package cream cheese, softened
- 3/4 cup butter, softened
- 1 cup sugar
- 2 teaspoons vanilla
- 2 1/4 cups flour
- 1/2 teaspoon baking soda
- 4 rolls ring-shaped hard candies, crushed (i.e., LifeSavers) – separated by color
Equipment Needed
- Mixing bowl
- Electric mixer
- Plastic wrap
- Rolling pin
- Cookie cutters (3-inch assorted shapes)
- Greased baking sheets
- Wire cooling rack
- Resealable plastic bags
- Meat mallet or rolling pin (for crushing candies)
Instructions
-
Preheat your oven to 350°F (175°C). Ensuring your oven is properly preheated is essential for even baking.
-
In a large mixing bowl, beat together the softened cream cheese, softened butter, sugar, and vanilla with an electric mixer until the mixture is light and well blended. Don’t rush this step; creaming the butter and sugar properly incorporates air, which contributes to a tender cookie.
-
Add the flour and baking soda to the creamed mixture. Mix well until all ingredients are fully incorporated and a smooth dough forms. Be careful not to overmix at this point, as overmixing can develop the gluten in the flour, resulting in tougher cookies.
-
Cover the dough with plastic wrap and refrigerate for at least 30 minutes. Chilling the dough allows the gluten to relax, making it easier to roll out and preventing the cookies from spreading too much during baking.
-
Once chilled, lightly flour a clean work surface. Roll out the dough to a thickness of approximately 1/8 inch. Keeping the dough thickness consistent ensures even baking.
-
Using 3-inch cookie cutters of assorted shapes, cut out the cookies. You can also choose to drop spoonfuls of dough onto the baking sheets for a more rustic, drop-cookie style. For the “stained glass” effect, use a smaller cutter (or a knife) to cut out a shape in the center of each cookie. Hearts, stars, or simple circles work well.
-
Place the cut-out cookies onto greased baking sheets, leaving a small space between each cookie to allow for even baking.
-
Bake for 10-12 minutes, or until the edges of the cookies begin to lightly brown. Keep a close eye on them; the baking time may vary slightly depending on your oven.
-
Remove the baking sheets from the oven and immediately transfer the cookies to a wire rack. While the cookies are still hot, gently press about 1/2 teaspoon of crushed hard candies into the center cutout of each cookie. Work quickly, as the cookies will cool and harden rapidly.
-
If the crushed candies aren’t sticking properly to the hot cookie, you can apply a very thin layer of frosting (like a simple glaze of powdered sugar and milk) to the cutout area before adding the crushed candies. This acts like glue.
-
Allow the cookies to cool completely on the wire racks. As they cool, the candy will melt and harden, creating the “stained glass” effect.
-
To easily crush the candies, separate them by color. Place each color in a separate resealable plastic bag and crush them using a rolling pin or meat mallet until they are finely ground. Crushing each color separately helps maintain the vibrant colors in your “stained glass.”
Expert Tips & Tricks
-
Softened Butter and Cream Cheese are Key: Make sure your butter and cream cheese are truly softened to room temperature before beginning. This will ensure a smooth and creamy dough.
-
Don’t Overwork the Dough: Overmixing develops gluten, leading to tough cookies. Mix only until the ingredients are just combined.
-
Chilling is Crucial: Don’t skip the chilling step! It prevents spreading and makes the dough easier to handle.
-
Even Rolling: For evenly baked cookies, roll the dough to a consistent thickness.
-
Candy Color Combinations: Get creative with your candy colors! Experiment with different combinations for unique “stained glass” effects.
-
Preventing Bubbles: If bubbles form in the candy during baking, gently prick them with a toothpick while the candy is still molten.
-
Make-Ahead Tip: The dough can be made ahead of time and stored in the refrigerator for up to 3 days, or in the freezer for up to 2 months. Thaw completely before rolling out.
Serving & Storage Suggestions
Serve these beautiful cookies on a festive platter or arrange them in a decorative box for gifting. They also make wonderful additions to holiday cookie exchanges.
Store the cooled cookies in an airtight container at room temperature for up to 5 days. To maintain the candy’s clarity and prevent it from becoming sticky, avoid storing them in a humid environment. Freezing is not recommended, as it can affect the texture of the candy.
Nutritional Information
| Nutrient | Amount per Serving | % Daily Value |
|---|---|---|
| Calories | 1122.5 kcal | N/A |
| Calories from Fat | 565 g | 50% |
| Total Fat | 62.9 g | 96% |
| Saturated Fat | 39.4 g | 196% |
| Cholesterol | 175.9 mg | 58% |
| Sodium | 656.2 mg | 27% |
| Total Carbohydrate | 127.2 g | 42% |
| Dietary Fiber | 2.2 g | 8% |
| Sugars | 62.1 g | 248% |
| Protein | 13.6 g | 27% |
Note: Nutritional information is an estimate and may vary depending on specific ingredients and portion sizes.
Variations & Substitutions
- Gluten-Free: Substitute a gluten-free all-purpose flour blend for the regular flour. Be sure to choose a blend that contains xanthan gum for binding.
- Vegan: Use vegan cream cheese and butter substitutes. Ensure the hard candies are also vegan-friendly (some may contain gelatin or other animal-derived ingredients).
- Flavor Extracts: Experiment with different flavor extracts in the dough, such as almond, lemon, or peppermint, to complement the candy flavors.
- Citrus Zest: Add finely grated citrus zest (lemon, orange, or lime) to the dough for a bright and aromatic twist.
- Spice it up! Add a pinch of ground cinnamon, nutmeg, or ginger to the dough for a warm, holiday-inspired flavor.
FAQs (Frequently Asked Questions)
Q: Why is my dough crumbly and hard to roll out?
A: This likely means your butter and/or cream cheese were not softened enough. Ensure they are at room temperature before mixing. If the dough is already made, try letting it sit at room temperature for a short time to soften slightly.
Q: My candy is bubbling and cracking in the oven. What am I doing wrong?
A: This can happen if the oven temperature is too high or the candy layer is too thick. Make sure your oven is calibrated correctly and that you’re using the recommended temperature. Also, use a thin layer of crushed candy. Prick any bubbles with a toothpick.
Q: Can I use different types of hard candies?
A: Absolutely! While LifeSavers are a classic choice, feel free to experiment with other hard candies that have vibrant colors. Just be sure to crush them finely.
Q: The candy is sticking to my baking sheet. How can I prevent this?
A: Make sure your baking sheet is well-greased or lined with parchment paper. This will prevent the candy from sticking and make it easier to remove the cookies.
Q: Can I make these cookies without cookie cutters?
A: Yes, you can easily make these as drop cookies. Simply drop spoonfuls of dough onto the baking sheet, create a small indentation in the center, and fill with the crushed candy.
Final Thoughts
These Stained Glass Sugar Cookies are more than just a treat; they’re a symbol of warmth, creativity, and shared joy. Whether you’re baking them for a holiday gathering, a cookie exchange, or simply to brighten someone’s day, they’re sure to bring a smile to everyone’s face. So, gather your ingredients, preheat your oven, and let the magic begin! I encourage you to try this recipe and share your creations with family and friends. And feel free to experiment with different flavors and colors to create your own unique versions of these beautiful and delicious cookies. They pair perfectly with a warm cup of cocoa or a glass of chilled milk! Enjoy!