
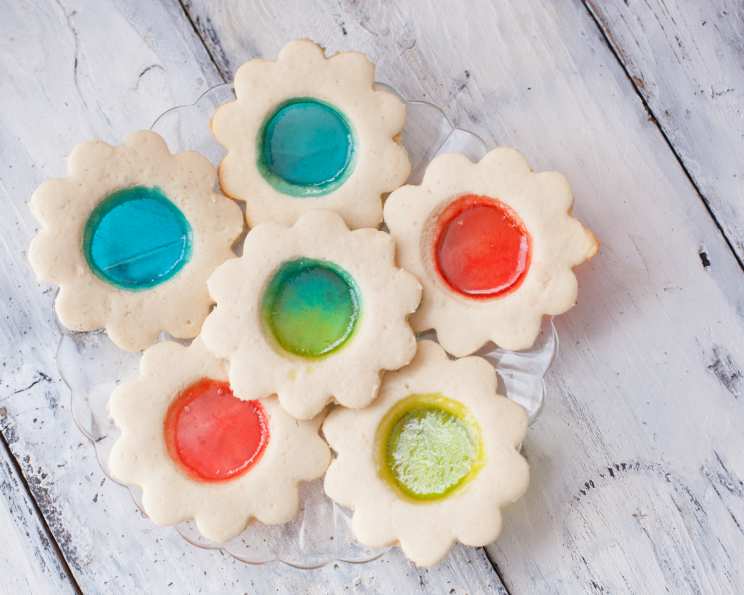
Stained Glass Window / Lollipop Cookies
The first time I saw these cookies, it was like peering through a tiny, edible cathedral window. I was at a holiday bake sale, and amidst the peanut butter blossoms and chocolate crinkles, these stood out like shimmering jewels. The vibrant, melted lollipop centers, suspended within the golden cookie frames, captured my imagination. It wasn’t just the taste; it was the artistry, the way simple ingredients transformed into something magical. Immediately, I knew I had to learn to make them myself. These cookies became a holiday staple, a source of endless delight for both kids and adults.
Recipe Overview:
- Prep Time: 30 minutes
- Cook Time: 10 minutes
- Total Time: 40 minutes
- Yields: 25 cookies
- Serves: 25
- Dietary Type: Dairy-Free (if using dairy-free margarine)
Ingredients:
- 4 cups flour
- 1 cup margarine (dairy or non-dairy, softened)
- 1 1/4 cups sugar
- 2 eggs
- 1/4 tablespoon lemon juice
- 1/4 teaspoon salt
- 1 tablespoon vanilla extract
- 1/4 cup orange juice
- 18 lollipops, crushed (assorted colors recommended)
Equipment Needed:
- Large mixing bowl
- Electric mixer (optional, but recommended)
- Measuring cups and spoons
- Rolling pin
- Scalloped-edged cookie cutter (approx. 3-inch diameter)
- Small cookie cutter (various shapes)
- Lined cookie sheets (parchment paper or silicone baking mat)
- Freezer bag
- Mallet or rolling pin (for crushing lollipops)
Instructions:
-
Preheat your oven to 350°F (175°C). Position a rack in the center of the oven.
-
Begin by preparing the dough. While the original recipe suggests mixing all the ingredients at once, I strongly recommend creaming the margarine and sugar together first. In a large mixing bowl, beat the softened margarine and sugar with an electric mixer (or by hand) until light and fluffy. This step is crucial for a tender cookie.
-
Beat in the eggs one at a time, ensuring each is fully incorporated before adding the next. This prevents the mixture from curdling.
-
Add the lemon juice, salt, and vanilla extract. Mix well to combine.
-
Now, gradually add the flour and orange juice, alternating between the two. Start by adding about one cup of flour, followed by a few tablespoons of orange juice, and continue until all the flour and orange juice are incorporated. Mix until just combined. Be careful not to overmix the dough, as this can lead to tough cookies. The dough should be smooth and pliable.
-
Lightly flour a work surface. Roll out the dough to about 1/4-inch thickness. If the dough is too sticky, add a little more flour, but be careful not to add too much, as this can dry out the cookies.
-
Using a scalloped-edged cookie cutter, cut out large circles from the rolled dough.
-
Place the scalloped circles onto lined cookie sheets, leaving some space between each cookie.
-
With a smaller cookie cutter (such as a star, heart, or circle), cut out desired shapes from the centers of each circle. This is where the “stained glass” will go.
-
Carefully remove the smaller dough cutouts. You can re-roll these scraps to make more cookies or bake them separately as simple sugar cookies.
-
Prepare the lollipop filling. Place the lollipops into a freezer bag. Seal the bag tightly, removing as much air as possible. Using a mallet or rolling pin, crush the lollipops into small pieces. Be sure to use a sturdy surface to avoid damaging your countertops. For easier cleanup, consider using multiple freezer bags, as the candy shards can sometimes poke holes. A food processor can also be used, but pulse carefully to avoid creating candy dust.
-
Fill the cut-out shapes in the cookie centers with the crushed lollipops. Make sure the candy pieces are evenly distributed and fill the entire opening.
-
Bake in the preheated oven for 10 minutes, or until the candy melts and the cookie edges are lightly golden brown. Keep a close eye on the cookies as they bake, as the candy can burn if overbaked.
-
Allow the cookies to cool completely on the cookie sheets before carefully removing them. The melted candy is very hot and fragile when first removed from the oven. Once cooled, the candy will harden, creating the “stained glass” effect.
Expert Tips & Tricks:
- Prevent Dough Stickiness: If the dough is too sticky to roll, chill it in the refrigerator for 30 minutes before rolling. This will make it easier to handle.
- Even Candy Melt: To ensure the candy melts evenly, use lollipops of similar thickness.
- Color Coordination: Experiment with different lollipop colors to create unique and vibrant stained glass patterns.
- Cookie Dough Flavor: Add a few drops of almond extract to the dough for a subtle, nutty flavor.
- Prevent Burning: If the cookie edges are browning too quickly, cover them loosely with foil during the last few minutes of baking.
- Thumbprint Variation: If you don’t want to cut out shapes, make thumbprint cookies by pressing an indentation into the center of each cookie before baking and filling it with crushed lollipops.
Serving & Storage Suggestions:
Serve these Stained Glass Window Cookies as a delightful treat for holidays, parties, or any special occasion. Their colorful appearance makes them a perfect addition to a dessert platter or as a homemade gift.
- Storage: Store the cookies in an airtight container at room temperature. They will stay fresh for up to 3-4 days.
- Freezing: You can freeze the baked cookies for up to 2 months. Thaw them at room temperature before serving. It is not recommended to freeze the raw dough, as the candy may absorb moisture and become sticky.
- Reheating: Reheating is generally not necessary, as these cookies are best enjoyed at room temperature.
Nutritional Information:
| Nutrient | Amount per Serving | % Daily Value |
|---|---|---|
| Calories | 185 kcal | N/A |
| Calories from Fat | 70 kcal | N/A |
| Total Fat | 7.8 g | 12% |
| Saturated Fat | 1.7 g | 8% |
| Cholesterol | 14.9 mg | 4% |
| Sodium | 114.6 mg | 4% |
| Total Carbohydrate | 25.7 g | 8% |
| Dietary Fiber | 0.6 g | 2% |
| Sugars | 10.3 g | 41% |
| Protein | 2.7 g | 5% |
Note: Nutritional information is an estimate and may vary based on specific ingredients and portion sizes.
Variations & Substitutions:
- Gluten-Free: Substitute the all-purpose flour with a gluten-free blend. Be sure to use a blend that contains xanthan gum for binding.
- Vegan: Use a vegan margarine alternative and a flax egg (1 tablespoon flaxseed meal mixed with 3 tablespoons water, let sit for 5 minutes) to replace the chicken eggs.
- Citrus Variation: Use lemon or lime juice instead of orange juice for a different citrus flavor.
- Spice It Up: Add a pinch of cinnamon, nutmeg, or ginger to the dough for a warm, spiced cookie.
- Lollipop Alternatives: Get creative with other meltable candies, such as hard caramel candies or Jolly Ranchers, for different flavor profiles.
FAQs (Frequently Asked Questions):
Q: Why is my dough too sticky?
A: The dough may be too sticky if the margarine was too soft or if the weather is humid. Try chilling the dough for 30 minutes to make it easier to handle. Adding a tablespoon or two of flour can also help.
Q: Can I use different cookie cutter shapes?
A: Absolutely! Get creative with different cookie cutter shapes for both the outer circle and the inner cutout. Stars, hearts, and squares all work well.
Q: How do I prevent the candy from burning?
A: Keep a close eye on the cookies while they bake. If the candy starts to bubble excessively or turn brown, reduce the oven temperature slightly or cover the cookies loosely with foil.
Q: Can I make these cookies ahead of time?
A: Yes, you can make the dough ahead of time and store it in the refrigerator for up to 2 days. Bring the dough to room temperature before rolling it out.
Q: What if I don’t have lollipops?
A: You can use other hard candies, such as Jolly Ranchers or hard caramel candies. Just make sure they are finely crushed before filling the cookie centers.
Final Thoughts:
These Stained Glass Window Cookies are more than just a treat; they’re a miniature work of art. The combination of buttery cookie dough and vibrant, melted candy creates a delightful sensory experience. Don’t be afraid to experiment with different colors, shapes, and flavors to create your own unique masterpieces. I encourage you to try this recipe and share the joy of these beautiful cookies with your loved ones. They’re sure to bring a smile to everyone’s face. And feel free to pair them with a warm mug of spiced cider or a glass of cold milk for the ultimate indulgence. Happy baking!