
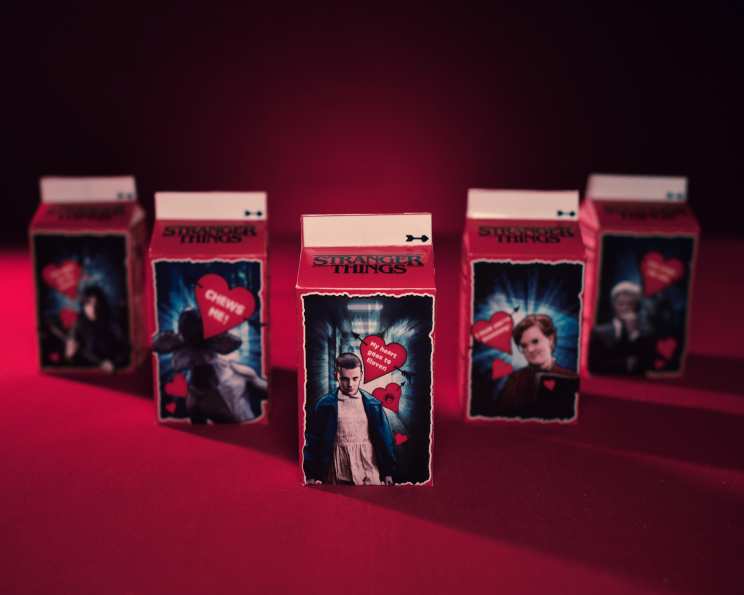
Stranger Things Candy Carton Assembly
My love for crafting, particularly when it intertwines with my culinary skills, stems from childhood memories of making personalized holiday treats. I remember spending hours with my grandmother, carefully constructing gingerbread houses and decorating them with colorful candies. It wasn’t just about the sweets; it was about the act of creation, the sharing of joy, and the personalized touch that made each treat special. This Stranger Things Candy Carton Assembly project immediately brought me back to those happy moments, inspiring me to channel my inner child and embrace the whimsical world of Hawkins, Indiana.
Recipe Overview
- Prep Time: 15 minutes
- Yields: 1 box
- Dietary Type: Not Applicable (depends on filling)
Ingredients
- 8 1/2 X 11″ Photo Paper
- Glue stick
- Scissors
- Exacto Knife or Razor Blade
- Straight Edge or ruler
- Binder Clips
- Stranger Things Strawberry Bubble Gum (or candy of your choice)
Equipment Needed
- Cutting board
Instructions
-
Begin by printing your chosen Stranger Things Candy Carton template onto the 8 1/2 X 11″ Photo Paper. Templates are available online. Choose from iconic characters like Barb, Joyce, Eleven, Dr. Martin Brenner, or the Demogorgon to personalize your gift.
-
Place the printed template on a cutting board. Using the Exacto Knife or Razor Blade, carefully cut out the carton pattern, following the template’s outlines. Take your time and work slowly to ensure clean, precise cuts. This step is crucial for a professional-looking finished product.
-
If you wish to personalize the carton further, now is the time to write out the “to and from” section. Doing this before assembly ensures a neater result, as you’ll be working on a flat surface.
-
Once the shape is perfectly cut, use the Straight Edge or ruler and the back (blunt side) of your Exacto Knife or Razor Blade to score the carton where the folds will take place. Scoring creates a crease that makes folding easier and more accurate. Apply firm, even pressure while scoring.
-
Refold all the scored lines, being careful not to dent any of the flat surfaces of the carton. Precision during this stage is key for creating a well-structured box.
-
Apply glue along one of the side seams of the carton. Press the edges together to create the side of the box. Hold the seam firmly until the glue sets.
-
Allow the side seam to dry completely. This is important to ensure a strong and stable bond.
-
Once the side seam is dry and set, you can begin to glue and fold in the top section of the carton. Apply glue to the appropriate flaps and carefully fold them into place.
-
Use binder clips to hold the folded top section securely in place until the glue is completely dry. The clips will provide even pressure, ensuring a strong and durable seal.
-
Do not seal the bottom of the carton until you are ready to fill it with candy.
-
Once the glue is fully dried, the binder clips can be removed.
-
Fill the carton with your chosen candy, such as Stranger Things Strawberry Bubble Gum.
-
Finally, glue and fold the bottom section of the carton in the same way as the top section. Use binder clips to hold it in place until the glue is completely dry.
Expert Tips & Tricks
- For exceptionally crisp folds, consider using a bone folder in place of the back of your Exacto knife. This will help you create cleaner, sharper creases.
- When cutting the template, work on a self-healing cutting mat to protect your work surface and extend the life of your blade.
- To avoid any glue mishaps, use a glue stick with a fine tip applicator for more controlled application.
- If you find that the binder clips are leaving indentations on the photo paper, place a small piece of cardboard or paper between the clip and the carton.
- If the glue is taking a long time to dry, you can use a low-heat hair dryer to speed up the process, but be careful not to overheat the paper.
Serving & Storage Suggestions
The assembled candy carton is best served immediately after filling with candy to maintain freshness. If you need to store the assembled carton before gifting, keep it in a cool, dry place away from direct sunlight to prevent the candy from melting or becoming sticky. While the carton itself will last indefinitely, the candy inside will have its own specific expiration date, so be mindful of that. Once filled, the carton is best given as soon as possible to ensure the candy’s optimal flavor and texture.
Nutritional Information
Because this recipe involves assembling a container, nutritional information is not directly applicable. The nutritional content will depend entirely on the candy used to fill the carton.
| Nutrient | Amount per Serving (Varies by Candy) | % Daily Value (Varies by Candy) |
|---|---|---|
| Calories | Varies by Candy | Varies by Candy |
| Total Fat | Varies by Candy | Varies by Candy |
| Saturated Fat | Varies by Candy | Varies by Candy |
| Cholesterol | Varies by Candy | Varies by Candy |
| Sodium | Varies by Candy | Varies by Candy |
| Total Carbohydrate | Varies by Candy | Varies by Candy |
| Dietary Fiber | Varies by Candy | Varies by Candy |
| Sugars | Varies by Candy | Varies by Candy |
| Protein | Varies by Candy | Varies by Candy |
Variations & Substitutions
- Theme Customization: While the provided templates are Stranger Things-themed, the same construction method can be used with any printable template. Create cartons with themes like birthdays, holidays, or favorite movies.
- Paper Choice: Experiment with different types of paper for a unique look and feel. Cardstock offers more durability, while textured paper adds a tactile element.
- Closure Options: Instead of gluing the top and bottom flaps, consider using ribbon or decorative tape for a reusable carton.
- Candy Alternatives: Fill the cartons with small toys, stickers, or other non-edible treats for children with allergies or dietary restrictions.
- Personalized Decorations: Add embellishments like glitter, stickers, or hand-drawn designs to further personalize the cartons.
FAQs (Frequently Asked Questions):
Q: What kind of glue stick is best for this project?
A: A standard, acid-free glue stick works well. Look for one that dries clear and quickly for best results.
Q: Can I use regular printer paper instead of photo paper?
A: While you can, photo paper provides a much sharper and more vibrant print quality, resulting in a more professional-looking finished product. Regular printer paper is also less durable.
Q: What if I don’t have an Exacto Knife or Razor Blade?
A: Very carefully use the tip of a pair of sharp scissors, but an Exacto knife or razor blade is highly recommended for precision and safety.
Q: How can I make sure the folds are perfectly straight?
A: Use a ruler or straight edge as a guide when scoring the paper and take your time when folding. Precision is key for a neat finish.
Q: Is it possible to print these templates in a larger size?
A: Yes, you can adjust the print settings to scale the image to a larger size, but keep in mind that you may need to adjust the cutting and folding accordingly.
Final Thoughts
Embarking on this Stranger Things Candy Carton Assembly is more than just creating a container; it’s crafting a personalized gesture filled with thoughtfulness. The act of meticulously cutting, folding, and gluing transforms simple materials into a tangible expression of affection. Whether you’re gifting it to a friend, family member, or treating yourself, the joy of creating something unique is a reward in itself. So, gather your supplies, unleash your inner artist, and prepare to spread some joy, one meticulously crafted candy carton at a time. Who knows, maybe your creation will even lure someone back from the Upside Down!