
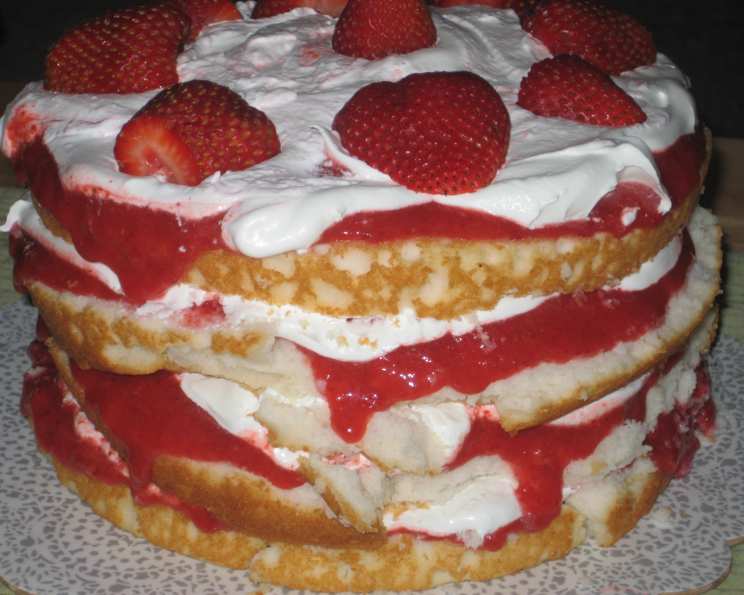
Strawberries and Cream Layer Cake: A Slice of Summer Bliss
I remember my grandmother’s garden, bursting with plump, ruby-red strawberries. The sweet, sun-warmed berries stained our fingers as we picked them, and the air hummed with the buzz of bees. The best part of the harvest wasn’t just eating them fresh, but when she transformed them into her famous Strawberry Layer Cake. Each bite was a symphony of light, fluffy cake, creamy sweetness, and the bright tang of fresh strawberries – a taste of pure summer joy that I cherish to this day. Now, I’m excited to share my version of this classic, ensuring your own summer moments are just as delicious.
Recipe Overview
- Prep Time: 30 minutes
- Cook Time: 25-30 minutes
- Total Time: 45 minutes
- Servings: 8-12
- Yield: 1 Layer Cake
- Dietary Type: Vegetarian
Ingredients
- 1 (18 1/2 ounce) package white cake mix
- 2 (10 ounce) packages frozen strawberries, thawed and pureed
- 1 (12 ounce) package frozen whipped topping, thawed
- 1 cup fresh strawberries, cleaned, hulled, and sliced
Equipment Needed
- Two 9-inch round cake pans
- Mixing bowls
- Electric mixer (hand or stand)
- Spatula
- Large serving plate
- Serrated knife
- Measuring cups and spoons
Instructions
-
Begin by preheating your oven according to the instructions on the white cake mix package. Prepare the cake batter as directed on the package, ensuring all ingredients are well combined.
-
Grease and flour two 9-inch round cake pans. This will prevent the cakes from sticking and ensure easy removal. Divide the batter evenly between the two pans.
-
Bake the cakes according to the package directions, typically around 25-30 minutes, or until a toothpick inserted into the center comes out clean. Every oven is different, so start checking for doneness around the 25-minute mark.
-
Once baked, remove the cake pans from the oven and let them cool in the pans for about 10 minutes. This allows the cakes to set slightly and prevents them from crumbling when you try to remove them.
-
After 10 minutes, carefully invert the cakes onto a wire rack to cool completely. Make sure the wire rack is clean and free of any debris that could stick to the cakes. Allow the cakes to cool completely before proceeding with the assembly. This is crucial because warm cake will melt the whipped topping.
-
While the cakes are cooling, prepare the strawberry puree. Thaw the two packages of frozen strawberries. Once thawed, puree them using a blender or food processor until smooth. If you prefer a less pulpy texture, you can strain the puree through a fine-mesh sieve.
-
Once the cakes are completely cool, use a long, serrated knife to carefully cut each layer in half horizontally. This will give you four layers of cake. A serrated knife is essential for clean cuts without tearing the cake. Gently saw back and forth, applying even pressure.
-
Now comes the fun part: assembling the cake! Place one cake layer on a large serving plate or cake stand. Brush the top of the cake layer generously with the strawberry puree. Be sure to get the puree all the way to the edges.
-
Spread a generous layer of the thawed whipped topping evenly over the strawberry puree. The amount of whipped topping is flexible; use as much as you like to achieve your desired creaminess.
-
Place the second cake layer on top of the whipped topping, cut-side up. Repeat the process: brush with strawberry puree, then spread with whipped topping.
-
Continue layering the cake, puree, and whipped topping until all four cake layers are used.
-
Once assembled, garnish the top of the cake with the fresh strawberry slices. Arrange them attractively in a circular pattern, or however you desire.
-
Refrigerate the cake for at least 30 minutes before serving. This allows the flavors to meld together and the whipped topping to set slightly, making it easier to slice.
Expert Tips & Tricks
- Cake Mix Enhancement: For a richer cake, substitute milk for the water called for in the cake mix instructions. You can also add a teaspoon of vanilla extract to the batter.
- Strawberry Intensity: If you want an even more intense strawberry flavor, consider adding a few drops of strawberry extract to the puree.
- Even Layers: Use a cake leveler or a long serrated knife and a ruler to ensure your cake layers are perfectly even. This will make for a more visually appealing cake.
- Stabilized Whipped Cream: If you’re worried about the whipped topping deflating, you can stabilize it by adding a teaspoon of cornstarch or gelatin powder (bloomed in cold water) to the whipped topping before spreading it on the cake.
- Make-Ahead Prep: The cake layers can be baked a day in advance and stored tightly wrapped at room temperature. You can also make the strawberry puree ahead of time and store it in the refrigerator.
- Troubleshooting: If your cake layers are dry, you can brush them with a simple syrup (equal parts sugar and water, simmered until dissolved) before adding the strawberry puree.
Serving & Storage Suggestions
Serve the Strawberries and Cream Layer Cake chilled. A slice of this cake is the perfect ending to any summer meal. It pairs beautifully with a scoop of vanilla ice cream or a dollop of extra whipped cream.
Store leftover cake in an airtight container in the refrigerator. It will keep for up to 3 days. The whipped topping may start to soften after a day or two, but the cake will still be delicious. While freezing is not recommended due to the whipped topping’s texture, individual slices can be frozen if necessary.
Nutritional Information
Note: Nutritional information is an estimate and can vary based on specific ingredients and serving sizes.
| Nutrient | Amount per Serving | % Daily Value |
|---|---|---|
| Calories | 448 kcal | 22% |
| Total Fat | 18 g | 28% |
| Saturated Fat | 10 g | 50% |
| Cholesterol | 0 mg | 0% |
| Sodium | 451 mg | 19% |
| Total Carbohydrate | 69 g | 23% |
| Dietary Fiber | 2 g | 8% |
| Sugars | 50 g | N/A |
| Protein | 4 g | 8% |
Variations & Substitutions
- Gluten-Free: Use a gluten-free white cake mix to make this cake gluten-free. Ensure all other ingredients are also gluten-free.
- Dairy-Free: Substitute the whipped topping with a dairy-free whipped topping alternative made from coconut cream or other plant-based ingredients.
- Other Berries: Feel free to experiment with other berries, such as raspberries, blueberries, or blackberries, either in combination with strawberries or as a substitute.
- Lemon Zest: Add lemon zest to the cake batter or the whipped topping for a bright, citrusy twist.
- Almond Extract: Enhance the flavor by adding a few drops of almond extract to the cake batter.
- Strawberry Jam: If you don’t have frozen strawberries, you can use strawberry jam thinned with a little water as the puree.
- Angel Food Cake: For an even lighter dessert, use angel food cake as the base.
FAQs (Frequently Asked Questions)
Q: Can I use fresh strawberries for the puree?
A: Yes, you can use fresh strawberries for the puree. Just be sure to wash and hull them before pureeing. You might need to add a little sugar if the strawberries aren’t very sweet.
Q: How can I prevent the cake layers from sticking to the pan?
A: Be sure to grease and flour the cake pans thoroughly. You can also use parchment paper rounds in the bottom of the pans for extra insurance.
Q: Can I make this cake a day in advance?
A: Yes, you can assemble the cake a day in advance, but keep in mind that the whipped topping may soften over time. It’s best to add the fresh strawberry garnish just before serving.
Q: What if I don’t have two 9-inch cake pans?
A: You can bake the cake in one pan, but it will take longer to bake. Keep an eye on it and test for doneness with a toothpick. You can also bake the batter in multiple batches.
Q: My whipped topping is melting. What can I do?
A: Ensure your cake layers are completely cool before adding the whipped topping. You can also try using a stabilized whipped cream recipe.
Final Thoughts
This Strawberries and Cream Layer Cake is more than just a recipe; it’s a celebration of simple pleasures and shared moments. It’s the perfect centerpiece for a summer gathering, a delightful treat for a special occasion, or just a sweet way to brighten an ordinary day. Don’t be afraid to make it your own by experimenting with different variations and substitutions. Bake it, share it, and savor every delicious bite. Your summer, and everyone else’s, will be a little sweeter for it.