
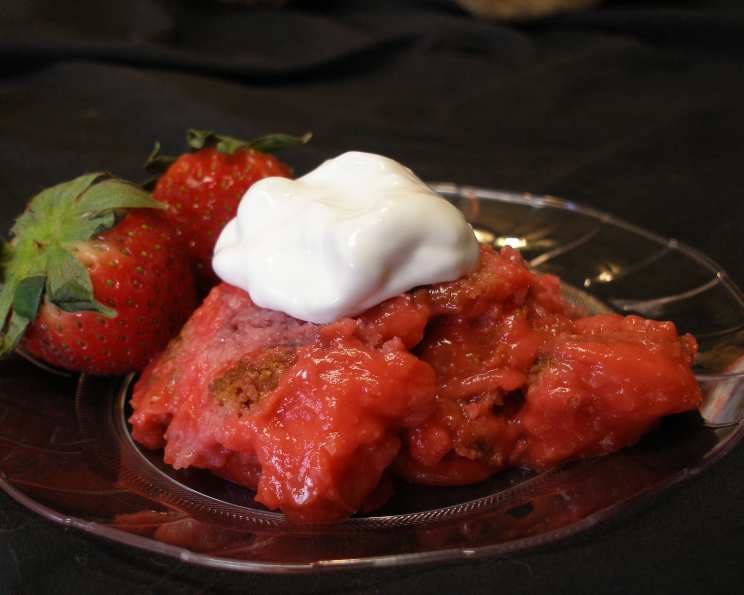
Strawberry Disaster Cake: A Delicious Redemption Story
My grandmother, bless her heart, wasn’t always the most graceful in the kitchen. I fondly recall one sweltering summer afternoon, helping her bake a strawberry cake for the church picnic. She was so eager to impress, she mistakenly used salt instead of sugar in the batter. The resulting cake was, to put it mildly, inedible. Yet, from that comical mishap stemmed a newfound family tradition of adding a pinch of salt to our strawberry desserts, a subtle reminder that even disasters can lead to delicious discoveries. This Strawberry Disaster Cake reminds me of that day, it’s beautiful precisely because of its imperfections!
Recipe Overview
- Prep Time: 30 minutes
- Cook Time: 60-65 minutes
- Total Time: 1 hour 35 minutes
- Servings: 24
- Yield: One 13″x9″ pan
- Dietary Type: Not specified
Ingredients
- 2 1/4 cups fresh strawberries, sliced
- 1/2 cup granulated sugar
- 1 (18 1/4 ounce) box strawberry cake mix
- 1 (3 ounce) package strawberry gelatin
- 2/3 cup vegetable oil
- 1 1/2 cups walnuts, chopped
- 4 eggs, at room temperature
- 2 tablespoons flour
- 2 cups fresh strawberries, sliced (optional)
- 5 (4 3/4 ounce) boxes strawberry-flavor danish dessert mix
- 10 cups cold water
- 1 (8 ounce) package cream cheese, softened (optional)
Equipment Needed
- 13″x9″ glass baking dish
- Large mixing bowl
- Electric beater
- Wire rack
- 15″x10″ baking dish
- Large saucepan
- Whisk
- Plastic wrap
Instructions
-
Begin by combining the 2 1/4 cups of sliced fresh strawberries and 1/2 cup of granulated sugar in a bowl. Gently mix them together and allow them to stand for 15 minutes. This process, called maceration, draws out the natural juices of the strawberries, creating a flavorful syrup that enhances the overall taste of the cake.
-
While the strawberries are macerating, preheat your oven to 350 degrees F (175 degrees C). Grease and flour a 13″x9″ glass baking dish thoroughly. This step prevents the cake from sticking and ensures easy removal after baking.
-
In a large mixing bowl, combine the strawberry and sugar mixture with the following ingredients: strawberry cake mix, strawberry gelatin, vegetable oil, chopped walnuts, eggs, and flour. Use an electric beater on medium-high speed for 3 minutes, or until everything is thoroughly blended. The batter should be smooth and well-combined.
-
Pour the prepared batter into the greased and floured baking dish, spreading it evenly to ensure uniform baking.
-
Bake in the preheated oven for 60-65 minutes. To check for doneness, insert a toothpick into the center of the cake. If it comes out clean or with just a few moist crumbs, the cake is ready. If not, continue baking for a few more minutes, checking periodically.
-
Once baked, remove the cake from the oven and place it on a wire rack to cool for 10 minutes before removing it completely from the baking pan. Allow the cake to cool COMPLETELY before proceeding to the next step. This is essential to prevent the cake from crumbling when broken into chunks.
-
Once cooled, break the cake into good-sized chunks (larger than bite-sized). Spread these chunks out in a 15″x10″ baking dish, making sure all the pieces are below the rim of the dish, but NOT FLAT. Embrace the “lumpy” aesthetic; it’s part of the charm!
-
If desired, spread the optional 2 cups of sliced fresh strawberries over the top of the cake pieces. This adds an extra layer of fresh strawberry flavor and visual appeal.
-
Now, prepare the Danish dessert topping. In a large saucepan, mix the strawberry-flavor danish dessert mix with the cold water. Bring the mixture to a full boil over medium-high heat, stirring constantly to prevent scorching. Once boiling, continue to boil for 1 minute, still stirring constantly.
-
If you’ve opted to use cream cheese, there are two methods for incorporating it. The first is to mix the softened cream cheese directly into the hot Danish dessert pudding in the saucepan. The second is to carefully pour the hot pudding mixture into a large mixing bowl. Then, using an electric mixer on low speed (or a large whisk), mix the pudding and cream cheese together until relatively smooth. Don’t worry if there are small specks of cheese throughout the pudding mixture; this adds a nice texture.
-
Pour the pudding over the cake and strawberries, being careful to completely cover all of the cake and all of the strawberries. Even though the chunks are covered, the result should be a lumpy, bumpy surface, not smooth!
-
To avoid a skin forming on the surface of the pudding, cover the entire surface of the pudding with plastic wrap, pressing it gently against the pudding. This creates an airtight seal that prevents condensation and keeps the pudding smooth.
-
Finally, let the cake cool completely at room temperature before refrigerating. Once cooled, refrigerate the cake for at least 2 hours, or until the pudding has set.
Expert Tips & Tricks
- For a more intense strawberry flavor, consider using freeze-dried strawberries in the cake mix. Simply crush them into a powder and add them to the dry ingredients.
- Toasting the walnuts before adding them to the batter enhances their flavor and adds a pleasant crunch.
- If you don’t have a 15″x10″ baking dish, you can use two smaller dishes.
- Be patient when letting the cake cool completely before breaking it into chunks. If it’s still warm, it will be more difficult to handle and may crumble excessively.
- The key to a successful Danish dessert topping is constant stirring while boiling. This prevents the mixture from scorching and ensures a smooth, creamy texture.
Serving & Storage Suggestions
Serve the Strawberry Disaster Cake chilled, straight from the refrigerator. Garnish with a sprig of fresh mint or a few extra slices of strawberries for an elegant presentation. Leftovers can be stored in an airtight container in the refrigerator for up to 3 days. Due to the pudding topping, freezing is not recommended, as it may affect the texture.
Nutritional Information
| Nutrient | Amount per Serving | % Daily Value |
|---|---|---|
| Calories | 149.9 kcal | N/A |
| Calories from Fat | N/A | N/A |
| Total Fat | 11.7 g | 18% |
| Saturated Fat | 1.5 g | 7% |
| Cholesterol | 35.2 mg | 11% |
| Sodium | 30.4 mg | 1% |
| Total Carbohydrate | 10 g | 3% |
| Dietary Fiber | 0.8 g | 3% |
| Sugars | 8.1 g | 32% |
| Protein | 2.6 g | 5% |
Variations & Substitutions
- Gluten-Free: Substitute the strawberry cake mix with a gluten-free strawberry cake mix. Ensure the gelatin and Danish dessert mix are also gluten-free.
- Berry Medley: Replace some of the strawberries with other berries like raspberries, blueberries, or blackberries for a more complex flavor.
- Nuts: If you’re not a fan of walnuts, try using pecans, almonds, or even macadamia nuts.
- Cream Cheese Alternative: For a lighter version, you can use Neufchâtel cheese instead of cream cheese.
- Pudding Flavor: Experiment with different flavors of Danish dessert mix, such as vanilla or raspberry, to complement the strawberry cake and fruit.
FAQs (Frequently Asked Questions)
Q: Why is it called “Disaster Cake”?
A: The name comes from the creator’s first attempt, where the cake fell apart. This led to the creation of the unique, deconstructed presentation that defines the recipe.
Q: Can I use frozen strawberries instead of fresh?
A: While fresh strawberries are preferred for their texture and flavor, frozen strawberries can be used in a pinch. Thaw them completely and drain off any excess liquid before using.
Q: How do I prevent the cake from sticking to the pan?
A: Make sure to grease and flour the baking dish thoroughly before pouring in the batter. You can also use baking spray with flour for extra insurance.
Q: Can I make this cake ahead of time?
A: Yes, this cake can be made a day ahead of time. Store it covered in the refrigerator until ready to serve.
Q: Is it necessary to use the cream cheese in the pudding?
A: No, the cream cheese is optional. It adds a richer flavor and creamier texture to the pudding, but the cake is still delicious without it.
Final Thoughts
This Strawberry Disaster Cake is more than just a dessert; it’s a testament to the fact that even culinary missteps can lead to unexpected and delightful creations. Don’t be afraid to embrace the “lumpy” aesthetic and enjoy the explosion of strawberry flavor. I encourage you to try this recipe and share your own “disaster” stories and adaptations. Perhaps a scoop of vanilla ice cream on the side or a glass of chilled rosé would be the perfect accompaniment? Happy baking!