
Strawberry Dream Cake: A Taste of Sunshine
My grandmother, bless her heart, wasn’t much of a baker. Her strengths lay in savory dishes – pot roast that could melt glaciers and gravy so rich it practically defied the laws of physics. But once a year, for my birthday, she’d attempt a strawberry cake. It was always a little lopsided, the frosting a tad too sweet, and the strawberries…well, they were definitely there. But oh, that cake! It was made with love, and that sugary, slightly flawed masterpiece tasted like pure joy and childhood summers. This Strawberry Dream Cake takes inspiration from those early memories, elevated with techniques for a perfect bake, but still infused with that nostalgic strawberry essence.
Recipe Overview
- Prep Time: 45 minutes
- Cook Time: 20-25 minutes
- Total Time: Approximately 3 hours (including cooling)
- Servings: 10
- Yield: 1 cake
- Dietary Type: Not specified
Ingredients
- 10 ounces frozen whole strawberries (2 cups)
- ¾ cup whole milk, room temperature
- 6 large egg whites, room temperature
- 2 teaspoons vanilla extract
- 2 ¼ cups cake flour
- 1 ¾ cups granulated sugar
- 4 teaspoons baking powder
- 1 teaspoon salt
- 12 tablespoons unsalted butter, cut into 12 pieces and softened
- 10 tablespoons unsalted butter, softened
- 2 ¼ cups confectioners’ sugar
- 12 ounces cream cheese, cut into 12 pieces and softened
- 1 pinch salt
- 8 ounces fresh strawberries, hulled and sliced thin (about 1 ½ cups)
Equipment Needed
- Two 9-inch round cake pans
- Parchment paper
- Fine-mesh strainer
- Small saucepan
- Mixing bowls
- Stand mixer (or electric hand mixer)
- Wire rack
- Rubber spatula
- Paper towels
Instructions
-
Prepare the Cake Pans: Position an oven rack in the middle of the oven and preheat to 350 degrees Fahrenheit (175 degrees Celsius). Grease two 9-inch round cake pans thoroughly. Cut circles of parchment paper to fit the bottoms of the pans, line the pans with parchment, grease the parchment paper, and then flour the entire interior of the pans, tapping out any excess flour. This ensures the cakes release cleanly.
-
Prepare the Strawberry Reduction: Transfer the frozen strawberries to a microwave-safe bowl, cover, and microwave until the strawberries are soft and have released their juice, about 5 minutes. Place a fine-mesh strainer over a small saucepan. Pour the cooked strawberries into the strainer and firmly press the fruit to extract as much juice as possible (you should get at least ¾ cup of juice); reserve the pressed strawberry solids. Bring the juice to a boil over medium-high heat, stirring occasionally, until it reduces to a syrupy ¼ cup, about 6 to 8 minutes. Watch it carefully to prevent burning. Whisk the whole milk into the reduced strawberry juice until well combined. Set aside.
-
Prepare the Wet Ingredients: In a separate bowl, whisk together the strawberry milk mixture, the egg whites, and the vanilla extract. Set aside.
-
Combine Dry Ingredients: Using a stand mixer fitted with the paddle attachment (or an electric hand mixer), mix the cake flour, granulated sugar, baking powder, and salt on low speed until thoroughly combined.
-
Incorporate Butter: Add the softened butter, one piece at a time, to the dry ingredients. Mix on low speed until the butter is incorporated and only pea-sized pieces remain, about 1 minute.
-
Add Wet Ingredients: Add half of the strawberry milk mixture to the butter and flour mixture. Increase the mixer speed to medium-high and beat until the batter is light and fluffy, about 1 minute. Reduce the speed to medium-low, add the remaining strawberry milk mixture, and beat until just incorporated, about 30 seconds. Give the batter a final stir by hand with a rubber spatula to ensure everything is evenly mixed and there are no hidden pockets of flour.
-
Bake the Cakes: Scrape equal amounts of batter into the prepared cake pans. Gently smooth the tops. Bake until a toothpick inserted into the center of each cake comes out clean, 20 to 25 minutes, rotating the pans halfway through baking to ensure even browning.
-
Cool the Cakes: Cool the cakes in the pans on a wire rack for 10 minutes. Then, carefully invert the cakes onto the wire rack, discard the parchment paper, and allow them to cool completely, about 2 hours. (Cooled cakes can be wrapped tightly with plastic wrap and stored at room temperature for up to 2 days).
-
Prepare the Frosting: Using a stand mixer fitted with the paddle attachment, mix the softened butter and confectioners’ sugar on low speed until combined, about 30 seconds. Increase the speed to medium-high and beat until the frosting is pale and fluffy, about 2 minutes.
-
Add Cream Cheese and Strawberry Solids: Add the softened cream cheese, one piece at a time, and beat until incorporated, about 1 minute. Add the reserved strawberry solids and a pinch of salt, and mix until just combined, about 30 seconds. Refrigerate the frosting until ready to use, up to 2 days. This will help it firm up slightly, making it easier to spread.
-
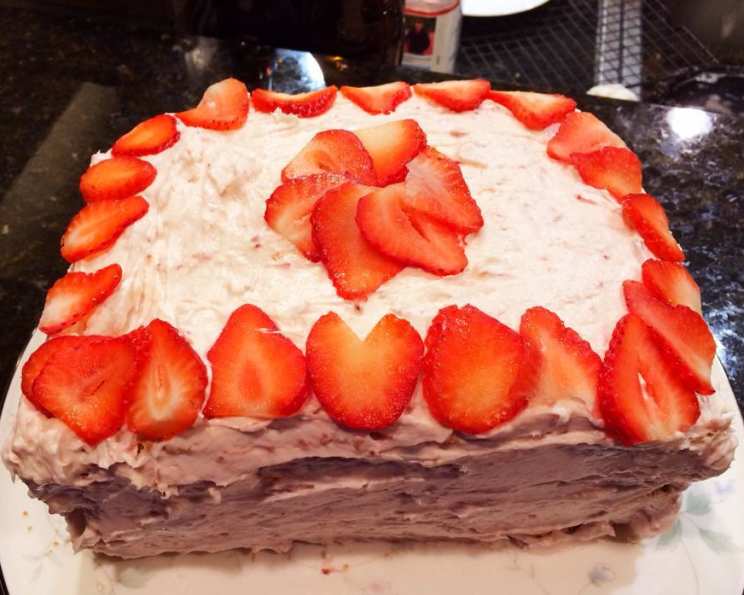
Assemble the Cake: Pat the fresh strawberries dry with paper towels. This will prevent the frosting from becoming watery. Once the cakes are completely cooled, spread ¾ cup of frosting evenly over one cake round. Press 1 cup of the sliced strawberries in an even layer over the frosting, and then cover the strawberries with an additional ¾ cup of frosting.
-
Final Layer: Top with the second cake round and spread the remaining frosting evenly over the top and sides of the cake.
-
Garnish and Serve: Garnish the cake with the remaining fresh strawberries. Serve immediately, or refrigerate until ready to serve. It’s best to bring the cake to room temperature before serving for optimal flavor and texture.
Expert Tips & Tricks
- Room Temperature Ingredients: Using room temperature ingredients, especially the butter, cream cheese, milk, and eggs, is crucial for a smooth, emulsified batter and a tender cake.
- Cake Flour is Key: Cake flour has a lower protein content than all-purpose flour, resulting in a more delicate and tender crumb. Don’t substitute unless absolutely necessary.
- Don’t Overmix: Overmixing the batter develops gluten, leading to a tough cake. Mix until just combined.
- Level Cakes: If your cakes have a slight dome, use a long serrated knife to carefully trim the tops to create even layers for frosting.
- Strawberry Infusion: For an even more intense strawberry flavor, consider brushing the cooled cake layers with a simple strawberry syrup made from reserved strawberry juice or a strawberry liqueur before frosting.
Serving & Storage Suggestions
This Strawberry Dream Cake is best served slightly chilled or at room temperature. It’s a perfect dessert for birthdays, celebrations, or simply a delightful treat on a warm day. To store leftovers, cover the cake tightly with plastic wrap or place it in an airtight container and refrigerate. It will keep for up to 2 days. Bring the cake to room temperature for about 30 minutes before serving for the best texture. Freezing is not recommended, as the frosting can become grainy.
Nutritional Information
| Nutrient | Amount per Serving | % Daily Value |
|---|---|---|
| Calories | 734.7 kcal | N/A |
| Calories from Fat | N/A | 47% |
| Total Fat | 38 g | 58% |
| Saturated Fat | 23 g | 115% |
| Cholesterol | 106.5 mg | 35% |
| Sodium | 549.2 mg | 22% |
| Total Carbohydrate | 93.3 g | 31% |
| Dietary Fiber | 1.6 g | 6% |
| Sugars | 66.1 g | 264% |
| Protein | 7.8 g | 15% |
Note: Nutritional information is an estimate and may vary based on specific ingredients and portion sizes.
Variations & Substitutions
- Gluten-Free Option: Substitute the cake flour with a high-quality gluten-free cake flour blend. Be sure to use a blend that contains xanthan gum for binding.
- Dairy-Free Version: Replace the whole milk with a plant-based milk alternative like almond or soy milk. Use a dairy-free butter alternative and cream cheese substitute for the frosting.
- Lemon Zest: Add the zest of one lemon to the cake batter for a brighter, more citrusy flavor.
- Seasonal Fruit: Substitute the fresh strawberries with other seasonal berries like raspberries, blueberries, or blackberries.
- Strawberry Jam: Use a layer of high-quality strawberry jam between the cake layers for an extra burst of strawberry flavor.
FAQs (Frequently Asked Questions)
Q: Can I use all-purpose flour instead of cake flour?
A: While you can, the cake will be denser and less tender. Cake flour is highly recommended for the best texture.
Q: Why do I need to reduce the strawberry juice?
A: Reducing the juice concentrates the strawberry flavor and prevents the cake from becoming soggy.
Q: Can I make the frosting ahead of time?
A: Yes, the frosting can be made up to 2 days in advance and stored in the refrigerator. Bring it to room temperature and rewhip before using.
Q: How do I prevent the strawberries from making the frosting watery?
A: Patting the strawberries dry with paper towels removes excess moisture and helps the frosting stay thick and creamy.
Q: My cake is browning too quickly. What should I do?
A: Tent the cake pans loosely with aluminum foil during the last few minutes of baking to prevent excessive browning.
Final Thoughts
This Strawberry Dream Cake is more than just a dessert; it’s a slice of summer, a memory waiting to be made. Don’t be intimidated by the steps – each one contributes to the final masterpiece. So, gather your ingredients, preheat your oven, and prepare to create a cake that will not only delight your taste buds but also warm your heart. Share your creation with loved ones, and let the sweet taste of strawberries and homemade goodness bring joy to your table. And don’t be afraid to experiment with variations to make it your own!