
Strawberry Dream Cake
The aroma of strawberries always transports me back to my grandmother’s kitchen. I remember standing on a stool, barely tall enough to see over the counter, eagerly anticipating the first bite of her strawberry shortcake. The sweet, juicy berries, nestled between layers of fluffy, homemade biscuits, were a summer staple. This Strawberry Dream Cake evokes that same sense of comforting nostalgia, with its vibrant strawberry flavor and cloud-like texture – it’s a taste of sunshine and happiness in every slice.
Recipe Overview
- Prep Time: 45 minutes
- Cook Time: 25 minutes
- Total Time: 2 hours 40 minutes (includes cooling time)
- Servings: 10
- Yield: 1 cake
- Dietary Type: Not Gluten-Free
Ingredients
- 10 ounces frozen whole strawberries (2 cups)
- ¾ cup whole milk, room temperature
- 6 large egg whites, room temperature
- 2 teaspoons vanilla extract
- 2 ¼ cups cake flour
- 1 ¾ cups granulated sugar
- 4 teaspoons baking powder
- 1 teaspoon salt
- 12 tablespoons unsalted butter, cut into 12 pieces and softened
- 10 tablespoons unsalted butter, softened
- 2 ¼ cups confectioners’ sugar
- 12 ounces cream cheese, cut into 12 pieces and softened
- 1 pinch salt
- 8 ounces fresh strawberries, hulled and sliced thin (about 1 ½ cups)
Equipment Needed
- Two 9-inch round cake pans
- Parchment paper
- Fine-mesh strainer
- Small saucepan
- Stand mixer
- Wire rack
Instructions
-
Preheat your oven to 350 degrees Fahrenheit (175 degrees Celsius). Adjust the oven rack to the middle position. Grease two 9-inch round cake pans thoroughly. Line the bottoms of the pans with parchment paper circles, then grease the parchment paper and flour the entire pan, tapping out any excess flour. This ensures the cakes release cleanly after baking.
-
Transfer the frozen strawberries to a bowl. Cover the bowl and microwave until the strawberries are soft and have released their juice, about 5 minutes. The goal is to extract as much strawberry flavor as possible.
-
Place a fine-mesh strainer over a small saucepan. Pour the cooked strawberries into the strainer. Firmly press the fruit to extract all the juice (you should have at least ¾ cup). Reserve the strawberry solids for later.
-
Bring the strawberry juice to a boil over medium-high heat. Cook, stirring occasionally, until the juice is syrupy and reduced to ¼ cup, about 6 to 8 minutes. This concentrated strawberry reduction intensifies the cake’s flavor.
-
Whisk the whole milk into the reduced strawberry juice until combined. This creates the strawberry milk that will be used in the cake batter.
-
In a separate bowl, whisk together the strawberry milk, egg whites, and vanilla extract. Set aside.
-
Using a stand mixer fitted with the paddle attachment, mix the cake flour, granulated sugar, baking powder, and salt on low speed until combined.
-
Add the softened butter, one piece at a time, and mix until only pea-size pieces remain, about 1 minute. Do not overmix at this stage; you want to maintain some texture.
-
Add half of the milk mixture to the flour and butter mixture. Increase the mixer speed to medium-high and beat until light and fluffy, about 1 minute. This incorporates air into the batter, creating a tender crumb.
-
Reduce the mixer speed to medium-low. Add the remaining milk mixture and beat until just incorporated, about 30 seconds. Avoid overmixing, as this can develop the gluten in the flour and result in a tough cake.
-
Give the batter a final stir by hand to ensure everything is evenly combined.
-
Scrape equal amounts of batter into the prepared cake pans.
-
Bake until a toothpick inserted in the center comes out clean, 20 to 25 minutes, rotating the pans halfway through baking to ensure even cooking.
-
Cool the cakes in the pans on a wire rack for 10 minutes. This allows the cakes to set slightly before removing them from the pans.
-
Remove the cakes from the pans, discarding the parchment paper. Cool completely on a wire rack, about 2 hours. Cooled cakes can be wrapped tightly in plastic wrap and stored at room temperature for up to 2 days.
-
While the cake is cooling, prepare the frosting. Using the stand mixer fitted with the paddle attachment, mix the softened butter and confectioners’ sugar on low speed until combined, about 30 seconds.
-
Increase the speed to medium-high and beat until pale and fluffy, about 2 minutes. This creates a smooth and airy buttercream frosting.
-
Add the softened cream cheese, one piece at a time, and beat until incorporated, about 1 minute. Be careful not to overmix, as this can cause the cream cheese to become runny.
-
Add the reserved strawberry solids and salt and mix until combined, about 30 seconds. This adds a burst of strawberry flavor and a beautiful pink hue to the frosting.
-
Refrigerate the frosting until ready to use, up to 2 days. This helps the frosting firm up and makes it easier to spread.
-
Pat the fresh strawberries dry with paper towels to remove any excess moisture.
-
When the cakes are completely cooled, it’s time to assemble. Spread ¾ cup of frosting over one cake round.
-
Press 1 cup of sliced strawberries in an even layer over the frosting.
-
Cover the strawberries with an additional ¾ cup of frosting.
-
Top with the second cake round.
-
Spread the remaining frosting evenly over the top and sides of the cake.
-
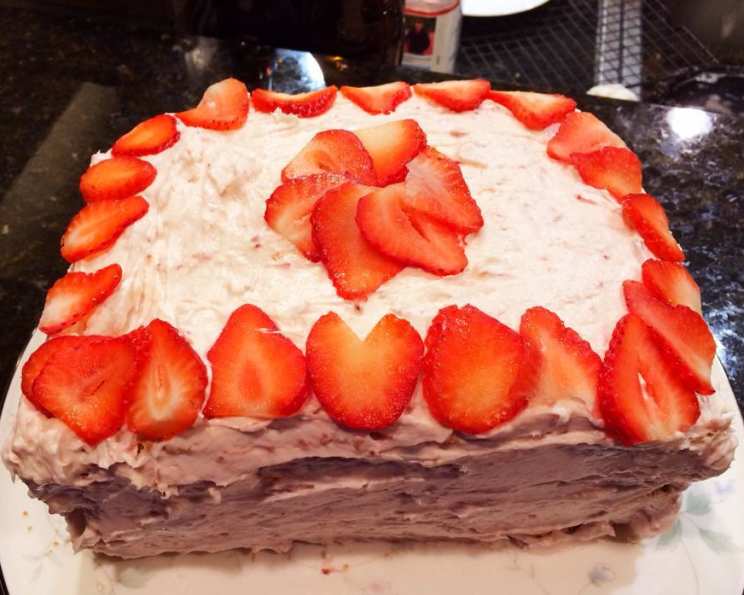
Garnish with the remaining sliced strawberries.
-
Serve. The cake can be refrigerated for 2 days. Bring to room temperature before serving for the best flavor and texture.
Expert Tips & Tricks
- Room temperature ingredients are key for a smooth batter and even baking. Ensure your butter, milk, and eggs are at room temperature before starting.
- Don’t skip the step of reducing the strawberry juice. It intensifies the flavor significantly.
- For an extra burst of strawberry flavor, consider adding a tablespoon of strawberry liqueur to the frosting.
- If your frosting becomes too soft, add a tablespoon of confectioners’ sugar at a time until it reaches the desired consistency.
- To prevent the cake from sticking, ensure the pans are well-greased and floured, even with the parchment paper lining.
Serving & Storage Suggestions
Serve the Strawberry Dream Cake chilled or at room temperature. It’s a perfect dessert for birthdays, celebrations, or simply a sweet treat on a warm day.
To store leftovers, cover the cake tightly with plastic wrap or place it in an airtight container. It will keep in the refrigerator for up to 2 days. For longer storage, you can freeze individual slices for up to a month. Thaw in the refrigerator before serving. The cake is best served at room temperature to allow the flavors to fully develop.
Nutritional Information
| Nutrient | Amount per Serving | % Daily Value |
|---|---|---|
| Calories | 734.7 kcal | N/A |
| Calories from Fat | N/A | 47% |
| Total Fat | 38 g | 58% |
| Saturated Fat | 23 g | 115% |
| Cholesterol | 106.5 mg | 35% |
| Sodium | 549.2 mg | 22% |
| Total Carbohydrate | 93.3 g | 31% |
| Dietary Fiber | 1.6 g | 6% |
| Sugars | 66.1 g | 264% |
| Protein | 7.8 g | 15% |
Variations & Substitutions
- Gluten-Free: Substitute the cake flour with a gluten-free all-purpose flour blend. Be sure to check that your baking powder is also gluten-free.
- Dairy-Free: Use a dairy-free butter substitute and a dairy-free cream cheese alternative. Almond milk or oat milk can be used in place of whole milk.
- Different Berries: While this is a Strawberry Dream Cake, feel free to experiment with other berries like raspberries, blueberries, or a mixed berry combination. Adjust the fruit puree and fresh berries accordingly.
- Lemon Zest: Add a teaspoon of lemon zest to the cake batter for a bright, citrusy note that complements the strawberry flavor beautifully.
FAQs (Frequently Asked Questions)
Q: Can I use frozen strawberries for the fresh strawberry slices?
A: While fresh strawberries are preferred for their texture and appearance, you can use frozen strawberries if necessary. Be sure to thaw them completely and pat them dry before using.
Q: Why is cake flour important for this recipe?
A: Cake flour has a lower protein content than all-purpose flour, resulting in a more tender and delicate crumb. It is crucial for achieving the light and airy texture of the cake.
Q: Can I make the cake layers ahead of time?
A: Yes, the cooled cake layers can be wrapped tightly in plastic wrap and stored at room temperature for up to 2 days or frozen for up to a month.
Q: My frosting is too soft. How can I fix it?
A: Refrigerate the frosting for 30 minutes to an hour to firm it up. If it’s still too soft, add a tablespoon of confectioners’ sugar at a time until it reaches the desired consistency.
Q: How do I prevent the cake from sticking to the pan?
A: Thoroughly grease and flour the cake pans, even when using parchment paper liners. This ensures the cake releases cleanly after baking.
Final Thoughts
This Strawberry Dream Cake is more than just a dessert; it’s an experience. The delicate, strawberry-infused cake layers, the creamy, tangy frosting, and the bursts of fresh strawberry flavor create a symphony of textures and tastes that will leave you wanting more. Gather your ingredients, preheat your oven, and embark on a baking adventure. I encourage you to try this recipe, make it your own, and share your creations with loved ones. Don’t forget to leave a comment and let me know how it turned out!