
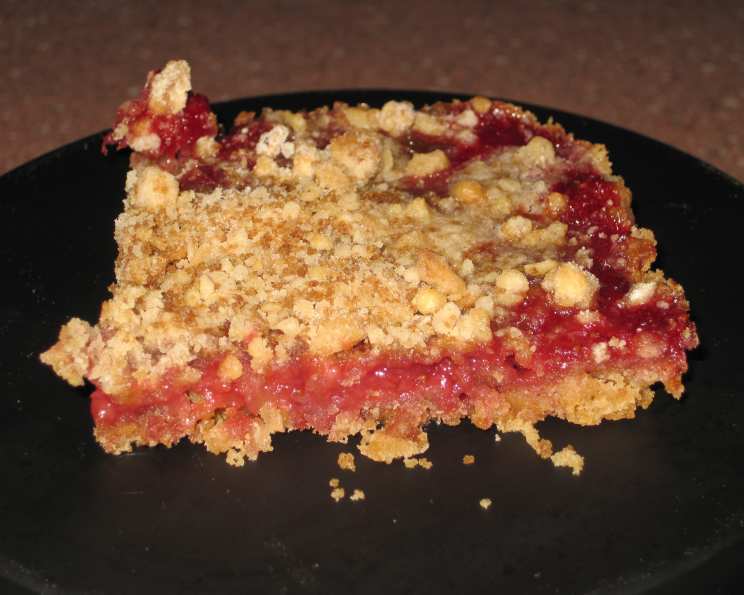
Strawberry Granola Squares: A Taste of Sunshine in Every Bite
My grandmother, bless her heart, wasn’t much of a baker, but she had one recipe that everyone adored: her “Strawberry Surprise Bars,” as she called them. I remember standing on a stool next to her, carefully pressing the granola mixture into the pan, the sweet scent of strawberries already filling the kitchen. Those bars, slightly crumbly and bursting with summer flavor, were pure joy. While this recipe might be a bit more refined than Grandma’s, it captures the same spirit of simple goodness and the irresistible combination of crunchy granola and sweet strawberries.
Recipe Overview
- Prep Time: 20 minutes
- Cook Time: 25 minutes
- Total Time: 45 minutes
- Servings: Varies, approximately 16 squares
- Yields: 9-inch square pan
- Dietary Type: Vegetarian (easily adaptable to Vegan and Gluten-Free)
Ingredients
- 1 1⁄2 cups granola cereal, without raisins
- 3⁄4 cup all-purpose flour (see variations for gluten-free option)
- 1⁄3 cup packed brown sugar
- 1⁄2 teaspoon ground cinnamon
- 5 tablespoons cold butter, cut into small pieces (or vegan butter substitute)
- 1 cup strawberry preserves (high-quality recommended)
Equipment Needed
- 9-inch square baking dish
- Large mixing bowl
- Measuring cups and spoons
- Pastry blender or fork (optional)
- Wire rack
Instructions
- Preheat your oven to 375°F (190°C). Grease a 9-inch square baking dish thoroughly to prevent sticking.
- In a large bowl, combine the granola, flour, brown sugar, and cinnamon. Whisk together to evenly distribute the cinnamon and break up any clumps in the brown sugar.
- Cut in the cold butter using a pastry blender or your fingertips. The mixture should resemble coarse crumbs. The colder the butter, the better the texture will be, so work quickly.
- Set aside approximately one-third of the granola mixture for the topping. This will create a delightful crunchy layer on top of the strawberry filling.
- Press the remaining two-thirds of the granola mixture firmly and evenly into the prepared baking dish. Ensure the crust is compact to prevent it from crumbling too much.
- Bake the crust for 10 minutes. This par-baking helps the crust set and creates a stable base for the preserves. Keep a close eye on it; you want it lightly golden, not browned.
- Remove the crust from the oven and spread the strawberry preserves evenly over the baked crust. Use a good-quality preserve for the best flavor; look for one with large pieces of fruit.
- Sprinkle the reserved granola mixture evenly over the strawberry preserves. Don’t pack it down; you want it to remain crumbly for a pleasant textural contrast.
- Return the baking dish to the oven and bake for an additional 15 minutes, or until the filling is bubbly around the edges and the topping is golden brown. The exact baking time may vary depending on your oven.
- Let the squares cool completely on a wire rack before cutting into squares. This allows the preserves to set properly and prevents the bars from falling apart. Chilling them in the refrigerator for an hour or two before cutting can also help.
- Cut into squares of your desired size. Store in the refrigerator.
Expert Tips & Tricks
- Cold Butter is Key: Using cold butter is crucial for creating a crumbly texture. If your butter softens too much, pop it back in the freezer for a few minutes.
- Pulse in a Food Processor: If you prefer a finer texture for the crust, pulse the granola and flour mixture in a food processor before adding the butter. Be careful not to over-process; you still want some texture.
- Prevent Sticky Mess: Line the baking dish with parchment paper, leaving an overhang on two sides. This makes it incredibly easy to lift the bars out after baking and avoids a sticky mess.
- Toast the Granola: For a deeper, nuttier flavor, lightly toast the granola in a dry skillet over medium heat before adding it to the recipe. Watch it carefully, as it can burn quickly.
- Don’t Overbake: Overbaking will result in a dry, crumbly crust. Remove the bars from the oven as soon as the filling is bubbly and the topping is golden brown.
- Crisp topping: If the topping starts to brown too quickly, tent the baking dish loosely with foil for the last few minutes of baking.
Serving & Storage Suggestions
These Strawberry Granola Squares are delicious served at room temperature or slightly chilled. They make a delightful addition to a brunch spread, a perfect afternoon snack, or a simple dessert.
- Serving: Dust the squares with powdered sugar for an elegant presentation. Serve with a dollop of whipped cream or a scoop of vanilla ice cream for an extra-special treat.
- Storage: Store leftover squares in an airtight container in the refrigerator for up to 5 days.
- Freezing: For longer storage, freeze the squares in a single layer on a baking sheet. Once frozen, transfer them to an airtight container or freezer bag. They can be frozen for up to 2 months. Thaw overnight in the refrigerator before serving.
- Reheating: While they are best served cold or at room temperature, you can gently warm the squares in a low oven (200°F/95°C) for a few minutes if desired.
Nutritional Information
Please note that these values are estimates and may vary depending on specific ingredients and portion sizes.
| Nutrient | Amount per Serving | % Daily Value |
|---|---|---|
| Calories | 210 kcal | 11% |
| Total Fat | 8g | 10% |
| Saturated Fat | 4g | 20% |
| Cholesterol | 15mg | 5% |
| Sodium | 50mg | 2% |
| Total Carbohydrate | 32g | 12% |
| Dietary Fiber | 2g | 7% |
| Sugars | 18g | N/A |
| Protein | 3g | 6% |
Variations & Substitutions
- Gluten-Free: Substitute the all-purpose flour with a gluten-free all-purpose blend. Ensure the granola is also gluten-free.
- Vegan: Use vegan butter substitute instead of butter. Check that your granola and preserves are vegan-friendly.
- Other Preserves: Feel free to experiment with other fruit preserves, such as raspberry, blueberry, or apricot. Each will impart a unique flavor to the squares.
- Nutty Twist: Add chopped nuts, such as almonds, walnuts, or pecans, to the granola mixture for added crunch and flavor.
- Citrus Zest: A teaspoon of lemon or orange zest added to the granola mixture will brighten the flavor of the squares.
- Chocolate Chips: Mix in some mini chocolate chips with the granola topping for a decadent treat.
- Spice it up: Add a pinch of ground ginger or nutmeg to the crust for a warm, comforting flavor.
FAQs (Frequently Asked Questions)
Q: Can I use a different size pan?
A: Yes, you can use an 8-inch square pan, but the squares will be slightly thicker and may require a few extra minutes of baking time. Adjust baking time as needed.
Q: My crust is too crumbly. What did I do wrong?
A: This is likely because the butter was not cold enough, or you didn’t press the crust firmly enough into the pan. Next time, ensure the butter is very cold, and use the bottom of a measuring cup to press the crust into a compact layer.
Q: Can I make these ahead of time?
A: Absolutely! These squares are perfect for making ahead of time. They can be stored in the refrigerator for up to 5 days.
Q: My preserves are too runny. What can I do?
A: If your preserves are very runny, you can simmer them in a saucepan over low heat for a few minutes to thicken them slightly before spreading them over the crust.
Q: Can I use homemade granola?
A: Yes, homemade granola will work perfectly in this recipe. Just be sure it doesn’t contain raisins, as the recipe calls for granola without raisins.
Final Thoughts
These Strawberry Granola Squares are more than just a recipe; they are a slice of sunshine, a comforting reminder of simple pleasures. Whether you’re a seasoned baker or just starting out, I encourage you to give this recipe a try. It’s easy to make, endlessly adaptable, and guaranteed to bring a smile to your face with every bite. Share them with friends and family, and don’t hesitate to experiment with different flavors and variations to create your own signature granola squares. I would love to hear about your creations and any variations you try. Happy baking!