
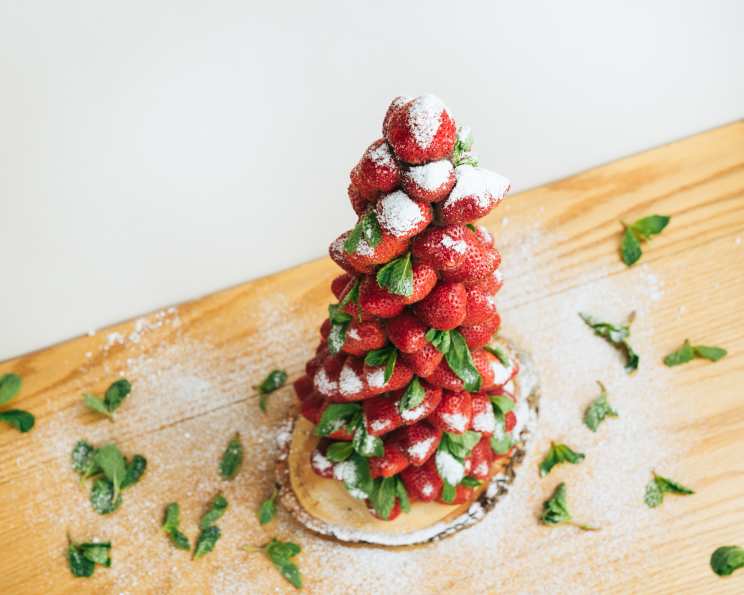
Strawberry Holiday Tree: A Festive Dessert Masterpiece
The scent of melting chocolate always takes me back to Christmases past, huddled in the kitchen with my grandmother, attempting (and often failing) to dip perfect chocolate-covered strawberries. Her hands, weathered but steady, guided mine as we navigated the sticky mess, giggling at our chocolate-smeared faces. Though our creations were never quite as polished as the ones in magazines, they were always made with love, and that’s what truly mattered. This Strawberry Holiday Tree, while slightly more ambitious than our simple dipped berries, evokes that same spirit of joy, togetherness, and delicious imperfection.
Recipe Overview
- Prep Time: 30 minutes
- Cook Time: 5 minutes
- Total Time: 40 minutes
- Servings: 15
- Yield: 1 tree
- Dietary Type: Vegetarian
Ingredients
- 12 ounces semi-sweet chocolate chips
- 2 teaspoons coconut oil
- 3 1/2 – 4 lbs strawberries, stems removed and berries well dried
- 25 -30 mint sprigs from 2 bunches of fresh mint
- 1/2 cup confectioners’ sugar
Equipment Needed
- 12×4-inch (or larger) Styrofoam cone
- Parchment paper
- Toothpicks
- Festive serving platter
- Medium bowl
- Double boiler or heatproof bowl
- Sifter
Instructions
- First, prepare the base. Wrap the Styrofoam cone completely with parchment paper, using toothpicks to hold the parchment in place. This is crucial to prevent the strawberries from directly contacting the Styrofoam.
- Place the prepared cone on the center of a festive serving platter. This will be your presentation stage, so choose one you love.
- In a medium bowl, combine the semi-sweet chocolate chips and coconut oil. Melt the chocolate using a double boiler or a heatproof bowl set over a pot of barely simmering water. Ensure the bottom of the bowl doesn’t touch the water.
- Heat the chocolate, stirring occasionally, until it is completely melted and smooth. Remove the bowl from the heat. The coconut oil helps to keep the chocolate glossy and prevents it from seizing up.
- Now, the fun begins! Working one at a time and starting with the largest strawberries at the bottom, dip the cut stem side of each strawberry into the melted chocolate.
- Immediately place the chocolate-dipped strawberry onto the parchment-wrapped cone. Press gently but firmly so the chocolate adheres to the parchment.
- Repeat the dipping and placing process, arranging the strawberries in rows and stacking them on top of each other to reach the top of the tree. Vary the sizes of the strawberries to create a more natural, conical shape.
- Once all the strawberries are placed on the cone, arrange the mint sprigs in the spaces between the berries. This adds a fresh, festive touch and a lovely aroma. Don’t be afraid to get creative with the arrangement – let the mint sprigs peek out and create a whimsical feel.
- Finally, place the confectioners’ sugar in a sifter and gently tap it around the tree to dust the strawberries with sugar. This creates a snowy effect, enhancing the holiday spirit.
Expert Tips & Tricks
- Strawberry Selection: Choose firm, ripe strawberries of varying sizes for the best visual effect. Ensure they are thoroughly dried after washing, as excess moisture can prevent the chocolate from adhering properly.
- Chocolate Tempering (Optional): For a truly professional finish, consider tempering your chocolate. This will give it a glossy sheen and prevent it from blooming (developing white streaks). While not strictly necessary for this recipe, it elevates the presentation.
- Cone Stability: Make sure your Styrofoam cone is stable on the serving platter. You might consider adding a small amount of melted chocolate to the bottom of the cone to secure it to the platter.
- Mint Prep: Before arranging the mint sprigs, gently wash and thoroughly dry them. This will ensure they stay fresh and vibrant on your tree.
- Sugar Dusting Technique: Hold the sifter a bit higher above the tree for a lighter, more even dusting of confectioners’ sugar.
- Preventing Chocolate Seizing: If your chocolate starts to seize (become thick and grainy), try adding a teaspoon of hot water or more coconut oil and stirring vigorously until smooth again.
- Make Ahead: The cone can be wrapped with parchment paper a day in advance. Also, the strawberries can be washed and dried ahead of time. However, the tree itself is best assembled shortly before serving to maintain the freshness of the berries and mint.
- Toothpick Alternative: If you are concerned about using toothpicks, edible glue dots can be used to secure the parchment paper to the cone.
Serving & Storage Suggestions
Serve the Strawberry Holiday Tree immediately after assembly for the best flavor and presentation. It’s a stunning centerpiece for a holiday dessert table.
Due to the fresh strawberries and chocolate, this dessert is best consumed within a few hours of assembly. If you have any leftovers, carefully wrap the tree in plastic wrap and store it in the refrigerator. However, the strawberries may become slightly soft, and the chocolate may bloom. It is not recommended to freeze this dessert.
Nutritional Information
| Nutrient | Amount per Serving | % Daily Value |
|---|---|---|
| Calories | 163.8 kcal | N/A |
| Calories from Fat | N/A | 42% |
| Total Fat | 7.7 g | 11% |
| Saturated Fat | 4.6 g | 22% |
| Cholesterol | 0 mg | 0% |
| Sodium | 3.6 mg | 0% |
| Total Carbohydrate | 26.7 g | 8% |
| Dietary Fiber | 3.5 g | 13% |
| Sugars | 21.5 g | 85% |
| Protein | 1.7 g | 3% |
Note: Nutritional information is an estimate and may vary based on specific ingredients and portion sizes.
Variations & Substitutions
- Different Chocolate: Experiment with different types of chocolate, such as dark chocolate, milk chocolate, or white chocolate. For a festive touch, use colored candy melts to create a vibrant, multicolored tree.
- Fruit Variations: While strawberries are the classic choice, you could also use other fruits, such as raspberries, blueberries, or blackberries, either alone or in combination.
- Vegan Option: Use vegan chocolate chips and ensure the confectioners’ sugar is vegan-friendly (some brands use bone char in the refining process).
- Nutty Additions: Sprinkle chopped nuts, such as almonds, pecans, or walnuts, over the chocolate-dipped strawberries for added flavor and texture.
- Citrus Zest: Add a touch of citrus zest (orange, lemon, or lime) to the melted chocolate for a bright, aromatic twist.
- Caramel Drizzle: Drizzle caramel sauce over the finished tree for an extra layer of sweetness and indulgence.
- Edible Glitter: Gently sprinkle edible glitter over the tree for a dazzling, festive effect.
FAQs (Frequently Asked Questions)
Q: Can I use frozen strawberries?
A: It’s not recommended. Frozen strawberries contain more moisture and may not adhere well to the chocolate, resulting in a soggy tree. Fresh, dry strawberries are the best choice.
Q: How do I prevent the strawberries from sliding off the cone?
A: Ensure the parchment paper is securely attached to the cone and that the chocolate is at a good consistency for adhesion – not too runny. Also, use the larger strawberries at the base for better stability.
Q: Can I make this tree a day in advance?
A: It’s best to assemble the tree shortly before serving to ensure the strawberries and mint stay fresh. However, you can prep the cone and wash the strawberries ahead of time.
Q: What if I don’t have a double boiler?
A: You can create a makeshift double boiler by placing a heatproof bowl over a pot of simmering water. Ensure the bottom of the bowl doesn’t touch the water.
Q: How do I store leftover strawberries?
A: Carefully wrap the tree in plastic wrap and store it in the refrigerator. Keep in mind that the strawberries may become softer, and the chocolate may bloom. They are best enjoyed within a day or two.
Final Thoughts
This Strawberry Holiday Tree is more than just a dessert; it’s a centerpiece, a conversation starter, and a symbol of festive joy. Gather your loved ones, put on some holiday music, and create this edible masterpiece together. Don’t be afraid to get creative, experiment with different flavors and decorations, and most importantly, have fun! I can’t wait to hear about your creations and the memories you make while crafting this delicious and visually stunning holiday treat. Share your photos and feedback, and happy holidays!