
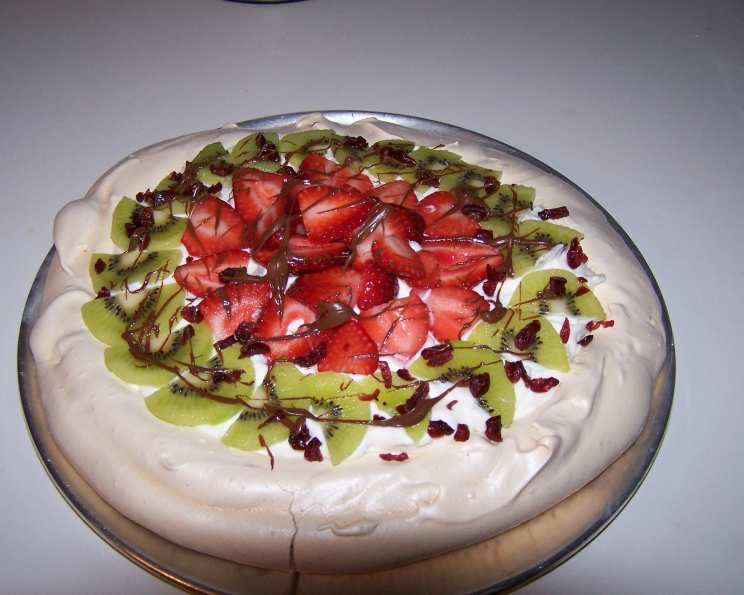
Strawberry Kiwi Pavlova: A Burst of Summer on a Cloud
I still remember the first time I tasted a pavlova. It was at a summer garden party, the sun was setting, and the air was filled with the scent of roses and freshly cut grass. This ethereal dessert, with its crisp meringue shell, pillowy cream, and vibrant fruit topping, felt like a taste of pure joy. The combination of textures and flavors – the sweet meringue, the tangy fruit, and the rich cream – was simply divine. I’ve been hooked ever since, and this Strawberry Kiwi Pavlova is my own spin on the classic, perfect for bringing a little sunshine to any occasion.
Recipe Overview
- Prep Time: 30 minutes
- Cook Time: 1 hour 30 minutes
- Total Time: 2 hours (plus cooling time)
- Servings: 8
- Yield: 1 pavlova
- Dietary Type: Gluten-Free
Ingredients
Meringue:
- 3 egg whites, room temperature
- 1 pinch cream of tartar
- ¾ cup granulated sugar
- 1 teaspoon pure vanilla extract
Cream Filling:
- ½ cup marshmallow creme
- ½ cup creme fraiche
- 1 cup whipping cream
Toppings:
- 1 kiwi fruit, peeled & sliced thinly
- 1 cup sliced strawberries
- 2 tablespoons dried cranberries, minced
- 2 tablespoons Nutella
Equipment Needed
- Stand mixer or hand mixer
- Baking sheet
- Parchment paper or aluminum foil
- Spatula
- Serving platter
Instructions
-
Preheat your oven to a low 275°F (135°C). This low and slow bake is key to achieving that perfect meringue texture.
-
In a clean, grease-free bowl, begin to beat the egg whites with the cream of tartar. The cream of tartar helps to stabilize the egg whites and create a firmer meringue. Continue beating until soft peaks form. This means the peaks will curl slightly at the tips.
-
Gradually add the granulated sugar, about 1 tablespoon at a time, while continuing to beat the egg whites. Make sure each addition of sugar is fully incorporated before adding the next. This prevents a grainy meringue. Continue beating until stiff, glossy peaks form. The peaks should stand straight up when the beaters are lifted.
-
Beat in the vanilla extract. This adds a lovely aroma and enhances the sweetness of the meringue.
-
Line a baking sheet with parchment paper or aluminum foil. This will prevent the meringue from sticking.
-
Spread the meringue onto the prepared baking sheet in a 10-inch circle. Use a spatula to create a well in the center, pushing up the edges slightly. This well will hold the cream filling and toppings.
-
Bake the meringue for 1 ½ hours, or until it is firm to the touch. The surface should be dry and slightly cracked.
-
Turn off the oven and leave the meringue inside to dry completely. This can take several hours or even overnight. This step is crucial for achieving a crisp, dry meringue. Do not open the oven door during this time.
-
Once the meringue is completely cool and dry, carefully remove it from the oven and transfer it to a serving platter.
-
While the meringue is cooling (or after it has cooled), prepare the cream filling. In a separate bowl, combine the marshmallow creme and creme fraiche. Mix well until smooth and fully combined.
-
In another bowl, whip the whipping cream until stiff peaks form. Be careful not to overwhip, or the cream will become grainy.
-
Gently fold the whipped cream into the marshmallow creme mixture. Be careful not to deflate the whipped cream. The goal is to create a light and airy filling.
-
Spread the cream filling evenly over the cooled meringue, filling the well in the center.
-
Decoratively arrange the sliced kiwi and strawberries on top of the cream filling. Get creative with your arrangement!
-
Drizzle the Nutella over the fruit and cream.
-
Sprinkle the minced dried cranberries over the top.
Expert Tips & Tricks
- Room Temperature Egg Whites: Using room temperature egg whites is essential for achieving maximum volume when whipping the meringue. Allow the eggs to sit at room temperature for at least 30 minutes before using.
- Grease-Free Bowl: Ensure your mixing bowl and beaters are completely clean and free of any grease. Even a small amount of grease can prevent the egg whites from whipping properly.
- Don’t Overbake: Be careful not to overbake the meringue, as this can cause it to become too dry and brittle.
- Patience is Key: The key to a perfect pavlova is patience. Allow the meringue to cool completely in the oven to ensure a crisp exterior and soft interior.
- Make Ahead: The meringue can be made a day or two in advance and stored in an airtight container at room temperature. Assemble the pavlova just before serving to prevent the meringue from becoming soggy.
- Crème Fraiche Substitute: If you can’t find crème fraiche, you can substitute it with sour cream. Just make sure to drain any excess liquid before using it.
Serving & Storage Suggestions
Serve the Strawberry Kiwi Pavlova immediately after assembling for the best texture. The meringue tends to soften over time as it absorbs moisture from the cream and fruit.
If you have leftovers, store them in the refrigerator in an airtight container. The meringue will soften, but the pavlova will still be delicious. It’s best to consume it within 1-2 days.
Do not freeze the pavlova, as the meringue will become soggy and the cream will separate.
Nutritional Information
| Nutrient | Amount per Serving | % Daily Value |
|---|---|---|
| Calories | 317 kcal | – |
| Calories from Fat | 162 | – |
| Total Fat | 18.1 g | 27% |
| Saturated Fat | 11.6 g | 58% |
| Cholesterol | 61.1 mg | 20% |
| Sodium | 51.5 mg | 2% |
| Total Carbohydrate | 37.1 g | 12% |
| Dietary Fiber | 0.9 g | 3% |
| Sugars | 29.8 g | – |
| Protein | 2.9 g | 5% |
Note: Nutritional information is an estimate and may vary based on specific ingredients and portion sizes.
Variations & Substitutions
- Berry Blast: Substitute the kiwi with other berries like raspberries, blueberries, or blackberries for a different flavor profile.
- Tropical Twist: Use mango, pineapple, and passion fruit for a tropical pavlova.
- Chocolate Lover’s Pavlova: Fold cocoa powder into the meringue batter for a chocolate-flavored meringue. Drizzle with melted dark chocolate instead of Nutella.
- Lemon Curd Pavlova: Use lemon curd instead of marshmallow crème mixture for a tangy and refreshing twist.
- Nutty Pavlova: Sprinkle chopped nuts, such as almonds, pecans, or walnuts, over the fruit topping for added crunch and flavor.
FAQs (Frequently Asked Questions)
Q: Why is my meringue cracking?
A: Cracking is normal for pavlovas! It’s usually caused by temperature fluctuations in the oven. The most important thing is that the meringue is cooked through, even if it has cracks.
Q: Can I make the meringue ahead of time?
A: Absolutely! The meringue can be made a day or two in advance and stored in an airtight container at room temperature.
Q: Why is my meringue soft and chewy instead of crisp?
A: This is usually caused by humidity or not drying the meringue long enough in the oven after baking. Make sure to leave the meringue in the turned-off oven until it’s completely cool.
Q: Can I use a hand mixer instead of a stand mixer?
A: Yes, you can use a hand mixer. Just be sure to beat the egg whites for a longer time to achieve stiff peaks.
Q: Can I use a different type of sugar?
A: Granulated sugar is the best choice for pavlova. Other types of sugar may not dissolve properly and can affect the texture of the meringue.
Final Thoughts
This Strawberry Kiwi Pavlova is more than just a dessert; it’s a celebration of flavors and textures. The light and airy meringue, the creamy filling, and the burst of fresh fruit create a symphony of deliciousness that will impress your guests and leave them wanting more. Don’t be intimidated by the seemingly complex process – with a few simple steps and a little patience, you can create a truly stunning and unforgettable dessert. I encourage you to try this recipe and make it your own. Feel free to experiment with different fruit combinations and toppings. And most importantly, enjoy the process and savor every bite! Pair this beautiful pavlova with a glass of chilled Prosecco or a light dessert wine for the perfect finishing touch to your meal. Happy baking!