
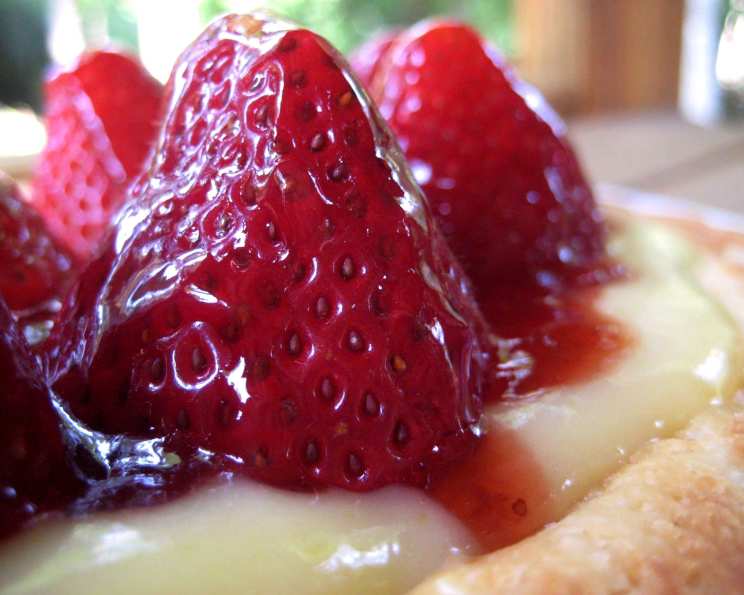
Strawberry Lemon Curd Tart: A Symphony of Sweet and Tart
There’s something truly magical about the first bite of a Strawberry Lemon Curd Tart. I remember the first time I tasted one – a warm summer afternoon, a county fair, and the bright, almost aggressively cheerful yellow of the lemon curd peeking out from under a crown of glistening red strawberries. The buttery, crumbly crust gave way with a satisfying snap, followed by the tangy burst of lemon and the sweet succulence of the berries. It was sunshine on a plate, pure and simple, and it ignited my passion for pastry. This tart captures that same joyful essence.
Recipe Overview
- Prep Time: 1 hour 30 minutes
- Cook Time: 20 minutes
- Total Time: 3 hours
- Servings: 10
- Yield: 1 tart
- Dietary Type: Not specified
Ingredients
For the Curd:
- 2 large eggs
- ½ cup sugar
- 3 tablespoons fresh lemon juice
- ¼ cup unsalted butter
- 1 ½ teaspoons grated lemon rind
For the Crust:
- 1 ½ cups flour
- 3 tablespoons sugar
- ¼ teaspoon salt
- ½ cup unsalted butter, chilled, cut into ½ inch cubes
- 2 tablespoons chilled whipping cream (or more)
- 1 large egg yolk
For the Tart:
- 1 ½ quarts fresh strawberries, stem end of each cut flat
- ½ cup strawberry jam
Equipment Needed
- Food processor
- 9-inch diameter tart pan with removable bottom
- Small saucepan
- Small bowl
- Plastic wrap
- Rolling pin
- Fork
Instructions
- Prepare the Lemon Curd: In a heavy, small saucepan, whisk together the eggs, sugar, and lemon juice until well blended.
- Add Butter and Zest: Add the butter and lemon rind to the saucepan.
- Cook the Curd: Stir the mixture over medium heat until the curd thickens to a pudding-like consistency. This should take approximately 8 minutes. Be patient and stir constantly to prevent scorching. The curd is ready when it coats the back of a spoon and a line drawn through it with your finger holds its shape.
- Chill the Curd: Transfer the lemon curd to a small bowl. Press plastic wrap directly onto the surface of the curd to prevent a skin from forming. Chill the curd in the refrigerator for at least 2 hours, or preferably longer.
- Make the Tart Crust: In a food processor, combine the flour, sugar, and salt. Blend for about 5 seconds to combine the dry ingredients.
- Incorporate the Butter: Add the chilled butter cubes to the food processor. Using on/off turns, blend the mixture until it resembles coarse meal. This ensures the butter remains cold and creates a flaky crust.
- Add Wet Ingredients: Add 2 tablespoons of chilled whipping cream and the egg yolk. Blend until moist clumps begin to form. If the dough appears too dry, add more cream, one teaspoon at a time, until it just comes together. Be careful not to overmix, as this will result in a tough crust.
- Chill the Dough: Gather the dough into a ball and flatten it into a disk. Wrap the disk tightly in plastic wrap and chill in the refrigerator for at least 1 hour. This allows the gluten to relax, resulting in a more tender crust.
- Roll Out the Dough: On a lightly floured surface, roll out the chilled dough into a 13-inch round. Work quickly and efficiently to prevent the dough from warming up too much.
- Transfer to Tart Pan: Carefully transfer the rolled-out dough to a 9-inch diameter tart pan with a removable bottom. Gently press the dough into the bottom and up the sides of the pan.
- Trim and Shape the Edges: Trim the excess dough overhang to ½ inch. Fold the overhang inward and press firmly to create a double-thick side crust. This will help prevent the crust from shrinking during baking.
- Dock the Crust: Pierce the bottom of the crust all over with a fork. This process, known as docking, prevents the crust from puffing up unevenly during baking.
- Chill Again: Refrigerate the prepared crust for another 1 hour. This further chills the butter and relaxes the gluten, resulting in a crisper crust.
- Preheat the Oven: Preheat your oven to 400°F (200°C).
- Bake the Crust: Bake the crust until it is golden brown, approximately 20 minutes. If the crust begins to bubble up during baking, gently press it down with the back of a fork. This will help maintain its shape.
- Cool Completely: Allow the baked crust to cool completely on a wire rack before filling.
- Fill with Lemon Curd: Once the crust is completely cool, spread the chilled lemon curd evenly over the bottom.
- Arrange Strawberries: Stand the fresh strawberries upright in the curd, creating a decorative pattern. Ensure the cut, flat ends are facing down, providing a stable base.
- Prepare the Glaze: Strain the strawberry jam into a small saucepan. Warm it briefly over low heat to thin it out. This will make it easier to brush over the berries.
- Glaze the Strawberries: Brush the warmed strawberry jam evenly over the strawberries, creating a glossy glaze.
- Chill the Tart: Chill the completed tart in the refrigerator for at least 1 hour to allow the glaze to set completely. You can chill it for up to 6 hours.
- Serve: Carefully release the tart from the pan by gently lifting the bottom. Serve chilled and enjoy!
Expert Tips & Tricks
- Make Ahead: The lemon curd and tart dough can be made up to 2 days in advance and stored separately in the refrigerator. This makes assembling the tart a breeze.
- Blind Baking: For an extra crisp crust, consider blind baking. Line the unbaked crust with parchment paper and fill it with pie weights or dried beans before baking. Remove the weights for the last 5 minutes of baking to allow the crust to brown evenly.
- Lemon Zest Flavor: To maximize the lemon flavor in the curd, gently massage the lemon zest into the sugar before adding the other ingredients. This releases the essential oils and intensifies the citrusy aroma.
- Strawberry Substitute: Feel free to experiment with other fruits depending on the season. Raspberries, blueberries, or sliced peaches would all be delicious alternatives.
- Prevent a Soggy Crust: Brushing the cooled tart shell with melted chocolate before adding the lemon curd can help prevent the crust from becoming soggy.
Serving & Storage Suggestions
Serve the Strawberry Lemon Curd Tart chilled as a delightful dessert for any occasion. Its vibrant colors and refreshing flavors make it perfect for spring and summer gatherings.
To store leftovers, cover the tart loosely with plastic wrap or transfer it to an airtight container. It will keep in the refrigerator for up to 3 days. The crust may soften slightly over time. This tart is best enjoyed fresh, but it can be frozen for up to 1 month. Thaw it overnight in the refrigerator before serving. It is not recommended to leave it at room temperature for an extended period, especially due to the fresh curd and berries.
Nutritional Information
| Nutrient | Amount per Serving | % Daily Value |
|---|---|---|
| Calories | 364.2 kcal | N/A |
| Calories from Fat | 151 g | 42% |
| Total Fat | 16.8 g | 25% |
| Saturated Fat | 9.9 g | 49% |
| Cholesterol | 104 mg | 34% |
| Sodium | 84.3 mg | 3% |
| Total Carbohydrate | 50.5 g | 16% |
| Dietary Fiber | 2.5 g | 10% |
| Sugars | 28.7 g | N/A |
| Protein | 4.3 g | 8% |
Variations & Substitutions
- Gluten-Free Crust: Substitute the all-purpose flour with a gluten-free flour blend for a gluten-free version. Add a teaspoon of xanthan gum to help bind the ingredients.
- Dairy-Free Curd: Use a vegan butter alternative and plant-based milk (such as almond or oat milk) in the lemon curd recipe. Ensure the vegan butter has a high fat content for the best texture.
- Other Citrus: Try using different citrus fruits in the curd, such as lime or orange, for a unique flavor twist. Adjust the sugar to taste based on the tartness of the citrus.
- Berry Medley: Instead of just strawberries, use a mix of your favorite berries for a colorful and flavorful tart.
- Chocolate Crust: For a richer flavor, add 2 tablespoons of unsweetened cocoa powder to the crust dough.
FAQs (Frequently Asked Questions)
Q: Can I use bottled lemon juice for the curd?
A: Freshly squeezed lemon juice is highly recommended for the best flavor. Bottled lemon juice can sometimes have a slightly bitter taste.
Q: How do I prevent the tart crust from shrinking during baking?
A: Thoroughly chilling the dough, docking the crust with a fork, and using pie weights during blind baking can all help prevent shrinking.
Q: My lemon curd is too tart. Can I fix it?
A: Yes, you can add a small amount of powdered sugar to the curd, one tablespoon at a time, until you reach your desired sweetness level.
Q: Can I freeze the entire assembled tart?
A: Yes, you can freeze the entire tart, but the texture of the crust and strawberries might change slightly upon thawing. Wrap the tart tightly in plastic wrap and then foil for best results.
Q: What can I do if my strawberries aren’t perfectly ripe?
A: If your strawberries aren’t perfectly ripe, you can macerate them in a little sugar and lemon juice for about 30 minutes before arranging them on the tart. This will help draw out their natural sweetness and soften them slightly.
Final Thoughts
This Strawberry Lemon Curd Tart is a celebration of simple ingredients transformed into something truly special. The bright, tangy lemon curd paired with the sweet, juicy strawberries creates a flavor combination that is both refreshing and satisfying. Don’t be intimidated by the multiple steps; each element is easy to master, and the final result is well worth the effort. I encourage you to give this recipe a try and share your delightful creation with friends and family. Pair it with a glass of chilled Prosecco for a truly memorable treat!