
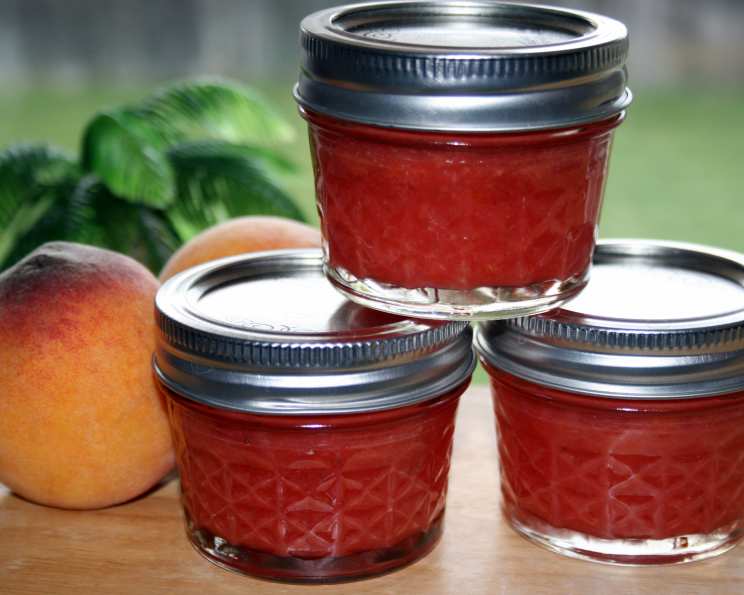
Strawberry & Peach Jam: A Taste of Summer Sunshine
The scent of ripe peaches and strawberries always takes me back to my grandmother’s sun-drenched kitchen. Jars of jewel-toned jam lined her shelves, each one a promise of summer’s bounty bottled for colder days. She taught me the simple magic of transforming fresh fruit into sweet preserves, a skill I cherish and love to share. This Strawberry & Peach Jam recipe, inspired by her techniques, captures the essence of those warm memories in every spoonful.
Recipe Overview
- Prep Time: 45 minutes
- Cook Time: 45 minutes
- Total Time: 1 hour 30 minutes
- Yields: Approximately 12 8 oz. jars
- Dietary Type: Vegetarian, Gluten-Free, Dairy-Free
Ingredients
- 5 cups peaches (equals 12 large peaches, mashed)
- 3 1/2 cups strawberries (equals 3 pints, mashed)
- 2 cups sugar
- 1/2 cup lemon juice (1 Tablespoon per cup of fruit)
- 5-6 teaspoons dry pectin (adjust amount for desired thickness)
Equipment Needed
- Large pot or saucepan
- Wooden spoon or heat-resistant spatula
- Potato masher or immersion blender
- Measuring cups and spoons
- Small bowl
- Jar lifter
- Canning jars (8 oz.) with lids and rings
- Canning funnel (optional)
- Large pot for water bath canning
Instructions
- Begin by thoroughly washing and mashing the strawberries. Set aside.
- Next, slice, pit, and dice the peaches. Once diced, mash the peaches with a potato masher or an immersion blender for a smoother consistency.
- Place the mashed strawberries and mashed peaches into a large pot or saucepan. Set the pot over medium heat.
- Cook the fruit mixture until it begins to boil, stirring occasionally to prevent sticking. Once boiling, reduce the heat to medium-low and continue to cook for 30 minutes, stirring periodically. This allows the fruit to soften and release its natural juices.
- While the fruit is cooking, prepare the sugar and pectin mixture. In a separate small bowl, combine the 2 cups of sugar with 5-6 teaspoons of dry pectin. Stir the mixture thoroughly to ensure the pectin is evenly distributed throughout the sugar. This step is crucial for preventing clumps when adding it to the hot fruit.
- After the fruit has cooked for 30 minutes, add the sugar and pectin mixture to the pot. Stir constantly to ensure it is fully incorporated into the fruit mixture.
- Next, add the 1/2 cup of lemon juice to the pot and stir well. The lemon juice not only adds a bright, tangy flavor but also helps to preserve the jam and activate the pectin.
- Increase the heat to high and bring the mixture to a full, rolling boil that cannot be stirred down. Boil the jam mixture vigorously for 5 minutes, stirring constantly to prevent scorching. This step is critical for activating the pectin and achieving the desired jam consistency.
- After 5 minutes of boiling, remove the pot from the heat. Carefully skim off any foam that has formed on the surface of the jam using a clean spoon.
- Fill the prepared canning jars with the hot jam, leaving approximately 1/4 inch of headspace at the top of each jar. A canning funnel can be helpful for this step.
- Use a clean, damp cloth to wipe the rims of the jars clean. This ensures a proper seal.
- Place the two-piece lids on the jars, centering the flat lid on top of the jar. Then, screw on the metal bands until they are fingertip tight. Do not overtighten.
- Carefully submerge the sealed jars into a hot water bath in a large pot. The water should cover the jars by at least 1-2 inches. The water in the canning pot should be approximately 200 degrees Fahrenheit (or boiling).
- Once the water is boiling, process the jars for 10 minutes. This ensures a proper seal and prevents spoilage.
- After 10 minutes, remove the jars from the hot water bath using a jar lifter. Place them on a towel-lined surface to cool completely.
- As the jars cool, you should hear a “pop” sound as the lids seal. This indicates that the jars have been properly processed and are airtight.
- Let the jars cool completely on the counter before checking the seals.
- After the jars are completely cool, check the seals by pressing down on the center of each lid. If the lid does not flex or move, it is properly sealed. If the lid flexes, the jar is not properly sealed and should be refrigerated and used immediately or reprocessed with a new lid.
Expert Tips & Tricks
- Pectin Power: If you prefer a thicker jam, you can add an extra teaspoon or two of dry pectin. However, be cautious not to add too much, as this can result in a rubbery texture.
- Fruit Freshness: Use the freshest, ripest peaches and strawberries you can find. The quality of the fruit directly impacts the flavor of the jam.
- Jam Doneness Test: Before jarring, place a small spoonful of jam on a chilled plate. Let it cool for a minute, then gently push it with your finger. If it wrinkles, it’s ready.
- Prevent Floating Fruit: To minimize fruit floating to the top of the jar, let the jam sit for about 5 minutes after cooking, stirring occasionally, before filling the jars. This allows the fruit to distribute more evenly.
- Adjust Sweetness: While this recipe uses a specific amount of sugar, you can adjust it slightly to your preference. Taste the jam during the cooking process and add more sugar if desired, but remember that sugar also acts as a preservative.
Serving & Storage Suggestions
This Strawberry & Peach Jam is incredibly versatile. Spread it on toast, scones, or biscuits for a classic breakfast treat. It’s also delicious paired with cheeses, used as a glaze for grilled meats, or swirled into yogurt or oatmeal.
Sealed jars of jam can be stored in a cool, dark place for up to 1 year. Once opened, refrigerate the jam and use it within 2-3 weeks. If you haven’t water-bathed your jam and just want to refrigerate it, it will last up to 3 weeks.
Nutritional Information
(Estimated values per 1 tablespoon serving)
| Nutrient | Amount per Serving | % Daily Value* |
|---|---|---|
| Calories | 50 kcal | 3% |
| Total Fat | 0g | 0% |
| Saturated Fat | 0g | 0% |
| Cholesterol | 0mg | 0% |
| Sodium | 0mg | 0% |
| Total Carbohydrate | 13g | 4% |
| Dietary Fiber | 0g | 0% |
| Sugars | 12g | |
| Protein | 0g | 0% |
*Percent Daily Values are based on a 2,000 calorie diet.
Variations & Substitutions
- Spiced Jam: Add a pinch of ground cinnamon, nutmeg, or ginger to the jam while it’s cooking for a warm, spiced flavor.
- Peach Variety: Experiment with different varieties of peaches, such as white peaches or donut peaches, to create unique flavor profiles.
- Berry Blend: Incorporate other berries, such as raspberries or blueberries, for a mixed berry jam.
- Low-Sugar Option: Use a sugar substitute designed for jam-making to reduce the sugar content. Be sure to follow the manufacturer’s instructions for proper usage.
- Herb Infusion: Add a sprig of fresh rosemary or thyme to the jam while it simmers for a savory twist. Remove the herbs before jarring.
FAQs (Frequently Asked Questions)
Q: Can I use frozen fruit for this recipe?
A: Yes, you can use frozen peaches and strawberries. Thaw them completely and drain off any excess liquid before using. Keep in mind that frozen fruit may release more water during cooking, so you may need to cook the jam for a longer period to achieve the desired consistency.
Q: How do I know if my jam has set properly?
A: The jam should thicken considerably as it cools. You can also use the chilled plate test mentioned in the Expert Tips & Tricks section to check for doneness.
Q: What do I do if my jam is too runny?
A: If your jam is too runny, you can try cooking it for a few more minutes to evaporate more moisture. You can also add a little more pectin, following the package directions.
Q: Can I skip the water bath canning process?
A: While you can skip the water bath canning process and simply refrigerate the jam, it will only last for about 2-3 weeks. Water bath canning ensures a proper seal and allows the jam to be stored at room temperature for up to a year.
Q: Why didn’t my jars seal?
A: There are several reasons why jars may not seal properly, including improper headspace, dirty jar rims, or worn-out lids. Make sure to follow all instructions carefully and use new lids each time you can. If a jar doesn’t seal, refrigerate the jam and use it within a few weeks.
Final Thoughts
Making your own Strawberry & Peach Jam is a rewarding experience that allows you to enjoy the taste of summer all year round. Don’t be intimidated by the canning process – it’s easier than you think! Gather your ingredients, follow the steps, and savor the delicious results of your homemade creation. I encourage you to try this recipe and share the fruits of your labor with family and friends. Nothing says “I care” quite like a jar of homemade jam. Enjoy!