
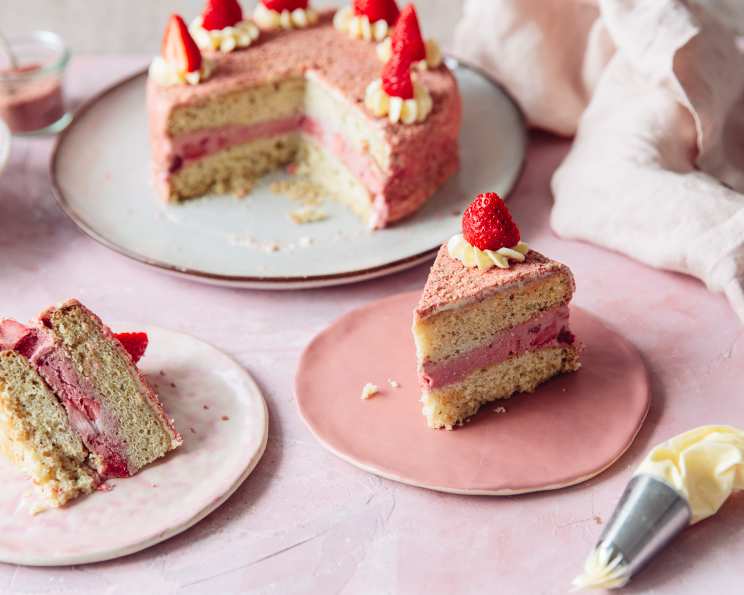
Strawberry Shortcake Ice Cream Cake: A Slice of Summer Nostalgia
There’s something undeniably magical about strawberry shortcake ice cream bars. As a kid, the arrival of the ice cream truck was a symphony of possibility, but the pink-dusted, crumb-coated bars were always my go-to. The combination of creamy strawberry ice cream, soft cake, and that satisfyingly crunchy coating – it was pure, unadulterated summer happiness. This Strawberry Shortcake Ice Cream Cake is my grown-up tribute to that childhood joy, a shareable dessert that brings back all those sunny memories in every slice.
Recipe Overview
- Prep Time: 30 minutes
- Cook Time: 25 minutes
- Total Time: 4 hours 55 minutes (includes freezing time)
- Servings: 8
- Yield: 1 cake
- Dietary Type: Not specified
Ingredients
- 1 (15 1/4 ounce) box white cake mix
- Eggs (according to cake mix directions)
- Vegetable oil (according to cake mix directions)
- Water (according to cake mix directions)
- 1 1/2 pints strawberry ice cream
- 1/2 cup strawberries, hulled and diced
- 1 1/2 ounces freeze-dried strawberries
- 2 1/2 ounces vanilla wafers
- 2/3 cup store-bought vanilla frosting
- 3-4 fresh strawberries, for topping
Equipment Needed
- Two 9-inch cake tins
- Baking paper
- Wire racks
- Large bowl
- Wooden spoon
- 9-inch springform cake pan
- Plastic wrap
- Food processor
- Metal offset spatula
- Piping bag fitted with a wide star tip (optional)
Instructions
-
Begin by preheating your oven to the temperature specified on the white cake mix box. This is crucial for even baking. Ensure the oven rack is positioned in the center. Grease and line the bottom of two 9-inch cake tins with baking paper. This prevents sticking and allows for easy removal of the cake layers. The baking paper should slightly overhang the sides for easier lifting.
-
In a large bowl, tip the cake mix. Add the eggs, vegetable oil, and water according to the directions on the box for the quantities needed and mixing directions. Using a hand mixer or stand mixer, mix the ingredients until just combined. Be careful not to overmix, as this can result in a tough cake.
-
Divide the batter evenly between the prepared cake pans. Use a scale for precise measurements if desired, ensuring each pan receives an equal amount of batter. This will ensure that the cake layers bake uniformly.
-
Bake for the time specified on the cake mix box. Check for doneness by inserting a toothpick into the center of each cake layer; if it comes out clean, the cakes are ready. Baking times may vary depending on your oven, so it’s always best to err on the side of caution.
-
Tip the cake layers out onto wire racks immediately after removing them from the oven. Peel the baking paper off and set aside to cool completely. Cooling them upside down can help flatten any domes that formed during baking. This is essential before assembling the ice cream cake, as the heat will melt the ice cream.
-
Let the strawberry ice cream soften for a few minutes before scooping it out into a large bowl. This will make it easier to work with. Avoid letting it melt completely, as this will affect the final texture.
-
Use a wooden spoon to beat the softened ice cream until you get a buttercream-like texture. This process incorporates air into the ice cream, making it smoother and easier to spread.
-
Add the diced strawberries to the softened ice cream and fold together gently. Be careful not to overmix, as this can cause the strawberries to break down and make the ice cream watery.
-
Line a tall 9-inch springform cake pan with plastic wrap, allowing a few inches to overhang on the outside of the cake pan. This will help you easily remove the frozen cake later. The plastic wrap should completely cover the bottom and sides of the pan.
-
Place the first cooled cake layer in the prepared springform pan. Gently press it down to ensure it’s evenly distributed.
-
Spread the softened strawberry ice cream in an even layer over the cake layer. Use a spatula or offset spatula to create a smooth, consistent layer.
-
Place the second cooled cake layer on top of the ice cream layer. Gently press it down to ensure it adheres to the ice cream.
-
Cover the cake with the overhanging plastic wrap and freeze for 3-4 hours, or until firm. This allows the ice cream to set completely, preventing it from melting when you decorate it.
-
While the cake is freezing, prepare the coating. In a food processor, pulse the freeze-dried strawberries and vanilla wafers together until broken down into a breadcrumb-like texture. The finer the crumbs, the more evenly they will adhere to the frosting. If you don’t have a food processor, you can crush them in a zip-top bag using a rolling pin.
-
Remove the cake from the freezer and carefully remove it from the springform pan. Peel away the plastic wrap.
-
Use a metal offset spatula to spread the vanilla frosting in a thin, even layer over the top and sides of the cake. Work quickly, as the cake will start to soften at room temperature.
-
Immediately press the strawberry-vanilla wafer powder over the top and sides of the cake. Gently pat the crumbs onto the frosting to ensure they adhere properly. Work quickly to prevent the frosting from softening too much.
-
(Optional) Pipe 6-8 peaks of vanilla frosting onto the top of the cake using a piping bag fitted with a wide star tip.
-
Top each frosting peak with a halved fresh strawberry.
-
Serve immediately.
Expert Tips & Tricks
- To prevent the cake layers from sticking, use parchment paper rounds in addition to greasing the cake pans.
- If you want a more intense strawberry flavor, add a teaspoon of strawberry extract to the ice cream mixture.
- For easier spreading, slightly warm the vanilla frosting in the microwave for a few seconds.
- If the crumb coating is not sticking well, lightly dampen the frosting with a spray of water.
- Make the cake layers a day ahead and store them at room temperature, tightly wrapped in plastic wrap, to save time.
- To prevent ice crystals from forming on the ice cream, ensure the cake is tightly wrapped in plastic wrap before freezing.
Serving & Storage Suggestions
Serve the Strawberry Shortcake Ice Cream Cake immediately after assembling to enjoy the best texture and flavor. If you have leftovers, store them in an airtight container in the freezer. The cake will last for up to a week in the freezer, but the quality may degrade over time. It’s best to let it sit at room temperature for a few minutes before serving to soften slightly. Avoid refreezing once thawed.
Nutritional Information
Note: Nutritional information is an estimate and may vary based on specific ingredients and portion sizes.
| Nutrient | Amount per Serving | % Daily Value |
|---|---|---|
| Calories | 373 kcal | N/A |
| Calories from Fat | 106 g | 29% |
| Total Fat | 11.9 g | 18% |
| Saturated Fat | 3.9 g | 19% |
| Cholesterol | 14.4 mg | 4% |
| Sodium | 418.6 mg | 17% |
| Total Carbohydrate | 63.5 g | 21% |
| Dietary Fiber | 1.4 g | 5% |
| Sugars | 30.4 g | N/A |
| Protein | 4.5 g | 9% |
Variations & Substitutions
- Gluten-Free: Use a gluten-free white cake mix and gluten-free vanilla wafers.
- Dairy-Free: Substitute the strawberry ice cream with a dairy-free alternative, such as coconut milk or soy-based ice cream. Use dairy-free vanilla frosting.
- Different Berry: Experiment with different berries like raspberries, blueberries, or blackberries in the ice cream filling and as a topping.
- Cake Flavor: Try using a yellow cake mix or a strawberry cake mix for a different flavor profile.
- Crumb Coating: Add a tablespoon of melted butter to the crumb mixture for a richer flavor.
- Seasonal Adaptation: In the fall, use a spice cake mix and apple pie filling instead of strawberry ice cream.
FAQs (Frequently Asked Questions)
Q: Can I use a different size cake pan?
A: Yes, but you may need to adjust the baking time. Using a smaller pan will result in thicker cake layers, while a larger pan will result in thinner layers.
Q: Can I make this cake ahead of time?
A: Absolutely! This cake is best made ahead of time, as it needs to freeze for several hours to set.
Q: How do I prevent ice crystals from forming on the ice cream?
A: Make sure the cake is tightly wrapped in plastic wrap before freezing.
Q: Can I use homemade ice cream?
A: Yes, homemade strawberry ice cream would be delicious in this cake.
Q: My crumb coating is falling off. What should I do?
A: Lightly dampen the frosting with a spray of water to help the crumbs adhere better.
Final Thoughts
This Strawberry Shortcake Ice Cream Cake is more than just a dessert; it’s a trip down memory lane, a celebration of summer, and a delicious way to share joy with loved ones. Don’t be intimidated by the multiple steps – each one is simple and straightforward. I encourage you to try this recipe and experience the delightful combination of textures and flavors for yourself. And feel free to put your own spin on it – perhaps add a drizzle of chocolate sauce or a sprinkle of chopped nuts. However you choose to make it, I hope this cake brings a smile to your face and a sweet taste of nostalgia to your day. Share your creations and feedback; happy baking!