
Stuffing Turducken: A Culinary Masterpiece
The memory is etched in my mind: my grandfather, a man of few words but immense presence, standing proudly behind a glistening, golden-brown bird that seemed to defy all logic. He’d carved into it with theatrical flair, revealing a tapestry of meats and stuffings that drew gasps of amazement from everyone at the table. That was my first encounter with Turducken, a dish that transformed our family holiday from a simple gathering into a culinary spectacle. It wasn’t just food; it was an experience, a conversation starter, and a testament to the love and effort poured into its creation. Today, I carry on that tradition, relishing the challenge and the inevitable “oohs” and “aahs” that follow.
Recipe Overview
- Prep Time: Several hours (Deboning and Assembly)
- Cook Time: 9-10 hours
- Total Time: ~13 hours
- Servings: 10-15
- Yield: 1 Turducken
- Dietary Type: Not specified (Contains Poultry and Sausage)
Ingredients
- (18-21 lb) Whole turkey
- (5-6 lb) Ducklings
- (4-5 lb) Whole chickens
- 4 cups Cornbread stuffing mix, prepared (I use Stovetop brand)
Seasoning Mix
- 2 tablespoons Salt
- 2 tablespoons Paprika
- 1 tablespoon Black pepper
- 1-2 teaspoons Dried thyme
Sausage Stuffing
- 2 tablespoons Butter
- 3 tablespoons Paprika
- 3 cups Onions, Chopped
- 1 1/2 cups Celery, Chopped
- 2 lbs Italian sausage (I recommend medium to spicy)
- 3 tablespoons Garlic, Minced
- 3 cups Chicken stock
- 2-3 cups Breadcrumbs, Toasted
Equipment Needed
- Large roasting pan with rack
- Cotton string to truss up the turkey
- Large needle and cotton thread to sew the turkey together
- 1-2 sq ft. of cheese cloth
Instructions
-
De-boning is Key: This is the most labor-intensive part. Sharpen your best knives and clear plenty of workspace. If you’re a de-boning novice, practice on the chicken first – mistakes will be hidden inside the larger birds.
-
Prepare the Turkey: Rinse the turkey and remove the neck and any giblets. Place the turkey, breast side down, on a clean, flat surface. Cut through the skin along the length of the spine.
-
Remove the Turkey Ribs: Using the tip of a knife, starting from the neck end, gently separate the meat from the rib cage on one side. Toward the neck end, cut through the meat to expose the shoulder blade. Cut the meat away from and around the bone, severing the bone at the joint to remove the shoulder blade. Disjoint the wing between the second and third joints. Leave the wing bones attached to the meat.
-
Separate the Thigh Bone: Continue separating the meat from the frame, heading toward the thighbone. Be careful to keep the “oyster” (pocket of meat on the back) attached to the skin, rather than leaving it with the bone. Cut through the ball-and-socket joint to release the thighbone from the carcass. The bird will be open on one side, exposing the bones left to deal with. Keep the leg attached to the meat.
-
Repeat on the Other Side: Repeat the boning procedure on the other side of the turkey. Carefully remove the carcass and reserve it for making stock.
-
Make Turkey Stock: Stock is essential for making the stuffing and gravy. Put the turkey carcass in a large pot and cover with water. Bring to a boil, then simmer on low heat overnight.
-
Refrigerate the Turkey: You should end up with a flat, boneless (except for the wings and legs) turkey with the skin intact in one large piece. Place the boned turkey in a large dish or bowl and cover with plastic wrap to keep it from drying out. Place it in the refrigerator.
-
De-bone the Duck and Chicken: Repeat the de-boning process on the duckling and the chicken, but de-bone both stumps of wings and leg drumsticks. Cut through the flesh at the thinnest point and trim around these bones with a knife until they can be removed. (Since they have little meat, we usually cut off the entire wings and add them to the stock pot.) Both the chicken and duck will be stuffed inside the turkey and need not be kept “perfectly” intact.
-
Trim Excess Fat: Trim excess skin and fat from the birds. Ducks, in particular, have a lot of excess fatty skin that should be saved to render fat to be used later for making gravy. We usually remove most of the skin from the chicken, but keep the duck skin, which adds flavor.
-
Prepare the Seasoning Mix: Combine the salt, paprika, black pepper, and dried thyme in a bowl and set aside.
-
Make the Sausage Stuffing: Melt the butter in a large skillet over high heat. Add the chopped onions and chopped celery. Sauté until the onions are dark brown but not burned, about 10 to 12 minutes.
-
Add Sausage and Spices: Add the Italian sausage to the skillet and cook about 5 minutes or until the meat is browned, stirring frequently. Add the paprika and minced garlic and cook approximately 3 minutes over medium heat, stirring occasionally.
-
Simmer in Chicken Stock: Stir in the chicken stock and bring to a simmer. Continue cooking until the water evaporates and the oil rises to the top, about 10 minutes. Stir in the toasted bread crumbs and mix well. Add more breadcrumbs if the mixture is too moist.
-
Prepare Cornbread Stuffing: Prepare a similar amount of another stuffing, such as cornbread stuffing, according to package directions.
-
Assemble the Turducken: Assemble the Turducken at least 11 to 12 hours before dinner.
-
Layer the Turkey: Spread the turkey, skin down, on a flat surface, exposing as much meat as possible. Rub 3 tablespoons of the seasoning mix evenly on the meat. Spread the sausage stuffing over the turkey in an even layer approximately 3/4 inch thick.
-
Add the Duck: Place the duck, skin down, on top of the sausage stuffing. Season the exposed duck meat with about 1 tablespoon of the seasoning mix. Spread the cornbread stuffing in an even layer (about 1/2 inch thick) over the duck.
-
Add the Chicken: Arrange the chicken, skin down, evenly on top of the cornbread stuffing. Season the chicken meat with the seasoning mix. Spread the remainder of the sausage stuffing and/or cornbread stuffing on top of the chicken.
-
Close the Turducken: With another person’s help, carefully lift the sides of the layered birds, folding the sides of the turkey together. Have a helper hold the bird while sewing the opening down the back of the turkey together using cotton thread. The bird may not close perfectly, and a strip of cheese cloth can be used to help close the “crack” in the back of the turkey so that the stuffing will not leak out when the bird is turned over.
-
Truss the Turducken: Since the Turducken has no skeleton, it must be trussed up, or it may fall apart in cooking. Tie 4-5 pieces of cotton string around the bird, width-wise, to act as skeletal support. Turn the bird over and place it in a roasting rack inside a large roasting pan, so it is oriented breast side up and looks like a “normal” turkey. Tie the legs together just above the tip bones.
-
Preheat the Oven: Heat the oven to 225 degrees F. Temperature control is critical since the Turducken is so massive that it has to be cooked slowly at a low temperature to prevent burning the outside before the interior is cooked. Using an oven thermometer is highly recommended. We place 2-3 oven thermometers at different locations within the oven to monitor oven temperature. We also use a meat thermometer inside the bird to measure its internal temperature.
-
Bake the Turducken: Place the bird in the center of the oven and bake until a meat thermometer inserted through to the center reads 165 degrees, approximately 9-10 hours, though cooking times will vary depending on the size of the birds and the amount of stuffing used. Rely on temperature and not time cooked for doneness.
-
Remove Drippings: There will be no need to baste, but accumulated drippings may need to be removed from the pan every few hours so that the lower portion does not deep fry in the hot oil. Save the pan drippings for gravy.
-
Rest Before Carving: Remove the Turducken from the oven and let it cool in the pan for an hour before serving. Make gravy according to your favorite recipe.
-
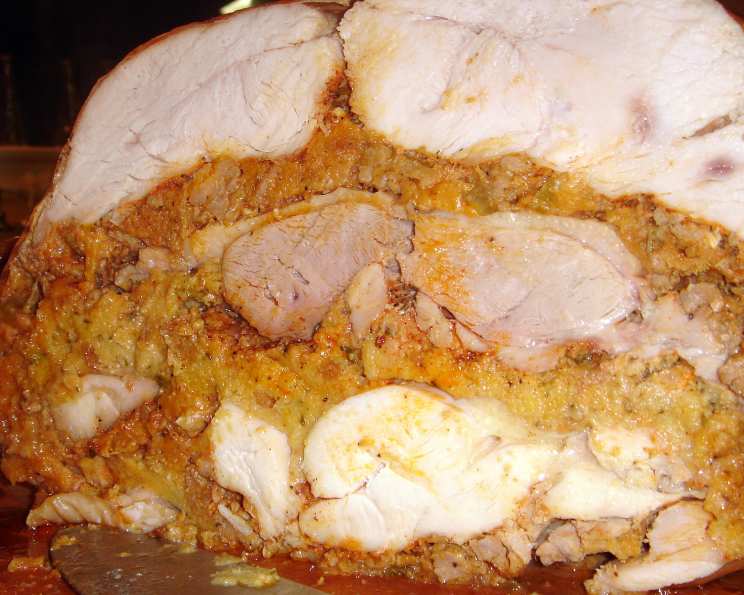
Carve and Serve: To serve, cut the bird in half. Carve crosswise so each slice reveals all 3 meats and stuffings.
-
Make Simple Gravy: Take 1 cup of pan drippings plus 1 cup of flour and cook over medium heat until “tan”. Add 10 cups stock to fat/flour all at once. Whisk thoroughly. Bring back to a boil and then simmer for 5 minutes while whisking constantly. Add salt + pepper + paprika “to taste”.
-
Alternative Gravy: Another simple gravy variation is to use about a quarter to half cup of pinot grigio and about two to three tablespoons of instant potatoes instead of the flour. Test for taste and if it gets too thick add water or more pinot.
The gravy can be made in advance and allowed to stand over low heat for at least 2 hours (maybe more). We usually make at least two batches.
Expert Tips & Tricks
- Deboning Assistance: Don’t be afraid to watch videos or ask your butcher for de-boning tips. A sharp knife is your best friend!
- Stuffing Consistency: Make sure the stuffing isn’t too wet. It should hold its shape without being soggy.
- Temperature is King: Invest in a reliable meat thermometer and use it! Don’t rely solely on cook time.
- Resting is Crucial: Resist the urge to carve immediately. Allowing the Turducken to rest ensures juicier meat and easier carving.
Serving & Storage Suggestions
Serve the Turducken hot, carved crosswise to showcase the layers. Garnish with fresh herbs like parsley or thyme. Leftovers should be stored in an airtight container in the refrigerator and will last for 3-4 days. For longer storage, freeze the leftovers in individual portions. Reheat in the oven or microwave until heated through.
Nutritional Information
| Nutrient | Amount per Serving (Estimated) | % Daily Value (Estimated) |
|---|---|---|
| Calories | 1800 kcal | 90% |
| Total Fat | 100g | 154% |
| Saturated Fat | 30g | 150% |
| Cholesterol | 700mg | 233% |
| Sodium | 3000mg | 125% |
| Total Carbohydrate | 25g | 8% |
| Dietary Fiber | 3g | 12% |
| Sugars | 5g | N/A |
| Protein | 200g | 400% |
These are estimates only and can vary based on specific ingredients and serving size.
Variations & Substitutions
- Gluten-Free: Use gluten-free breadcrumbs in the stuffing and ensure the sausage is gluten-free.
- Spice Level: Adjust the amount of paprika and sausage to control the heat level.
- Different Stuffings: Experiment with different stuffing combinations, such as wild rice stuffing or fruit and nut stuffing.
- Smaller Birds: If you’re feeding a smaller crowd, use a smaller turkey, duck, and chicken.
FAQs (Frequently Asked Questions)
Q: Is it really necessary to de-bone all three birds?
A: Yes, de-boning allows you to layer the birds and stuffing properly, creating the signature Turducken effect.
Q: Can I make the stuffing ahead of time?
A: Absolutely! Making the stuffing a day or two in advance can save you time on the day of assembly.
Q: What if I can’t find a duckling?
A: You can substitute with a Cornish hen or another small fowl of similar size.
Q: How do I know when the Turducken is fully cooked?
A: The most reliable method is to use a meat thermometer and ensure the internal temperature reaches 165°F in the center.
Q: Can I freeze the entire Turducken after it’s cooked?
A: While you can freeze it, the texture may change slightly upon thawing. It’s best to freeze individual slices or portions for optimal quality.
Final Thoughts
The Turducken is more than just a meal; it’s a culinary adventure, a testament to patience, and a dish that’s sure to impress. Don’t be intimidated by the process – take it one step at a time, and you’ll be rewarded with a show-stopping centerpiece that your friends and family will rave about for years to come. Pair it with a bold red wine, roasted vegetables, and good company for a truly unforgettable dining experience. I encourage you to try this recipe and make it your own – experiment with different stuffings, adjust the spices to your liking, and create a Turducken that reflects your personal culinary style. Enjoy the journey, and happy cooking!