
Sukiyaki: A Taste of Home and Hearth
The first time I experienced sukiyaki, it wasn’t in a restaurant but huddled around a portable burner in my grandmother’s cozy Tokyo apartment. The aroma of sweet soy and simmering beef filled the small space, mingling with the excited chatter of family. It was more than just a meal; it was a ritual, a shared experience of warmth and connection that transcended the food itself. The communal cooking, the dipping of savory morsels into rich egg yolk, and the laughter echoing around the table – these are the memories that make sukiyaki so special to me.
Recipe Overview
- Prep Time: 30 minutes
- Cook Time: 20 minutes
- Total Time: 50 minutes
- Servings: 4
- Dietary Type: Not Vegetarian
Ingredients
- 1 teaspoon oil
- 1 lb beef sirloin steak, thinly sliced in strips
- 1 teaspoon sugar
- 3 stalks celery, cut diagonally
- 1 bunch green onion (2-inch lengths)
- 2 cups bean sprouts
- 2 large onions, sliced
- 2 cups angel hair pasta, cooked
- 1 cup mushrooms, sliced
- 8 ounces tofu, cut in 1-1/2-inch squares
- 1⁄2 Chinese cabbage, chopped, not too large, not too small
For sukiyaki sauce:
- 1⁄3 cup soy sauce
- 3 tablespoons sherry wine
- 3⁄4 cup water
For dipping:
- 4 eggs or 1/2 cup Egg Beaters egg substitute
Equipment Needed
- Electric skillet
- Large platter
- Small mixing bowl
Instructions
-
Begin by preparing your vegetables. Slice the celery diagonally into bite-sized pieces. Cut the green onions into 2-inch lengths. Thoroughly rinse the bean sprouts. Slice the onions into thin half-moons. Slice the mushrooms. Cut the tofu into 1-1/2-inch squares. Finally, chop the Chinese cabbage, ensuring the pieces are not too large or too small, as this will affect their cooking time.
-
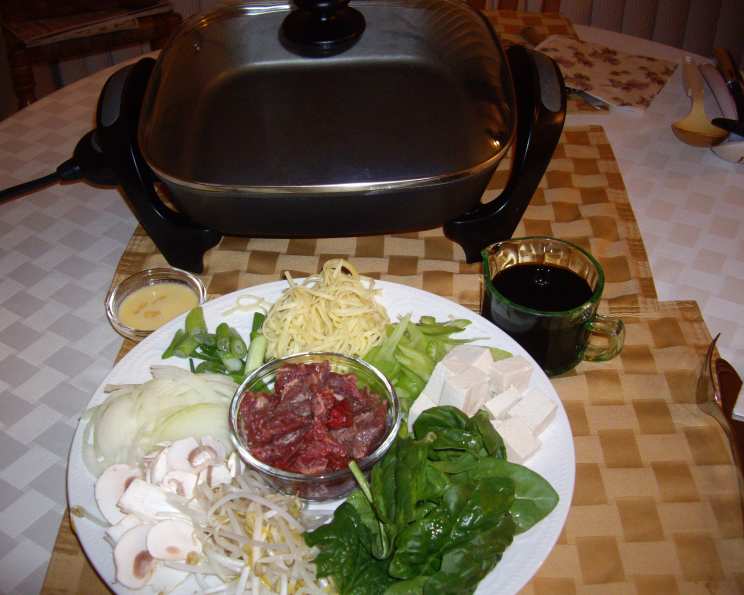
Arrange all the prepared vegetables, sliced beef, cooked angel hair pasta, and tofu attractively on a large platter. This presentation allows everyone at the table to easily access the ingredients during the cooking process.
-
In a separate small bowl, whisk together the sukiyaki sauce. Combine 1/3 cup of soy sauce, 3 tablespoons of sherry wine, and 3/4 cup of water. Stir until well combined. Taste and adjust to your preference – you can add a touch more soy sauce for saltiness or sherry wine for sweetness.
-
Place your electric skillet on the table where everyone can reach it. Heat 1 teaspoon of oil in the electric skillet over medium-high heat.
-
Once the oil is hot, add the thinly sliced beef to the skillet. Sprinkle 1 teaspoon of sugar over the beef, and pour a small amount of the prepared sukiyaki sauce over the beef as it browns. Use your cooking chopsticks or tongs to move the browned beef to one side of the skillet to make room for the other ingredients.
-
Now, strategically place the remaining ingredients into the skillet, keeping them separate from each other. This prevents the flavors from muddling too much and allows you to control the cooking of each ingredient.
-
Carefully pour the remaining sukiyaki sauce over all the ingredients in the skillet.
-
Cover the skillet with a lid. Bring the sauce to a boil, then reduce the heat to a simmer and cook for about 2 minutes, or until the vegetables begin to soften.
-
Continue to simmer the sukiyaki until all the ingredients are tender and cooked to your liking. The cooking time may vary depending on the thickness of your vegetable slices and your personal preference.
-
While the sukiyaki is simmering, prepare your dipping sauce. Crack the 4 eggs into a bowl and whisk them lightly. Alternatively, you can use 1/2 cup of Egg Beaters egg substitute. This dipping sauce adds richness and a silky texture to the cooked sukiyaki.
-
To eat, use your chopsticks to pick up the cooked sukiyaki ingredients from the skillet and dip them into the raw, beaten egg (or egg substitute) before eating.
-
As the liquid in the skillet boils away during cooking, add more of the prepared sukiyaki sauce as needed to prevent the ingredients from drying out and to maintain the desired level of flavor.
-
Serve immediately and enjoy the communal experience of sharing sukiyaki with your family and friends!
Expert Tips & Tricks
- For the best flavor, use high-quality beef sirloin with good marbling.
- Don’t overcrowd the skillet. Cook the ingredients in batches if necessary to ensure even cooking.
- If you prefer a thicker sauce, you can add a cornstarch slurry (1 tablespoon cornstarch mixed with 2 tablespoons cold water) to the sauce while it’s simmering.
- To prevent the tofu from sticking to the skillet, pat it dry with paper towels before adding it.
- For a richer flavor, use beef broth instead of water in the sukiyaki sauce.
Serving & Storage Suggestions
Serve sukiyaki hot, directly from the electric skillet. Offer a bowl of steamed rice on the side to complement the savory flavors. Garnish with extra green onions or sesame seeds for added visual appeal.
Leftovers can be stored in an airtight container in the refrigerator for up to 3 days. Reheat gently in a skillet or microwave before serving. Note that the texture of some vegetables may change slightly after being refrigerated. I do not recommend freezing leftover sukiyaki, as the texture of the ingredients will degrade significantly.
Nutritional Information
| Nutrient | Amount per Serving | % Daily Value |
|---|---|---|
| Calories | 450 kcal | 23% |
| Total Fat | 25g | 38% |
| Saturated Fat | 10g | 50% |
| Cholesterol | 250mg | 83% |
| Sodium | 1400mg | 58% |
| Total Carbohydrate | 20g | 7% |
| Dietary Fiber | 4g | 16% |
| Sugars | 10g | – |
| Protein | 35g | 70% |
Note: Nutritional information is an estimate and may vary based on specific ingredients and portion sizes.
Variations & Substitutions
- Vegetarian Sukiyaki: Substitute the beef with extra tofu, shiitake mushrooms, or wheat gluten (seitan). Use vegetable broth instead of water in the sukiyaki sauce.
- Gluten-Free Sukiyaki: Use tamari or gluten-free soy sauce in the sukiyaki sauce. Ensure the angel hair pasta is also gluten-free, or substitute with shirataki noodles.
- Spicy Sukiyaki: Add a pinch of red pepper flakes or a dash of Sriracha to the sukiyaki sauce for a spicy kick.
- Seasonal Variations: Incorporate seasonal vegetables like kabocha squash in the fall or bamboo shoots in the spring.
- Noodle Variation: Use Udon noodles instead of angel hair pasta for a heartier texture.
FAQs (Frequently Asked Questions)
Q: Can I prepare the sukiyaki sauce in advance?
A: Absolutely! Preparing the sauce a day ahead of time allows the flavors to meld together even more beautifully. Store it in an airtight container in the refrigerator.
Q: What type of beef is best for sukiyaki?
A: Thinly sliced beef sirloin is a classic choice, but you can also use ribeye or tenderloin. The key is to have it sliced very thinly for quick cooking.
Q: Is it necessary to use raw eggs for dipping?
A: While traditional, using raw eggs is optional. If you are concerned about raw egg consumption, you can use pasteurized eggs or Egg Beaters egg substitute.
Q: Can I add other vegetables to the sukiyaki?
A: Of course! Feel free to experiment with other vegetables like spinach, watercress, or enoki mushrooms. Just adjust the cooking time accordingly.
Q: How do I prevent the sukiyaki from becoming too salty?
A: Use low-sodium soy sauce and adjust the amount of soy sauce in the sauce to your taste preference. Adding a touch of sugar can also help balance the saltiness.
Final Thoughts
Sukiyaki is more than just a recipe; it’s an invitation to connect, to share, and to create lasting memories around the table. Don’t be afraid to experiment with different ingredients and variations to make it your own. I encourage you to gather your loved ones, set up the electric skillet, and experience the warmth and joy of sukiyaki. Share your culinary creations with me – I’d love to hear about your personal sukiyaki story! Pair it with a crisp, dry sake for an authentic Japanese experience.