
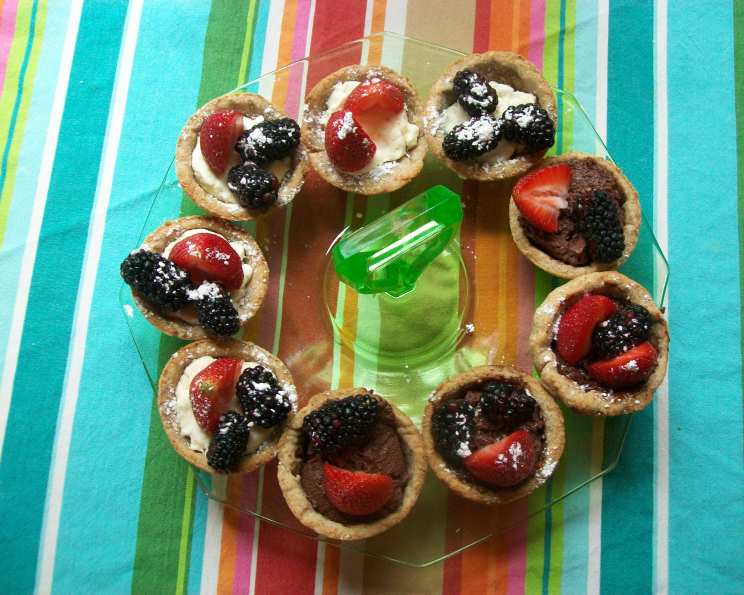
Summer Fruit Tartlets: A Burst of Sunshine in Every Bite
The memory is as clear as a summer sky: my grandmother’s kitchen, filled with the sweet aroma of baking and the vibrant colors of freshly picked berries. She’d always let me “help” arrange the fruit on her miniature tarts, a task I approached with the utmost seriousness. Each perfectly placed raspberry or blueberry felt like a tiny masterpiece, a tangible expression of the love she poured into her baking. These Summer Fruit Tartlets aren’t just a recipe; they’re a taste of that cherished time, a reminder of simple pleasures and the joy of creating something beautiful and delicious.
Recipe Overview
- Prep Time: 45 minutes
- Cook Time: 15 minutes
- Total Time: 1 hour
- Servings: 12
- Yields: 12 tartlets
- Dietary Type: Vegetarian
Ingredients
For the Dough:
- 1 1/2 cups all-purpose flour, plus extra for dusting
- 3/4 cup confectioners’ sugar
- 2/3 cup almonds, ground
- 1/2 cup butter, cold and cubed
- 1 egg yolk
- 1 tablespoon milk
For the Filling:
- 1 cup cream cheese, softened
- Confectioners’ sugar, to taste, plus extra for dusting
- 12 ounces fruit, such as berries (strawberries, raspberries, blueberries, etc.)
Equipment Needed
- Mixing bowls
- Sifter
- Spatula
- Plastic wrap
- Rolling pin
- 12 deep tartlet pans or individual brioche pans (or muffin pans)
- Fork
- Aluminum foil
- Wire rack
Instructions
-
Prepare the Dough: Sift together the all-purpose flour and confectioners’ sugar into a large mixing bowl. Sifting ensures a light and tender crust.
-
Add Almonds: Stir in the ground almonds. The almonds add a delightful nutty flavor and slightly sandy texture to the crust.
-
Incorporate the Butter: Add the cold, cubed butter to the flour mixture. Using your fingertips or a pastry blender, cut the butter into the flour until the mixture resembles coarse breadcrumbs. Work quickly to prevent the butter from melting.
-
Bind the Dough: Add the egg yolk and milk to the mixture. First, use a spatula to begin combining the ingredients. Then, using your hands, gently work the dough until it comes together into a cohesive ball. Be careful not to overwork the dough, as this can result in a tough crust.
-
Chill the Dough: Wrap the dough tightly in plastic wrap and refrigerate for at least 30 minutes. This chilling period allows the gluten to relax, making the dough easier to roll out and preventing it from shrinking during baking.
-
Preheat the Oven: Preheat your oven to 400 degrees Fahrenheit (200 degrees Celsius). Make sure your oven is properly calibrated for accurate baking.
-
Roll Out the Dough: Lightly flour a clean work surface. Remove the chilled dough from the refrigerator and roll it out to a thickness of about 1/8 inch (3mm). If the dough is sticking, add a little more flour to your work surface.
-
Line the Tartlet Pans: Carefully transfer the rolled-out dough to your tartlet pans. Gently press the dough into the bottom and sides of each pan, ensuring there are no air pockets. If using muffin pans, meticulously press the dough to conform to each cup. Trim any excess dough from the edges of the pans.
-
Prick the Bottoms: Use a fork to prick the bottom of each tartlet shell several times. This will prevent the dough from puffing up during baking.
-
Blind Bake with Foil: Press a piece of aluminum foil into each tartlet shell, covering the edges completely. This will help to prevent the edges from browning too quickly. You can also use pie weights or dried beans to weigh down the foil.
-
First Bake: Bake the tartlet shells in the preheated oven for 10-15 minutes, or until they are lightly golden brown. Keep a close eye on them, as baking times may vary depending on your oven.
-
Remove Foil and Finish Baking: Carefully remove the foil and pie weights from the tartlet shells. Bake for an additional 2-3 minutes, or until the shells are a deeper golden brown and fully cooked through.
-
Cool the Tartlet Shells: Transfer the baked tartlet shells to a wire rack to cool completely.
-
Prepare the Filling: While the tartlet shells are cooling, prepare the filling. In a mixing bowl, combine the softened cream cheese and confectioners’ sugar. Mix until smooth and creamy. Add the confectioners’ sugar gradually, tasting as you go, until you reach your desired level of sweetness.
-
Fill the Tartlets: Once the tartlet shells are completely cool, place a spoonful of the cream cheese filling into each shell. Spread the filling evenly over the bottom of the shell.
-
Arrange the Fruit: Arrange the fruit on top of the cream cheese filling. Get creative with your arrangement! You can use a single type of fruit or a combination of different fruits.
-
Dust with Sugar: Dust the finished tartlets with sifted confectioners’ sugar before serving. This adds a touch of sweetness and enhances their visual appeal.
-
Serve: Serve immediately and enjoy!
Expert Tips & Tricks
- Keep the Butter Cold: Using very cold butter is crucial for a flaky crust. If the butter gets too warm, the dough will become greasy and the crust will be tough.
- Don’t Overmix: Overmixing the dough develops the gluten, resulting in a tough crust. Mix just until the ingredients come together.
- Blind Baking is Key: Blind baking (baking the crust before adding the filling) ensures a crisp, non-soggy crust.
- Customize the Filling: Feel free to experiment with different flavorings in the cream cheese filling. A touch of vanilla extract, lemon zest, or almond extract can add a delicious twist.
- Egg Wash for Extra Shine: For a richer color and shine, brush the tartlet shells with an egg wash (1 egg yolk beaten with 1 tablespoon of milk or water) before the final bake.
Serving & Storage Suggestions
These Summer Fruit Tartlets are best enjoyed fresh, ideally within a few hours of assembly. The crust will begin to soften over time due to the moisture from the filling.
- Serving: Serve the tartlets chilled or at room temperature. Arrange them attractively on a platter for a visually appealing presentation.
- Storage: Store leftover tartlets in an airtight container in the refrigerator for up to 2 days.
- Freezing: While not ideal, you can freeze the unbaked tartlet shells. Wrap them tightly in plastic wrap and freeze for up to 1 month. Bake from frozen, adding a few extra minutes to the baking time. It is not recommended to freeze completed tartlets, as the fruit and filling will not hold up well.
Nutritional Information
(Estimated values per tartlet – may vary based on fruit selection and exact sugar content)
| Nutrient | Amount per Serving | % Daily Value |
|---|---|---|
| Calories | 220 kcal | 11% |
| Total Fat | 12g | 18% |
| Saturated Fat | 7g | 35% |
| Cholesterol | 45mg | 15% |
| Sodium | 50mg | 2% |
| Total Carbohydrate | 25g | 8% |
| Dietary Fiber | 1g | 4% |
| Sugars | 12g | – |
| Protein | 3g | 6% |
Variations & Substitutions
- Gluten-Free Crust: Substitute the all-purpose flour with a gluten-free flour blend for a gluten-free option. You may need to add a little more liquid to the dough to help it come together.
- Vegan Crust: Replace the butter with a vegan butter alternative and the egg yolk with 1 tablespoon of applesauce or flaxseed meal mixed with 3 tablespoons of water.
- Different Fruits: Get creative with your fruit selection! Try using peaches, nectarines, plums, or even tropical fruits like mango or pineapple.
- Lemon Curd Filling: For a tangy twist, replace the cream cheese filling with lemon curd.
- Chocolate Crust: Add 2 tablespoons of unsweetened cocoa powder to the flour mixture for a chocolate-flavored crust.
FAQs (Frequently Asked Questions)
Q: Can I make the dough ahead of time?
A: Absolutely! The dough can be made up to 2 days in advance and stored in the refrigerator, tightly wrapped in plastic wrap.
Q: Can I use store-bought tart shells?
A: Yes, you can use store-bought tart shells to save time. However, homemade tart shells generally taste better.
Q: How do I prevent the crust from shrinking during baking?
A: Chilling the dough before baking and using pie weights or dried beans during blind baking will help prevent the crust from shrinking.
Q: What if my filling is too thick?
A: If your cream cheese filling is too thick, add a tablespoon of milk or cream until it reaches your desired consistency.
Q: Can I add jam or glaze to the fruit?
A: Yes, you can brush the fruit with a thin layer of apricot jam or a simple glaze (made from equal parts melted apricot jam and water) to add shine and enhance the flavor.
Final Thoughts
These Summer Fruit Tartlets are a delightful way to celebrate the flavors of the season. With their crisp, buttery crust and creamy, fruit-topped filling, they are sure to be a crowd-pleaser. Don’t be afraid to experiment with different fruits and fillings to create your own unique variations. So, gather your ingredients, put on your apron, and bake a batch of these little beauties. And most importantly, share them with loved ones and enjoy the simple pleasure of good food and good company. I’d love to hear about your baking adventures, so feel free to leave a comment and share your creations!