
Summer Solstice Sunset Cake
I’ll never forget baking with my grandmother on the summer solstice. The kitchen, filled with the warm glow of the late evening sun, felt magical. We were always making something sweet, but one year, she surprised me with a cake that looked like the sunset – vibrant colors swirling on the outside and a hidden sun inside. It was more than just a cake; it was a celebration of light, warmth, and togetherness, a memory I cherish and recreate every year with this Summer Solstice Sunset Cake.
Recipe Overview
- Prep Time: 4 hours
- Cook Time: 35 minutes
- Total Time: 4 hours 35 minutes
- Servings: 20
- Yield: 1 Cake
- Dietary Type: Not specified
Ingredients
- 6 large egg whites, at room temperature
- 2 large whole eggs, at room temperature
- 2 cups whole milk, at room temperature, divided
- ½ teaspoon lemon extract
- ½ teaspoon vanilla
- 6 cups cake flour, sifted
- 3 cups granulated sugar
- 2 tablespoons and 2 teaspoons baking powder
- 2 teaspoons fine salt
- 1 ½ cups unsalted butter, at room temperature
- 9 cups Milkmoon Meringue Buttercream for frosting (recipe required, not included)
- ½ cup gold candy sprinkles
- Gel food coloring (Americolor gels: Electric Pink, Electric Yellow, Electric Blue, Watermelon Red, Tulip Red, and Orange)
Equipment Needed
- Stand mixer
- Paddle attachment
- Medium-size bowl
- Whisk
- Four 6-inch-round, 3-inch-deep (6”x3”) cake pans
- Shortening
- Baking paper rounds
- Piping bags
- Large star piping tip (Wilton 2D recommended)
- Bench scraper
- Extra-tall cake scraper (optional)
- Small, sharp paring knife
- Turntable
- Offset spatula
- Cake tester
- Cake board or plate
Instructions
- Preheat your oven to 350°F (175°C). Prepare four 6-inch-round, 3-inch-deep (6”x3”) cake pans by greasing with shortening, placing a baking paper round on the base, greasing again, and flouring. This ensures the cakes release cleanly.
- In a medium-size bowl, combine your egg whites, whole eggs, ½ cup of your milk, and vanilla and whisk to combine. Set aside. This mixture adds richness and flavor to the cake.
- In the bowl of a stand mixer fitted with the paddle attachment, combine your cake flour, sugar, baking powder, and salt and mix on low speed for a few minutes until combined. This ensures even distribution of the dry ingredients.
- Add in your butter and keep mixing. Stream in your remaining 1 ½ cups milk, half a cup at a time, continuing to beat on the lowest speed. This gradual addition prevents curdling. Raise the speed to medium and continue to beat for about 1 minute.
- Scrape your bowl, and then return the batter to low speed. Add your egg mixture in three batches, allowing each to incorporate fully before adding the next. Scrape again and mix briefly. This slow addition prevents the batter from deflating.
- Divide your cake batter into four portions. Tint the first portion a deep raspberry color using Watermelon Red gel color and Electric Pink with just a small touch of Electric Blue. Color the second portion sunset orange with Orange, a bit of Watermelon Red, and a bit of Electric Pink. Tint the third portion a deeper pink with Electric Pink and a touch of Watermelon Red, and the last portion a lighter pink with Electric Pink and a touch of orange.
- Spoon your batter into your pans, swirling up to two colors together in each pan if you want a swirlier look, although you can also just do one color per pan! Don’t overfill the pans; leave some room for the cake to rise.
- Bake your cakes for roughly 30-35 minutes, but keep an eye on them starting at minute 25. You’ll know they’re baked through when you press down in the center of each cake and it springs back. You can also insert a cake tester, and it should come out completely clean.
- Remove your cakes from the oven and allow to come to room temperature on a rack. Then, I like to wrap them up in plastic and put them in the fridge for at least half an hour, preferably overnight before I remove them from the pans. The cakes should be cold all the way through before attempting to trim them. Chilling makes them easier to handle and prevents crumbling.
- Whip up some buttercream using the recipe linked in the ingredients list. You will need to make one and a half times the listed recipe. Ensure the buttercream is smooth and holds its shape.
- Divide your buttercream into three equal portions. Set one of these portions aside.
- Split one of the two portions you’re working with in half, and color one part fiery red using Americolor Tulip Red and the other part a peachy pink with Electric Pink, Watermelon Red, and the tiniest bit of Electric Blue.
- Color the entirety of the second half a warm yellow using Electric Yellow and a touch of Tulip Red.
- Divide the one portion of buttercream you’d set aside earlier into three smaller portions. Color each portion a different shade of orange to create an ombre effect that ranges from your yellow and your fiery red that you just finished mixing. Use Electric Yellow, Tulip Red, and Orange to achieve this.
- Level and torte each of your 4 cakes in half. Take three layers total and stack these first, spreading a thin layer of pink buttercream between the cake layers. Set in the fridge or freezer for about 10 minutes until the buttercream hardens up. This creates a stable base for the next step.
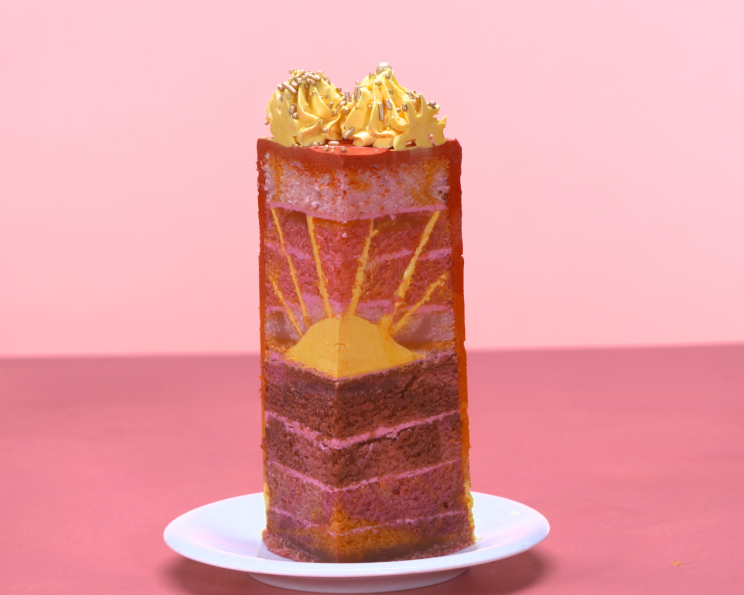
- Now you’re going to create the rays of the sun in this section of cake. It’s tricky, so work patiently and take your time! Take your cake out of the fridge and, using a small, sharp paring knife, cut into the cake, inserting the knife halfway the side of the cake at about a 25° angle. Without using a sawing motion at all, pull the knife through the cake as you rotate it on your turntable, creating a cone shape that you’re cutting into your cake.
- Pop the top of the cake out and set it aside. Spread a thin layer of yellow buttercream onto the exposed insides of the cake, then replace the top portion and gently press it into the buttercream to adhere. Place in the fridge or freezer for another 10 minutes to let it firm up again. Chilling is crucial for maintaining the shape.
- Repeat this step twice more, although the second time you’ll move your knife up to just inside the circumference of the top of the cake and hold it at a 45° angle, and the third time you’ll move your knife to a little over halfway along the radius of the top of the cake and hold it at a 65° angle. Make sure to rest the cake in the fridge or freezer between each cut to firm up the yellow buttercream!
- Finally, flip that section of cake upside down and use that paring knife to carve a shallow dome into the exposed base of the cake. I used a spoon to press the cake down into a smoother dome shape after cutting. This creates the smooth, rounded shape of the sun.
- Fill the dome completely with yellow buttercream and freeze or refrigerate again.
- Begin stacking your remaining layers of cake on your cake board or plate, layering a small amount of pink buttercream between every cake layer. Reserve the final layer and set aside.
- Grab your cake segment with the sun inside and flip it over onto the layers of cake you’ve been building up so that the sun dome is resting on the layers of cake below. Add a thin layer of pink buttercream on top of this segment and cap it with that final reserved layer of cake. Refrigerate for at least 10 minutes.
- Place your red and orange buttercreams into piping bags. Scoop about a half cup of your remaining yellow buttercream into a piping bag as well. Cut the tips off the bags to create a hole 1/8th of an inch wide on each.
- Place the remainder of your yellow buttercream in a piping bag fitted with your large star tip and set aside.
- Remove your stacked cake from the fridge and trim away the brown sides of the cake. This provides a clean canvas for the frosting. Then, pipe your yellow buttercream in rings rising up the base of the cake until it reaches roughly 1/5th of the way up the sides.
- Repeat with your ombre of orange buttercream, working your way up the sides of the cake, and finish with your red buttercream taking it all the way to the top, then covering the top of the cake entirely.
- Use your bench scraper to gently smooth the sides of the cake, holding it completely still at the base while you spin your turntable, cleaning it off, then moving it up towards the top and repeating. You will create smooth stripes of color that barely blend into each other.
- Smooth out the top of the cake with a small offset spatula, then, if you have one, use your extra tall cake scraper to smooth the sides one more time to create a perfectly cohesive smooth look. Tidy up the lip of buttercream at the top of the cake with your offset.
- Pipe frilly poofs of yellow buttercream with your star tip at the top of the cake, then add your sprinkles.
- Cut slices from your cake, either one at a time or, for a grand effect, remove an entire half of the cake at once to reveal the full sunset effect!
Expert Tips & Tricks
- For a more intense color, use gel food coloring instead of liquid. Gel colors are more concentrated, so you’ll need less to achieve the desired shade.
- If your buttercream is too soft, chill it in the refrigerator for 10-15 minutes before using.
- To prevent the cake layers from sticking to the pan, use parchment paper rounds at the bottom of the pans.
- If the cake layers crown during baking, gently level them with a serrated knife after they have cooled.
- When cutting the dome shape for the sun, go slow and use gentle motions to avoid tearing the cake.
Serving & Storage Suggestions
Serve the Summer Solstice Sunset Cake chilled for the best flavor and texture. The cake can be stored in an airtight container in the refrigerator for up to 3 days. You can also freeze the cake for up to 2 months. To freeze, wrap individual slices tightly in plastic wrap and then place them in a freezer-safe bag or container. Thaw overnight in the refrigerator before serving. Because of the buttercream, it is not recommended to leave the cake at room temperature for extended periods, especially in warm weather.
Nutritional Information
| Nutrient | Amount per Serving | % Daily Value |
|---|---|---|
| Calories | 849.9 kcal | N/A |
| Calories from Fat | 290 g | 34% |
| Total Fat | 32.3 g | 49% |
| Saturated Fat | 12.5 g | 62% |
| Cholesterol | 57.6 mg | 19% |
| Sodium | 569.8 mg | 23% |
| Total Carbohydrate | 134.3 g | 44% |
| Dietary Fiber | 0.7 g | 2% |
| Sugars | 97 g | 388% |
| Protein | 6 g | 11% |
Note: Nutritional information is an estimate and may vary based on specific ingredients and preparation methods.
Variations & Substitutions
- For a gluten-free version, use a gluten-free cake flour blend.
- To make the cake dairy-free, use a non-dairy milk alternative like almond or oat milk and a vegan butter substitute. Ensure the buttercream is also made with vegan ingredients.
- Experiment with different fruit purees or extracts to change the flavor profile of the cake layers. Consider using raspberry puree in the raspberry-colored layer or orange extract in the orange layer.
FAQs (Frequently Asked Questions)
Q: Can I make this cake ahead of time?
A: Yes, you can bake the cake layers and make the buttercream a day in advance. Store them separately in the refrigerator until ready to assemble.
Q: Can I use different food coloring?
A: Yes, you can use any gel food coloring you prefer. Just adjust the amounts to achieve the desired colors.
Q: Why are my cake layers dry?
A: Overbaking can cause dry cake layers. Be sure to check the cakes for doneness starting at 25 minutes and remove them from the oven as soon as a cake tester comes out clean.
Q: My buttercream is too soft. What should I do?
A: Place the buttercream in the refrigerator for 10-15 minutes to firm up. You can also add a tablespoon of powdered sugar at a time until it reaches the desired consistency.
Q: How do I get smooth stripes of color on the outside of the cake?
A: Use a bench scraper and hold it steady while you spin the turntable. Clean the scraper after each rotation.
Final Thoughts
I hope this Summer Solstice Sunset Cake brings as much joy to your celebrations as it has to mine. It’s a labor of love, but the vibrant colors and hidden sun are well worth the effort. Feel free to experiment with different colors and flavors to create your own unique sunset. And please, share your creations and feedback – I’d love to see your personal touches on this special cake! Perhaps serve it with a chilled glass of sparkling cider or a scoop of vanilla bean ice cream to complete the summery experience.