
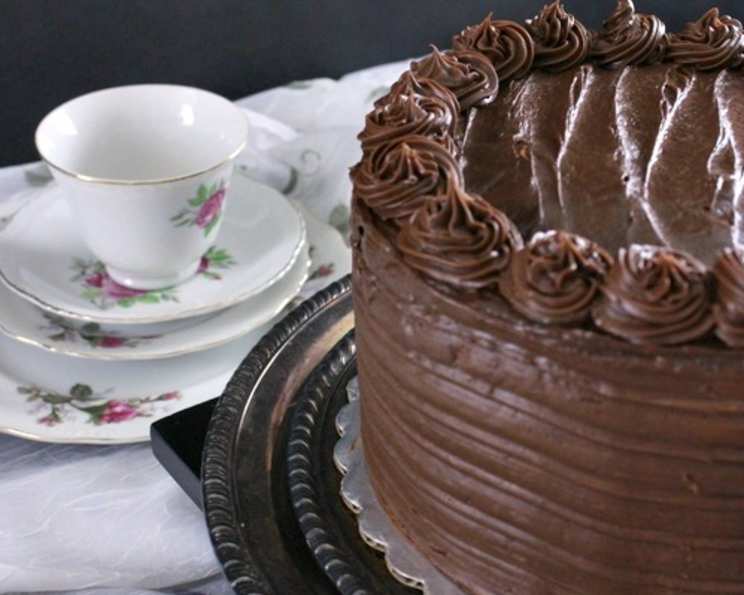
Super Dark Chocolate Cake With Milk Chocolate Lavender Mousse
The memory still makes my mouth water. It was my tenth birthday, and my aunt, a woman whose baking skills were legendary in our family, presented me with a towering dark chocolate cake. The aroma alone—deep, rich cocoa mingling with a delicate floral scent—was intoxicating. As I sunk my fork into the soft layers, the bitterness of the dark chocolate, combined with the ethereal, creamy lavender mousse, danced on my tongue. It wasn’t just a cake; it was a masterpiece, a symphony of flavors that cemented my love for chocolate and baking. This recipe, though not my aunt’s exact creation (that remains a treasured secret!), is my attempt to capture that same magic, that same feeling of pure chocolate bliss.
Recipe Overview
- Prep Time: 45 minutes
- Cook Time: 25 minutes
- Total Time: 1 hour 10 minutes
- Servings: 16
- Yield: One 8-inch 3-layer cake
- Dietary Type: Not specified (contains gluten, dairy, and eggs)
Ingredients
For the Super Dark Chocolate Cake:
- 2 cups unbleached all-purpose flour
- ½ cup plus 2 tablespoons Dutch-processed cocoa powder
- 1 ½ teaspoons instant espresso
- ½ teaspoon fine sea salt
- 1 ½ teaspoons baking soda
- 5 large eggs
- 1 ½ teaspoons vanilla extract
- 1 ¾ cups plus 2 tablespoons granulated sugar
- 1 ½ cups whole milk
For the Milk Chocolate Lavender Mousse:
- 1 cup heavy cream
- 2 cups milk chocolate chips
- 4 large egg yolks
- ¼ cup granulated sugar
- 2 tablespoons light corn syrup
- ¼ cup water
- 1 teaspoon vanilla extract
- ¼ teaspoon fine sea salt
- 1 teaspoon lavender oil, to taste (use culinary-grade oil)
Equipment Needed
- Three 8-inch round cake pans
- Parchment paper
- Nonstick cooking spray
- Stand mixer (or hand mixer)
- Mixing bowls
- Sifter
- Heatproof bowl
- Small pot
- Instant-read thermometer
- Cake tester or toothpick
Instructions
- Preheat and Prepare: Position a rack in the center of the oven and preheat to 350°F (175°C).
- Grease and Line Pans: Lightly grease three 8-inch round cake pans with nonstick cooking spray. Cut out parchment paper rounds that fit the bottom of each pan. Line the bottoms with the parchment rounds, then lightly grease the tops of the paper in the pans. This ensures the cakes release easily.
- Sift Dry Ingredients: In a medium bowl, sift together the flour, cocoa powder, instant espresso, salt, and baking soda. Sifting is crucial for a light and airy cake.
- Cream Wet Ingredients: In the bowl of a stand mixer fitted with the whip attachment, beat the eggs, vanilla extract, and sugar on high speed until thickened and light in color, about 3 minutes. The mixture should ribbon when the whisk is lifted.
- Incorporate Oil: Gradually add the oil to the egg mixture and continue to mix until evenly combined.
- Combine Wet and Dry: Next, reduce the speed of the mixer to low and gradually add the sifted dry ingredients and the milk, alternating between the two until fully combined. Begin and end with the dry ingredients to prevent the batter from curdling.
- Smooth the Batter: Scrape down the sides of the bowl with a rubber spatula and mix until the batter is smooth. Be careful not to overmix at this stage, as it can lead to a tough cake.
- Divide and Bake: Divide the batter evenly among the prepared cake pans. An easy way to do this is to weigh each pan on a kitchen scale to ensure even distribution. Bake until a cake tester inserted into the center of the cake comes out clean, about 25 minutes.
- Cool the Cakes: Let the cakes cool in the pans for 10 minutes before inverting them onto a wire rack to cool completely. Ensure the cakes are completely cool before frosting.
For the Milk Chocolate Lavender Mousse:
- Whip the Cream: In the bowl of a stand mixer, fitted with the whip attachment, beat the heavy cream until soft peaks form. Be careful not to overwhip, as this can turn the cream into butter.
- Refrigerate Cream: Transfer the whipped cream to a large bowl and refrigerate until ready to use. This helps stabilize the mousse.
- Melt the Chocolate: In a heatproof bowl set over a pot of simmering water (making sure the bottom of the bowl doesn’t touch the water), melt the milk chocolate chips. Stir frequently to prevent burning.
- Cool Chocolate: Remove the melted chocolate from the heat and let it stand at room temperature until ready to use. It should be smooth and slightly cooled, but not solidified.
- Whip the Egg Yolks: In the clean bowl of a stand mixer, fitted with the whip attachment, beat the egg yolks on medium speed until light in color.
- Cook the Sugar Syrup: Meanwhile, in a small pot, combine the sugar, corn syrup, water, vanilla extract, and salt. Cook over medium heat, stirring until the sugar dissolves. Then, stop stirring and allow the mixture to cook until it reaches 220°F (104°C) on an instant-read thermometer.
- Temper the Egg Yolks: Immediately remove the pot from the heat and slowly pour the hot sugar syrup over the egg yolks, with the stand mixer running on medium speed. This process is called tempering, and it prevents the egg yolks from scrambling.
- Whip to Fluffiness: Increase the speed of the mixer to high and whip the yolk mixture until light, fluffy, about tripled in volume, and cooled to room temperature. This may take several minutes.
- Combine Chocolate and Yolks: Remove the bowl of whipped egg yolks from the mixer, add the melted milk chocolate, and quickly fold until smooth and evenly combined.
- Fold in Whipped Cream: Gently fold the refrigerated whipped cream into the chocolate-yolk mixture. Be careful not to deflate the cream.
- Add Lavender Oil: Add the lavender oil, to taste, and fold until evenly incorporated. Start with a small amount (1/4 teaspoon) and gradually add more until you reach the desired level of lavender flavor. Remember, a little goes a long way.
Expert Tips & Tricks
- Room Temperature Ingredients: Ensure your eggs and milk are at room temperature for optimal emulsification, resulting in a smoother batter.
- Don’t Overbake: Overbaking will dry out the cake. Check for doneness a few minutes early and use a cake tester to be sure.
- Parchment Paper is Your Friend: Parchment paper rounds are essential for easy cake release and prevent sticking.
- Even Layers: For uniformly thick cake layers, use a kitchen scale to measure the batter into each pan.
- Lavender Oil Caution: Culinary lavender oil is highly concentrated. Start with a tiny amount and taste as you go. Too much can make the mousse taste soapy.
- Make Ahead: The cake layers can be baked a day ahead, wrapped tightly in plastic wrap, and stored at room temperature. The mousse can also be made a day ahead and stored in the refrigerator.
- Chocolate Selection: Use high-quality milk chocolate chips for the mousse for the best flavor.
Serving & Storage Suggestions
To serve, layer the cooled cake layers with the milk chocolate lavender mousse. You can optionally add a simple chocolate ganache or dust the top with cocoa powder. Garnish with fresh lavender sprigs or edible flowers for an elegant touch.
Store leftover cake in an airtight container in the refrigerator for up to 3 days. The cake can also be frozen for up to 2 months. Thaw in the refrigerator overnight before serving. It is best served chilled.
Nutritional Information
| Nutrient | Amount per Serving | % Daily Value |
|---|---|---|
| Calories | 383 kcal | N/A |
| Total Fat | 15.6g | 24% |
| Saturated Fat | 8.9g | 44% |
| Cholesterol | 131.7mg | 43% |
| Sodium | 286.3mg | 11% |
| Total Carbohydrate | 55g | 18% |
| Dietary Fiber | 2g | 8% |
| Sugars | 37.9g | N/A |
| Protein | 7.4g | 14% |
Note: Nutritional information is an estimate and may vary based on specific ingredients and portion sizes.
Variations & Substitutions
- Gluten-Free: Substitute the all-purpose flour with a gluten-free blend, ensuring it contains xanthan gum or another binding agent.
- Dairy-Free Mousse: While it will alter the flavor profile significantly, you could try using a high-quality coconut cream in place of the heavy cream for a dairy-free mousse. Be sure to use full-fat coconut cream and chill it thoroughly before whipping.
- Different Chocolate: Experiment with using dark chocolate in the mousse for a richer, more intense flavor, or white chocolate for a sweeter, more delicate taste. Adjust the amount of sugar accordingly.
- Other Flavorings: If you’re not a fan of lavender, try other complementary flavors like rosewater, orange zest, or peppermint extract.
- Espresso Boost: Add an extra teaspoon of instant espresso to the dry ingredients for an even more intense chocolate flavor.
FAQs (Frequently Asked Questions)
Q: Why is Dutch-processed cocoa powder recommended?
A: Dutch-processed cocoa powder is less acidic than natural cocoa powder, resulting in a smoother, less bitter chocolate flavor and a darker color.
Q: Can I use regular coffee instead of instant espresso?
A: While you can, instant espresso provides a more concentrated coffee flavor that enhances the chocolate notes. Using regular coffee might add too much liquid to the batter.
Q: How do I prevent the sugar syrup from crystallizing when making the mousse?
A: Ensure all the sugar is dissolved before the syrup comes to a boil, and avoid stirring it once it’s boiling.
Q: What if my lavender oil is very strong?
A: Start with just a few drops of lavender oil and taste the mousse frequently until you achieve the desired level of flavor. Too much lavender oil can make the mousse taste soapy.
Q: Can I freeze the assembled cake?
A: Yes, you can freeze the assembled cake. Wrap it tightly in plastic wrap and then in foil. Thaw in the refrigerator overnight before serving. The texture of the mousse may change slightly after freezing.
Final Thoughts
This Super Dark Chocolate Cake with Milk Chocolate Lavender Mousse is more than just a dessert; it’s an experience. The contrasting flavors and textures create a delightful symphony on your palate, making it perfect for special occasions or simply for indulging in a moment of pure pleasure. Don’t be intimidated by the multiple steps – each one contributes to the cake’s exceptional flavor and texture. So, gather your ingredients, preheat your oven, and prepare to create a chocolate masterpiece that will impress your friends, delight your family, and transport you back to your fondest dessert memories. I encourage you to try this recipe, experiment with variations, and share your creations. After all, the best part of baking is sharing the joy with others. Perhaps a cup of strong coffee or a glass of dessert wine would provide the perfect accompaniment?