
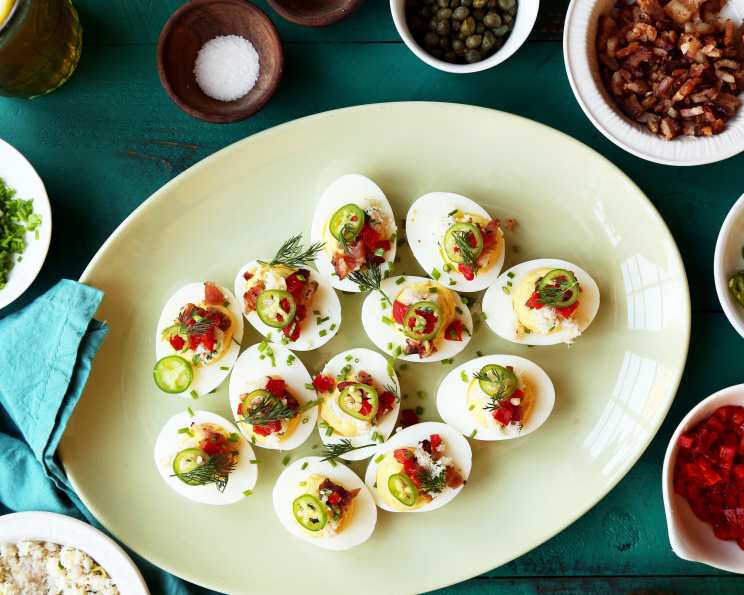
Surf and Turf Deviled Eggs: An Elevated Classic
The first time I ever had deviled eggs, it was at a family reunion picnic. My Great Aunt Mildred, the undisputed queen of Southern comfort food, always brought a platter piled high with them. They were simple, classic, and utterly addictive. I remember being mesmerized by the creamy, slightly tangy filling and the sprinkle of paprika on top. Those humble eggs were the highlight of the whole spread for me. Now, years later, I’ve taken that fond memory and elevated it to something truly special – a “Surf and Turf” deviled egg that’s sure to impress!
Recipe Overview
- Prep Time: 30 minutes
- Cook Time: 10 minutes
- Total Time: 40 minutes
- Servings: 12
- Yields: 24 deviled eggs
- Dietary Type: Gluten-Free
Ingredients
- 12 large eggs
- ½ cup mayonnaise
- 2 teaspoons prepared horseradish
- 1 teaspoon Dijon mustard
- Kosher salt
- 8 ounces lump crabmeat
- 2 tablespoons extra virgin olive oil
- 2 tablespoons finely chopped fresh parsley
- 1 tablespoon fresh lemon juice
- 1 teaspoon finely grated lemon zest
- ½ teaspoon kosher salt
- 12 ounces thick-cut bacon (cut into ¼-inch pieces)
- Dill fronds, tarragon leaves (finely chopped), chives, pimentos, capers, and thinly sliced serranos (for serving)
Equipment Needed
- Large bowl
- Large pot
- Slotted spoon
- Clean kitchen towel
- Sharp knife
- Food processor
- Pastry bag (or gallon-sized zip-top freezer bag)
- Medium bowl
- Large skillet
- Paper towel-lined plate
Instructions
-
Prepare the Ice Bath: Fill a large bowl with ice and cover with water. This will be crucial for stopping the cooking process of the eggs.
-
Boil the Eggs: Bring a large pot of water to a boil over medium-high heat. Gently lower the eggs into the water, being careful not to let them crack.
-
Cook the Eggs: Boil the eggs for exactly 12 minutes. Set a timer to ensure accuracy. Overcooked eggs will have a green ring around the yolk, which we want to avoid.
-
Ice Bath Shock: Immediately plunge the boiled eggs into the ice bath. Let them sit until completely cold, about 15 minutes. This makes peeling much easier.
-
Chill the Eggs: Remove the eggs from the water and chill them in the refrigerator until ready to make the filling. This is important to ensure the eggs are completely cooled before continuing.
-
Peel the Eggs: Peel the eggs carefully. If the shells are sticking, try tapping the egg gently all over before peeling under cold running water.
-
Slice the Eggs: Wet a clean kitchen towel with warm water; it should be pretty damp. Wet the blade of your knife with warm water. Slice one egg lengthwise through the center in one continuous motion (don’t saw the egg!). Use the towel to clean the blade and wet the knife, then repeat with the remaining eggs, cleaning the blade after each cut. This will give you clean, even slices.
-
Prepare the Yolk Mixture: Scoop out the yolks and transfer them to a food processor.
-
Process the Yolks: Process the yolks, mayonnaise, horseradish, Dijon mustard, ¾ teaspoon kosher salt, and 2-3 tablespoons water until smooth, light, and creamy. The consistency should be similar to cake frosting. Add water gradually until you achieve the desired consistency.
-
Chill the Yolk Mixture: Scrape the yolk mixture into a large pastry bag or a gallon-sized zip-top freezer bag and chill until ready to serve. Chilling allows the flavors to meld and the mixture to firm up slightly.
-
Make the Crab Salad: Fold the crabmeat, olive oil, parsley, lemon juice, lemon zest, and ½ teaspoon kosher salt in a medium bowl until completely combined. Be gentle when mixing to avoid breaking up the delicate crabmeat.
-
Chill the Crab Salad: Cover the crab salad and chill until ready to serve. Chilling is essential for food safety and flavor development.
-
Cook the Bacon: Cook the bacon in a large skillet over medium-high heat, stirring occasionally, until deep golden brown and crispy, about 7-10 minutes. Adjust the heat as needed to prevent burning.
-
Drain the Bacon: Transfer the cooked bacon to a paper towel-lined plate and let cool. This will remove excess grease and allow the bacon to crisp up further.
-
Assemble the Deviled Eggs: When ready to serve, cut a ⅓-inch wide tip off the pastry bag or the corner of the freezer bag. Pipe the yolk mixture into the egg whites.
-
Garnish and Serve: Serve the deviled eggs with the crab salad, bacon, dill, tarragon, chives, pimentos, capers, and serranos. Let your guests build their own surf and turf creations!
Expert Tips & Tricks
- For perfectly peeled eggs, add a teaspoon of baking soda to the boiling water. This helps to loosen the shell membrane.
- If you don’t have a food processor, you can use a potato masher or a fork to mash the yolks, but the texture will be slightly less smooth.
- Taste the yolk mixture before chilling and adjust the seasonings as needed. Everyone’s palate is different, so don’t be afraid to experiment.
- To prevent the egg whites from drying out, store them in a container filled with cold water in the refrigerator until ready to fill.
- If you don’t have fresh herbs, you can use dried herbs, but use them sparingly as they are more potent.
- For a spicier kick, add a pinch of cayenne pepper to the yolk mixture.
Serving & Storage Suggestions
Serve these Surf and Turf Deviled Eggs chilled. Arrange the filled eggs on a platter and offer the crab salad, bacon, and garnishes in separate bowls so your guests can customize their creations.
Store leftover deviled eggs in an airtight container in the refrigerator for up to 2 days. It’s best to store the crab salad and bacon separately to prevent the eggs from becoming soggy.
Deviled eggs are best served fresh. I do not recommend freezing the eggs.
Nutritional Information
| Nutrient | Amount per Serving | % Daily Value |
|---|---|---|
| Calories | 121.6 kcal | N/A |
| Calories from Fat | 90 g | 74% |
| Total Fat | 10 g | 15% |
| Saturated Fat | 3.1 g | 15% |
| Cholesterol | 109.8 mg | 36% |
| Sodium | 241.6 mg | 10% |
| Total Carbohydrate | 0.5 g | 0% |
| Dietary Fiber | 0 g | 0% |
| Sugars | 0.1 g | N/A |
| Protein | 6.9 g | 13% |
Variations & Substitutions
- Spicy Deviled Eggs: Add a pinch of cayenne pepper or a dash of hot sauce to the yolk mixture.
- Mediterranean Deviled Eggs: Mix chopped olives, sun-dried tomatoes, and feta cheese into the yolk mixture. Top with a drizzle of olive oil.
- Vegetarian Deviled Eggs: Omit the bacon and crab, and top the eggs with sauteed mushrooms and caramelized onions.
- Lighter Deviled Eggs: Substitute Greek yogurt for half of the mayonnaise in the yolk mixture.
- Different Crab: Use imitation crab if real crab meat is too expensive.
FAQs (Frequently Asked Questions)
Q: Can I make the deviled eggs ahead of time?
A: Yes, you can boil and peel the eggs a day in advance. Store the egg whites in water and the yolk mixture separately in the refrigerator. Assemble just before serving.
Q: How can I prevent the egg yolks from turning green?
A: Avoid overcooking the eggs. Plunging them into an ice bath immediately after cooking stops the cooking process and prevents the green ring from forming.
Q: What if I don’t have a pastry bag?
A: A zip-top freezer bag with a corner snipped off works perfectly well. You can also use a spoon, but the piping will be less precise.
Q: Can I use a different type of seafood instead of crab?
A: Absolutely! Shrimp, lobster, or even smoked salmon would be delicious alternatives.
Q: How long will the deviled eggs last?
A: Deviled eggs are best eaten within 1-2 days. After that, the texture may change, and the risk of bacterial growth increases.
Final Thoughts
I hope you’ll give these Surf and Turf Deviled Eggs a try. They are perfect for parties, potlucks, or just a special treat for yourself. Don’t be afraid to get creative with the toppings and garnishes. The possibilities are endless! Let me know in the comments how they turned out for you, and what other delicious variations you come up with. These eggs pair perfectly with a crisp glass of Sauvignon Blanc or a refreshing iced tea. Enjoy!