
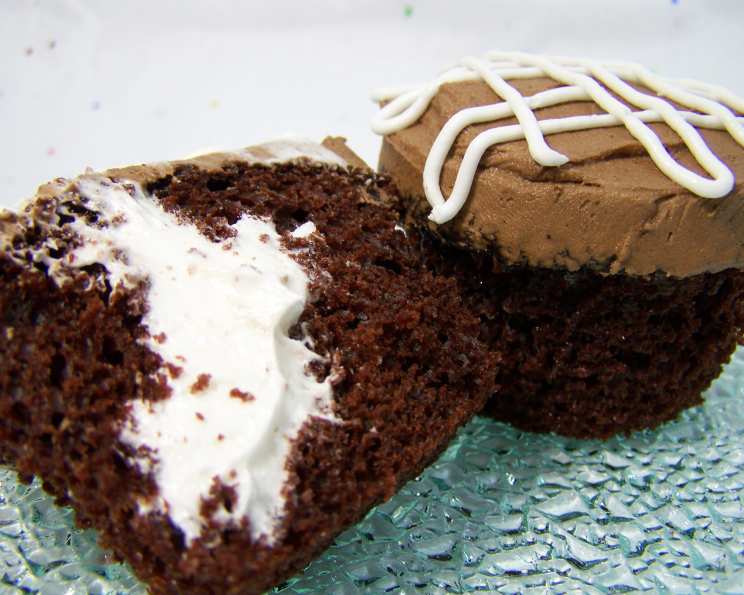
Surprise! Cream-Filled Cupcakes
There’s something utterly magical about biting into a simple cupcake and discovering a hidden treasure inside. I still remember the first time my grandmother let me help her fill her famous cream puffs. The look of sheer delight on everyone’s faces as they tasted that surprise filling sparked a lifelong love of baking in me. These Surprise! Cream-Filled Cupcakes bring back that same joy – a tender chocolate cake yielding to a burst of sweet, creamy goodness. They’re the perfect treat for kids and adults alike, guaranteed to put a smile on every face.
Recipe Overview
- Prep Time: 40 minutes
- Cook Time: 18-22 minutes
- Total Time: 1 hour 20 minutes
- Yields: 24 cupcakes
- Serves: 12
- Dietary Type: Not specified
Ingredients
Cupcakes
- 1 (18 1/4 ounce) box of Pillsbury Moist Supreme Devil’s Food Cake Mix
- 1 1/4 cups cooled coffee (or use water, if preferred)
- 1/2 cup vegetable oil
- 3 eggs
Filling
- 1/2 cup milk
- 2 tablespoons flour
- 1/2 cup vegetable shortening
- 1/2 cup sugar
- 1/2 teaspoon vanilla extract
- 1/2 cup powdered sugar
Buttercream Frosting
- 1/2 cup margarine
- 1/2 cup vegetable shortening
- 2 tablespoons water
- 3/4 teaspoon Wilton vanilla flavoring
- 1/4 teaspoon Wilton butter flavoring
- 1 tablespoon Wilton meringue powder
- 3 cups powdered sugar
Equipment Needed
- Muffin tin
- Paper muffin liners
- Non-stick cooking spray
- Mixing bowls
- Electric mixer
- Saucepan
- Whisk
- Saran wrap (plastic wrap)
- Frosting bag
- Star tip (size 18 or similar)
- Cooling rack
Instructions
- Prepare the cupcake batter: Follow the instructions on the Pillsbury Devil’s Food Cake Mix box. If desired, substitute the water called for on the box with cooled coffee. This will enhance the chocolate flavor, adding a subtle richness without a noticeable coffee taste.
- Mix the batter: Using an electric mixer, beat the batter on low speed until all the flour is moistened. Then, beat on medium speed for 2 minutes, or as directed on the box. Remember, you can use any type of cake mix you like; just follow the specific directions on its packaging.
- Fill the muffin liners: Line a muffin tin with 24 paper liners. Spray the insides of the liners with non-stick spray to ensure the cupcakes release easily after baking.
- Bake the cupcakes: Divide the batter evenly among the prepared muffin liners. Bake at 325 degrees Fahrenheit (160 degrees Celsius) for 18 to 22 minutes, or until a toothpick inserted into the center comes out clean. This lower baking temperature, which is 25 degrees less than the box might suggest, helps the cupcakes stay moist and have evenly topped surfaces – a useful tip I picked up in a Wilton decorating class!
- Cool the cupcakes: Remove the baked cupcakes from the muffin tin and transfer them to a cooling rack to cool completely.
- Prepare the filling: In a small saucepan, whisk the flour into the milk until no lumps remain.
- Cook the filling: Heat the milk and flour mixture over medium-low heat, stirring constantly with the whisk until the mixture thickens to a gravy-like consistency. This usually takes several minutes.
- Cool the filling base: Remove the thickened mixture from the hot pan and transfer it to a cool bowl. Cover the surface of the mixture directly with Saran wrap to prevent a skin from forming. Allow the mixture to cool completely to room temperature. You can speed up this process by placing the bowl in a cool water bath or refrigerating it.
- Make the cream filling: In a mixing bowl, cream together the vegetable shortening and sugar using an electric mixer for about 5 minutes, or until light and fluffy.
- Combine and whip: Add the cooled milk-flour gravy to the creamed shortening and sugar mixture. Beat until fluffy and the sugar is completely dissolved, another 5 minutes or so. Be sure to scrape down the sides of the bowl and the beaters frequently to ensure all the sugar grains are incorporated and dissolved. If you’re unsure, whip it for a bit longer.
- Flavor the filling: Add the vanilla extract and powdered sugar to the filling. Whip well until fully combined and smooth.
- Fill the cupcakes: Once the cupcakes are completely cooled, transfer the filling to a frosting bag fitted with a star tip (a size 18 or similar works well).
- Inject the filling: Press the tip of the frosting bag down into the center of each cupcake, about ¾ of an inch deep. Squeeze the bag firmly, enough to cause the top of the cupcake to rise slightly, but not so much that it cracks. Don’t worry if some cupcakes crack – the frosting will cover it up!
- Repeat and cool: Lift the tip out of each cupcake and repeat the filling process with the remaining cupcakes. Freshly baked and cooled cupcakes, or cupcakes stored in an airtight container until you are ready to fill them, are less likely to crack during this step.
- Prepare the buttercream frosting: To make the buttercream frosting, cream together the margarine, vegetable shortening, flavorings (vanilla and butter), and water in a mixing bowl until light and fluffy.
- Add sugar and meringue: Gradually add the powdered sugar and meringue powder to the creamed mixture. Beat until well combined and smooth. Avoid over-beating the frosting to maintain a smoother consistency.
- Frost the cupcakes: Frost the tops of the filled cupcakes with the buttercream frosting.
- Enjoy! Serve the cupcakes immediately and enjoy!
Expert Tips & Tricks
- Coffee Substitute: Don’t be afraid of using coffee in the chocolate cupcakes. The flavor is subtle but enhances the chocolate beautifully. However, if you’re truly averse to coffee or making these for very young children, water works perfectly fine.
- Cooling the Filling: Patience is key when cooling the filling base. If it’s not completely cool, it will melt the shortening in the buttercream, resulting in a runny mess. Use the water bath or refrigeration to speed things up.
- Dissolving the Sugar: Ensure the sugar is completely dissolved in the filling. Undissolved sugar will create a grainy texture. Whip it longer if needed.
- Frosting Consistency: If the buttercream frosting is too thick, add a tiny bit more water, one teaspoon at a time, until you reach the desired consistency. If it’s too thin, add a little more powdered sugar.
- Piping Skills: If you’re not confident with piping, simply spread the buttercream on top of the cupcakes with a knife or spatula. It will still taste delicious!
Serving & Storage Suggestions
Serve these cupcakes chilled or at room temperature. They are best enjoyed within a day or two of making them, as the cake can dry out over time. Store the finished cupcakes in a sealed container in the refrigerator to keep them fresh for up to 3 days. You can also freeze them for longer storage (up to 2 months). Thaw frozen cupcakes in the refrigerator before serving. Store any leftover frosting and filling separately in airtight containers in the refrigerator or freezer. The frosting and filling will keep well for months in the freezer.
Nutritional Information
| Nutrient | Amount per Serving | % Daily Value |
|---|---|---|
| Calories | 648.9 kcal | N/A |
| Calories from Fat | 344 g | 53% |
| Total Fat | 38.3 g | 58% |
| Saturated Fat | 8.9 g | 44% |
| Cholesterol | 47.9 mg | 15% |
| Sodium | 424.9 mg | 17% |
| Total Carbohydrate | 76.4 g | 25% |
| Dietary Fiber | 1.1 g | 4% |
| Sugars | 59.2 g | 236% |
| Protein | 4.7 g | 9% |
Note: Nutritional information is an estimate and may vary based on specific ingredients and portion sizes.
Variations & Substitutions
- Cake Mix Alternatives: Experiment with different cake mix flavors, such as yellow cake, white cake, or even a spice cake for a fall-themed treat.
- Filling Flavors: Get creative with the filling! Add a tablespoon of peanut butter for a peanut butter cream filling, a teaspoon of lemon zest for a lemon cream filling, or a dash of cinnamon for a spiced cream filling.
- Frosting Variations: Instead of classic buttercream, try a chocolate ganache, a cream cheese frosting, or a simple glaze. You can also add food coloring to the buttercream for a festive touch.
- Vegan Option: Substitute the eggs in the cake mix with applesauce or a commercial egg replacer. Use plant-based milk, margarine, and shortening. Check that the cake mix itself is vegan-friendly.
FAQs (Frequently Asked Questions)
Q: Can I use pre-made frosting instead of making my own buttercream?
A: Absolutely! A can of your favorite store-bought frosting can be substituted for the homemade buttercream to save time.
Q: Why do you bake the cupcakes at a lower temperature than the box suggests?
A: Baking at a slightly lower temperature helps the cupcakes stay moist and ensures they have a more even top, which is ideal for frosting.
Q: Can I make the filling ahead of time?
A: Yes, the filling can be made a day or two in advance and stored in an airtight container in the refrigerator. Just be sure to let it come to room temperature before using it to fill the cupcakes.
Q: My cupcakes cracked when I filled them. What did I do wrong?
A: This usually happens when too much filling is added at once, or the cupcakes are not completely cooled. Try using a smaller amount of filling and ensuring the cupcakes are thoroughly cooled before filling.
Q: Can I freeze the filled cupcakes?
A: Yes, you can freeze the filled and frosted cupcakes. Place them on a baking sheet and freeze until solid, then transfer them to an airtight container for longer storage. Thaw in the refrigerator before serving.
Final Thoughts
These Surprise! Cream-Filled Cupcakes are more than just a dessert; they’re a little burst of happiness in every bite. Whether you’re baking for a birthday party, a family gathering, or simply a sweet treat for yourself, I encourage you to give this recipe a try. Get creative with the flavors, experiment with different frostings, and most importantly, have fun! Don’t be afraid to share your creations and feedback. And why not pair these delightful cupcakes with a glass of cold milk or a steaming cup of coffee for the ultimate indulgence? Happy baking!