
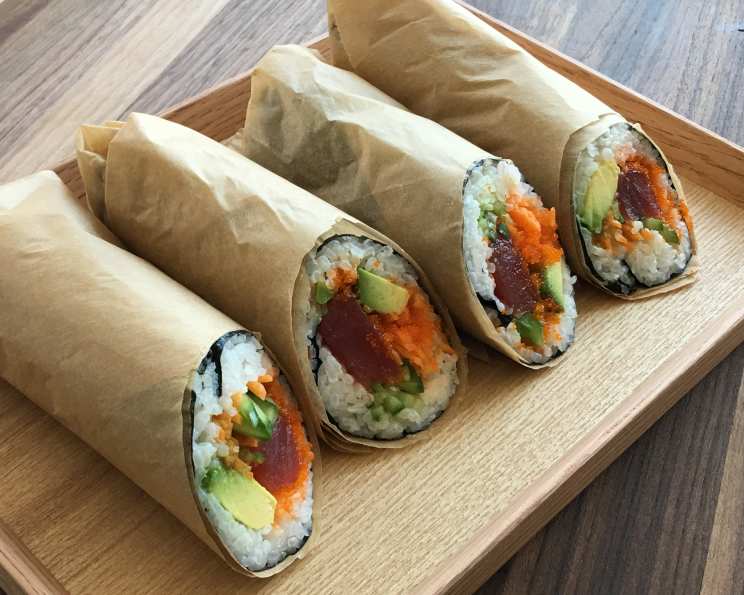
Sushi Burrito: A Culinary Fusion Adventure
I’ll never forget the first time I had a sushi burrito. I was at a food truck rally in Los Angeles, surrounded by the aroma of tacos, BBQ, and something distinctly… Japanese? It was this enormous seaweed-wrapped creation, packed to the brim with vibrant colors and textures. Hesitantly, I took a bite, and the explosion of flavors – the sweet rice, the savory tuna, the creamy avocado – transported me. It was a revelation, a perfect marriage of two of my favorite cuisines, and I knew I had to recreate it at home. Now, I am excited to share my take on this fun and delicious dish!
Recipe Overview
- Prep Time: 20 minutes
- Cook Time: 30 minutes
- Total Time: 50 minutes
- Servings: 4
- Yield: 4 Burritos
- Dietary Type: Gluten-Free (if using gluten-free soy sauce)
Ingredients
- 2 cups sushi rice (equivalent to 4 cups of cooked rice)
- ¼ cup seasoning rice vinegar
- 4 ounces sashimi grade tuna
- 1 avocado
- ¼ cup tobiko (flying fish roe)
- 1 persian cucumber (cut to size of matchsticks)
- ½ carrot (cut to size of matchsticks)
- 4 sheets nori (roasted sushi seaweed)
Equipment Needed
- Rice cooker (optional, but recommended)
- Sushi mat (makisu)
- Sharp knife
- Cutting board
- Spatula
- Small mixing bowl
Instructions
-
Begin by preparing the sushi rice. If using a rice cooker, follow the manufacturer’s instructions. Otherwise, rinse the rice under cold water until the water runs clear. Combine the rice with the appropriate amount of water (usually a 1:1 ratio) in a pot. Bring to a boil, then reduce heat to low, cover, and simmer for 15-20 minutes, or until all the water is absorbed.
-
Once the rice is cooked, remove it from the heat and let it rest for 10 minutes, covered. This allows the rice to steam and become perfectly fluffy.
-
While the rice is resting, prepare the seasoning rice vinegar. In a small bowl, combine the rice vinegar with a pinch of sugar and a pinch of salt (optional, to taste). Mix until the sugar and salt are dissolved.
-
Transfer the cooked rice to a large bowl. Gently pour the seasoning rice vinegar over the rice. Using a spatula, gently mix the vinegar into the rice, being careful not to crush the grains. The goal is to evenly coat the rice with the vinegar without making it mushy.
-
Allow the seasoned rice to cool to room temperature. This is important, as warm rice will make the nori soggy.
-
While the rice is cooling, prepare the other ingredients. Slice the sashimi-grade tuna into thin strips. Peel and slice the avocado. Cut the persian cucumber and carrot into matchsticks. Gather the tobiko.
-
Lay a sushi mat (makisu) on a clean surface. Place one sheet of nori on the mat, with the shiny side down. The shiny side will be on the outside of the burrito.
-
Spread about 1 cup of the cooled cooked rice evenly over the nori, leaving a ½-inch space around the edges. This will help seal the burrito. Use your fingers or the back of a spoon to gently press the rice down.
-
Lay down all ingredients in the middle of the mat of rice, leaving space in the front and back area. Place strips of tuna, slices of avocado, cucumber and carrot matchsticks, and a generous sprinkle of tobiko in a line across the center of the rice. Don’t overfill, or it will be difficult to roll.
-
Using the sushi mat, roll everything up tightly like a burrito. Start by lifting the edge of the mat closest to you and folding it over the ingredients. Tuck the ingredients in tightly as you roll, using the mat to compress the burrito into a compact cylinder.
-
Once rolled, firmly press the mat around the burrito to seal it completely. This helps to hold the shape and prevent it from falling apart.
-
Remove the sushi burrito from the mat. Using a sharp, wet knife, cut the burrito in half crosswise. Wetting the knife will prevent the rice from sticking.
-
Repeat steps 7-12 with the remaining nori sheets and ingredients.
Expert Tips & Tricks
- For best results, use high-quality sushi rice. Short-grain rice is essential for its stickiness.
- Don’t overcook the rice or it will become mushy. Follow the package instructions carefully.
- Use a fan to cool the rice quickly after adding the seasoning rice vinegar. This will give it a nice sheen and prevent it from becoming too sticky.
- If you don’t have a sushi mat, you can use a clean kitchen towel instead.
- Experiment with different fillings! Smoked salmon, cooked shrimp, or even tofu are all great options.
- For a spicier kick, add a drizzle of sriracha mayo or a sprinkle of chili flakes.
- To make the burritos easier to handle, you can wrap them in plastic wrap after rolling. This will help them hold their shape and prevent the nori from drying out.
Serving & Storage Suggestions
Serve the sushi burritos immediately after making them. They are best enjoyed fresh, when the nori is still crisp and the ingredients are at their peak flavor. You can serve them with soy sauce, wasabi, and pickled ginger on the side.
If you have any leftovers, wrap them tightly in plastic wrap and store them in the refrigerator. They will keep for up to 24 hours. However, the nori will become softer over time. It’s not recommended to freeze sushi burritos, as the texture of the rice and other ingredients will change.
Nutritional Information
| Nutrient | Amount per Serving | % Daily Value |
|---|---|---|
| Calories | 420 kcal | 21% |
| Total Fat | 15g | 23% |
| Saturated Fat | 3g | 15% |
| Cholesterol | 70mg | 23% |
| Sodium | 300mg | 13% |
| Total Carbohydrate | 60g | 20% |
| Dietary Fiber | 5g | 20% |
| Sugars | 3g | 6% |
| Protein | 18g | 36% |
Variations & Substitutions
- Vegetarian Sushi Burrito: Substitute the tuna with avocado, cucumber, bell peppers, or marinated tofu.
- Spicy Sushi Burrito: Add a drizzle of sriracha mayo or a sprinkle of chili flakes to the filling.
- Salmon Sushi Burrito: Replace the tuna with smoked or cooked salmon.
- Shrimp Sushi Burrito: Use cooked shrimp instead of tuna.
- Brown Rice Sushi Burrito: Substitute the white sushi rice with brown rice for a healthier option.
- Gluten-Free Sushi Burrito: Make sure to use gluten-free soy sauce and check the labels of all ingredients to ensure they are gluten-free.
- Vegan Sushi Burrito: Use seasoned tofu in place of the fish and omit the tobiko. Add extra veggies like shredded carrots and purple cabbage.
FAQs (Frequently Asked Questions)
Q: Can I make sushi burritos ahead of time?
A: Yes, you can make them a few hours in advance. Wrap them tightly in plastic wrap and store them in the refrigerator. However, the nori will become softer over time, so it’s best to enjoy them as soon as possible.
Q: Can I use regular rice instead of sushi rice?
A: While you can use regular rice, sushi rice is recommended because it is stickier and will hold the burrito together better.
Q: What is tobiko?
A: Tobiko is flying fish roe, often used in Japanese cuisine for its bright color and crunchy texture. You can find it at most Asian grocery stores or online.
Q: How do I prevent the nori from getting soggy?
A: Make sure the rice is cooled to room temperature before spreading it on the nori. Also, avoid adding too much wet filling, as this can also make the nori soggy.
Q: Can I use different vegetables in the burrito?
A: Absolutely! Feel free to experiment with different vegetables, such as bell peppers, spinach, or sprouts.
Final Thoughts
So there you have it – a fun, customizable, and incredibly delicious way to enjoy sushi! The sushi burrito is a culinary adventure waiting to happen, a chance to let your creativity shine and explore the endless possibilities of flavors and textures. Don’t be afraid to experiment with different fillings and sauces to create your own signature sushi burrito. Grab your ingredients, roll up your sleeves, and get ready to embark on a culinary journey that will tantalize your taste buds and leave you craving more. And most importantly, have fun with it! I’d love to hear about your creations and variations – share your feedback and let me know what you think!