
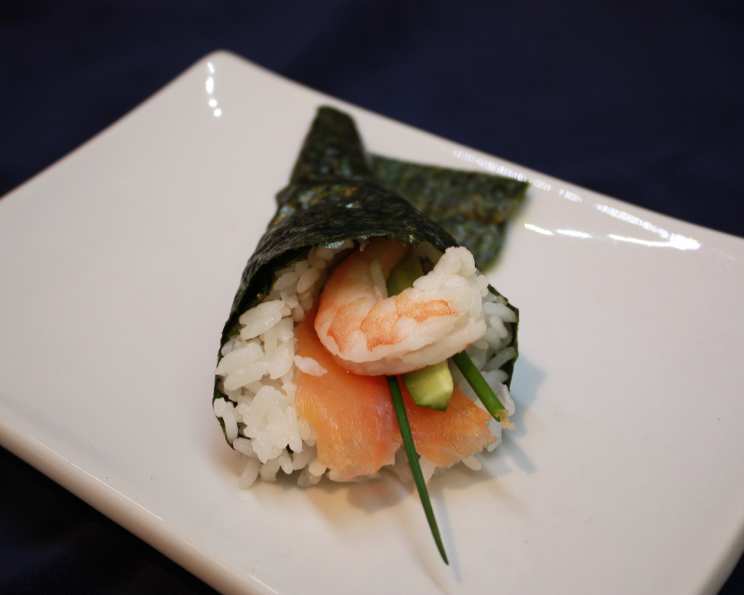
Sushi Cones: A Hand-Rolled Delight
My first encounter with sushi cones, or Temaki, wasn’t in a fancy sushi restaurant, but at a friend’s vibrant summer picnic. The setting sun cast a golden glow on the picnic blanket laden with colourful ingredients. I remember the delighted gasps as we all clumsily, yet enthusiastically, constructed our own personalized cones, the crisp nori seaweed crinkling in our hands, the seasoned rice sticking just enough to our fingers, and the burst of flavour as we took our first bite. It was a messy, joyful, and utterly delicious experience that transformed my understanding of sushi from a formal affair to a communal, creative act.
Recipe Overview
- Prep Time: 15 minutes
- Cook Time: 0 minutes
- Total Time: 15 minutes
- Servings: 8 cones
- Yield: 8 cones
- Dietary Type: Gluten-Free (depending on soy sauce), Dairy-Free
Ingredients
- 4 sheets nori
- 3 cups cooked sushi rice, seasoned with sushi vinegar seasoning (see Easy Sushi Rice recipe)
- 125 g smoked salmon
- 4 green onions (or several chives)
- 50 g enoki mushrooms
- 1 small cucumber
Equipment Needed
- Cutting board
- Sharp knife
- Small bowl (for water, optional)
Instructions
- First, prepare your ingredients. Cut the smoked salmon into narrow strips, about 3-4 inches long. This will make it easier to arrange inside the cone.
- Next, prepare the green onions. Slice them lengthwise into 3-4 inch long strips. If you’re using chives, simply cut them into 3-4 inch lengths. The thin strips of green onion or chives add a fresh, subtle bite.
- Slice the cucumber into thin, 3-4 inch long pieces. Consider using a vegetable peeler to create thin ribbons if you prefer a more delicate texture.
- Now, prepare the nori sheets. Cut each sheet in half crosswise, creating two rectangular pieces. This size is ideal for forming a manageable cone.
- Get ready to assemble your Temaki. Hold one piece of nori seaweed in one hand. If you are right-handed, hold the nori in your left hand. Place 2-3 tablespoons of seasoned sushi rice at one end of the nori sheet (the right end if you are holding it in your left hand).
- Spread the sushi rice evenly over approximately half of the nori sheet, leaving the opposite corner bare to help seal the cone. Lightly dampen your fingers with water to prevent the rice from sticking excessively.
- Arrange the fillings diagonally over the rice from the outside corner (upper right) towards the centre. Be mindful not to overfill the cone, as this can make it difficult to close and prone to falling apart. Include a mix of smoked salmon, green onions (or chives), enoki mushrooms, and cucumber.
- Fold the bottom right corner towards the middle to form a cone. Gently but firmly press the rice and nori together to create a secure seal.
- Continue to roll the nori around the fillings, shaping it into a cone. The moisture from the rice should help the nori stick to itself, completing the cone.
- Repeat the process with the remaining nori sheets and ingredients to make 8 cones.
- Serve your freshly made Temaki immediately with soy sauce, pickled ginger, and wasabi. Enjoy!
Expert Tips & Tricks
- Rice Consistency is Key: Ensure your sushi rice is properly cooked and seasoned. The rice should be sticky enough to hold its shape but not mushy. Using a high-quality sushi rice is essential.
- Nori Crispness: Keep the nori sheets stored in an airtight container until ready to use. This prevents them from becoming soft and difficult to work with. If your nori does become slightly soft, you can briefly toast it over a gas flame or in a dry pan to restore its crispness.
- Ingredient Prep: Prepping all ingredients beforehand is crucial for efficient assembly. Having everything cut and ready to go will make the rolling process much smoother.
- Cone Sealing: If you’re having trouble getting the cone to seal, you can use a grain of rice or a tiny dab of water to help stick the nori together.
- Experiment with Fillings: Don’t be afraid to get creative with your fillings! Avocado, crab sticks, cooked shrimp, and various vegetables all work wonderfully in Temaki.
Serving & Storage Suggestions
Temaki is best enjoyed immediately after preparation, when the nori is still crisp and the ingredients are fresh. Serve with a side of soy sauce for dipping, pickled ginger to cleanse the palate between bites, and wasabi for a spicy kick.
If you happen to have leftovers, store them in an airtight container in the refrigerator. However, be aware that the nori will soften over time. It’s best to consume leftover Temaki within a few hours for optimal quality. Reheating is not recommended as it will further soften the nori. While refrigeration is possible for a short period, the texture will be significantly altered.
Nutritional Information
| Nutrient | Amount per Serving | % Daily Value |
|---|---|---|
| Calories | 92 kcal | – |
| Calories from Fat | 7g | 9% |
| Total Fat | 0.9 g | 1% |
| Saturated Fat | 0.2 g | 0% |
| Cholesterol | 3.6 mg | 1% |
| Sodium | 127.9 mg | 5% |
| Total Carbohydrate | 16.1 g | 5% |
| Dietary Fiber | 1.2 g | 4% |
| Sugars | 0.8 g | 3% |
| Protein | 4.7 g | 9% |
Variations & Substitutions
- Vegetarian/Vegan Temaki: Replace the smoked salmon with avocado, tofu, marinated shiitake mushrooms, or a combination of other vegetables.
- Spicy Temaki: Add a touch of sriracha or chili mayo to your rice or directly to the fillings for a spicy kick.
- Seafood Variations: Try using cooked shrimp, tuna, yellowtail, or even imitation crab meat in place of the smoked salmon.
- Rice Alternatives: While sushi rice is traditional, you can experiment with other types of rice, such as brown rice or quinoa, for a healthier twist. Just make sure it’s seasoned appropriately.
- Gluten-Free: Use tamari instead of traditional soy sauce to ensure a gluten-free meal.
FAQs (Frequently Asked Questions)
Q: Can I prepare the sushi rice in advance?
A: Yes, you can cook the sushi rice a few hours in advance. Just make sure to keep it covered with a damp cloth to prevent it from drying out.
Q: Can I use different types of seaweed?
A: While nori is the most commonly used seaweed for Temaki, you can experiment with other types, but ensure they are suitable for rolling and have a pleasant flavour.
Q: How do I prevent the nori from tearing when rolling?
A: Make sure the nori is fresh and properly stored. Avoid overfilling the cone, as this puts extra stress on the nori.
Q: Is it possible to make these ahead of time for a party?
A: While Temaki is best served immediately, you can prep all the ingredients in advance and let your guests assemble their own cones for a fun and interactive experience.
Q: What if I don’t have sushi vinegar seasoning?
A: You can make your own sushi vinegar by combining rice vinegar, sugar, and salt. There are many recipes available online for homemade sushi vinegar.
Final Thoughts
Now it’s your turn to experience the simple joy of crafting your own sushi cones! Don’t be intimidated by the process; embrace the imperfections and have fun experimenting with different flavour combinations. Whether you’re hosting a casual gathering or simply looking for a quick and healthy meal, Temaki offers a delightful and customizable culinary adventure. So gather your ingredients, invite some friends, and get ready to roll! And don’t hesitate to share your creations and flavour combinations – I’m always keen to hear about your unique Temaki experiences!