
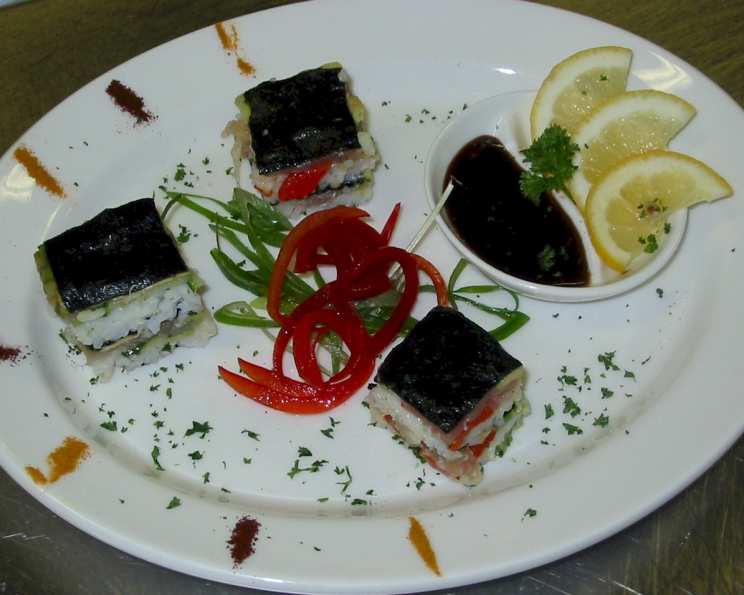
Sushi Layers: A Culinary Adventure in Every Bite
I remember the first time I had sushi. It wasn’t in a fancy restaurant, but at a potluck hosted by a dear friend known for her inventive culinary skills. She presented a dish that looked like a colorful mosaic, and the moment I tasted the harmonious blend of flavors and textures—the tangy rice, savory seafood, and crisp vegetables—I was hooked. That night sparked my lifelong fascination with Japanese cuisine, and particularly with creative ways to present sushi flavors beyond the traditional roll.
Recipe Overview
- Prep Time: 30 minutes
- Cook Time: 20 minutes
- Chill Time: 2 hours
- Total Time: 2 hours 50 minutes
- Yields: 60 squares
- Dietary Type: Gluten-Free (check soy sauce and rice wine ingredients)
Ingredients
- 4 1/2 cups water
- 1/3 cup rice vinegar
- 1/4 cup sugar
- 1 teaspoon salt
- 2 1/4 cups short-grain rice (or Pearl rice)
- 1/4 cup rice wine (sake) or 1/4 cup dry sherry
- 2 medium lemons, sliced paper thin and seeded
- 1 tablespoon small capers, drained and rinsed
- 1 (3 ounce) package of paper thin slices smoked salmon
- 8 ounces small cooked shrimp
- 4 nori sheets
- 1 1/2 cups cucumbers, with peel, thinly sliced (about 1/2 cucumber)
- 1/2 cup sliced green onion
- 1/2 cup carrot, coarsely grated
- 1 large red pepper, diced
Equipment Needed
- Medium saucepan
- 9×13 inch pan
- Plastic wrap
- Sharp knife
Instructions
- In a medium saucepan, bring the water, rice vinegar, sugar, and salt to a boil. Make sure the sugar and salt are fully dissolved. This mixture forms the base for your sushi rice and infuses it with its signature flavor.
- Stir in the rice. Once the mixture is boiling, gently incorporate the short-grain rice. Stir to ensure all the rice is submerged.
- Reduce the heat to low, cover, and simmer for 15 to 20 minutes, or until the water is completely absorbed and the rice is cooked. Check periodically to ensure the rice isn’t sticking to the bottom of the pan and burning. The rice should be tender and slightly sticky.
- Stir in the rice wine (sake) or dry sherry. After the rice is cooked, gently fold in the rice wine or sherry. This adds a subtle layer of complexity to the flavor profile.
- Cool the rice to room temperature. Allow the rice to cool completely before assembling the sushi layers. Cooling prevents the other ingredients from wilting and makes the rice easier to handle. This process should yield approximately 8 cups of cooked rice.
- Line a 9 x 13 inch pan with plastic wrap. Ensure the plastic wrap extends over the edges of the pan; this will make it easier to remove the sushi layers later.
- Arrange a thin, even layer of lemon slices in the bottom of the pan. The lemon slices add a bright, citrusy note and create a beautiful visual base for the layers.
- Sprinkle with capers. The capers add a salty, briny counterpoint to the other flavors.
- Cover half of the pan with smoked salmon and the other half with shrimp. This creates a visually appealing contrast and offers two distinct seafood flavors in each bite.
- Using wet hands, pack about 2 1/2 cups of cooked rice in an even layer on top. Wetting your hands prevents the rice from sticking and makes it easier to spread evenly. Gently press the rice to create a firm foundation.
- Lay 2 sheets of nori, trimmed to fit in a single layer, on the rice. The nori adds a savory, umami flavor and helps to bind the layers together. Trim the nori sheets so they fit snugly.
- Cover the nori with cucumber and green onion. The cucumber provides a refreshing crunch, while the green onion adds a mild, oniony bite. Distribute them evenly for consistent flavor throughout.
- Pack 2 1/2 cups of rice on top. Again, use wet hands to prevent sticking and create an even layer.
- Layer the carrot and red pepper. The carrot adds sweetness and a pop of color, while the red pepper provides a slightly sweet and crisp element.
- Cover with the remaining rice. Use all remaining rice, packing it down evenly.
- Lay 2 sheets of nori, trimmed to fit in single layer, on the rice. This second layer of nori helps to bind the final layer of rice, ensuring structural integrity.
- Cover with plastic wrap directly on the surface. Press gently to ensure the plastic wrap adheres to the top layer of rice.
- Set another 9 x 13 inch pan on top of the sushi and press down firmly to compress the layers evenly. This step is crucial for creating a cohesive and structurally sound final product.
- Chill for 2 hours. This allows the flavors to meld and the layers to firm up, making it easier to cut and serve.
- Remove the top plastic wrap.
- Invert the sushi onto a cutting surface. Use the overhanging plastic wrap to help you lift the sushi out of the pan.
- Remove the remaining plastic wrap.
- Use a sharp, wet, clean knife for each cut. Wetting the knife prevents the rice from sticking and ensures clean, even slices. Cut into squares or rectangles, depending on your preference.
Expert Tips & Tricks
- To prevent the rice from sticking to your hands, keep a small bowl of water nearby and dip your hands in it frequently.
- For a more intense lemon flavor, consider lightly zesting one of the lemons before slicing. Be careful to avoid the white pith, which can be bitter.
- If you don’t have rice wine or dry sherry, you can use a splash of white wine vinegar in its place, although the flavor profile will be slightly different.
- Experiment with different types of seafood, such as crab, tuna, or cooked scallops.
- Add a touch of wasabi to the rice for a spicy kick, but be careful not to overdo it.
- For a vegetarian version, replace the seafood with marinated tofu or avocado.
Serving & Storage Suggestions
Serve the sushi layers chilled or at room temperature. Garnish with extra green onion, a sprinkle of sesame seeds, or a drizzle of soy sauce.
Leftovers can be stored in an airtight container in the refrigerator for up to 2 days. Keep in mind that the texture of the rice may change slightly upon refrigeration, becoming a bit firmer.
This dish is best served fresh, as the flavors and textures are at their peak. Freezing is not recommended, as it can significantly alter the quality of the rice and vegetables.
Nutritional Information
| Nutrient | Amount per Serving | % Daily Value |
|---|---|---|
| Calories | 39.4 kcal | N/A |
| Calories from Fat | 1 g | 4% |
| Total Fat | 0.2 g | 0% |
| Saturated Fat | 0 g | 0% |
| Cholesterol | 7.7 mg | 2% |
| Sodium | 64.7 mg | 2% |
| Total Carbohydrate | 7.6 g | 2% |
| Dietary Fiber | 0.5 g | 2% |
| Sugars | 1.1 g | 4% |
| Protein | 1.7 g | 3% |
Variations & Substitutions
- Spicy Tuna Version: Substitute the smoked salmon with spicy tuna, prepared by mixing tuna with mayonnaise and sriracha.
- Vegetarian Delight: Replace the seafood with seasoned tofu, avocado, and extra vegetables like bell peppers or shredded daikon radish.
- Tropical Twist: Add diced mango and a sprinkle of toasted coconut flakes for a sweet and refreshing flavor.
- Gluten-Free Option: Ensure the rice wine or sherry you use is gluten-free, and use tamari instead of soy sauce.
- Budget-Friendly: Use imitation crab meat instead of shrimp or salmon to make it a more affordable dish.
FAQs (Frequently Asked Questions)
Q: Can I use brown rice instead of white rice?
A: While you can use brown rice, it will alter the texture and flavor. Brown rice is less sticky than short-grain white rice, which is essential for holding the layers together.
Q: Can I make this ahead of time?
A: Yes! In fact, chilling the sushi layers for at least 2 hours is recommended to allow the flavors to meld and the layers to firm up. You can assemble it up to 24 hours in advance.
Q: How do I prevent the rice from sticking to the knife when cutting?
A: The key is to use a very sharp knife and to wet the blade with water before each cut. This helps the knife glide through the rice without tearing or sticking.
Q: Can I use different types of vegetables?
A: Absolutely! Feel free to experiment with different vegetables based on your preferences and what’s in season. Julienned carrots, sliced bell peppers, and blanched asparagus are all great options.
Q: What can I serve this with?
A: These sushi layers are delicious on their own, but they also pair well with a side of edamame, a bowl of miso soup, or a light seaweed salad.
Final Thoughts
These Sushi Layers are more than just a dish; they’re an invitation to explore your culinary creativity. Don’t be afraid to experiment with different flavors, textures, and presentations to create a masterpiece that is uniquely yours. Gather your ingredients, embrace the process, and prepare to delight your friends and family with this elegant and delicious creation. I encourage you to try this recipe and share your feedback, and perhaps even pair it with a crisp, dry sake for an unforgettable dining experience.