
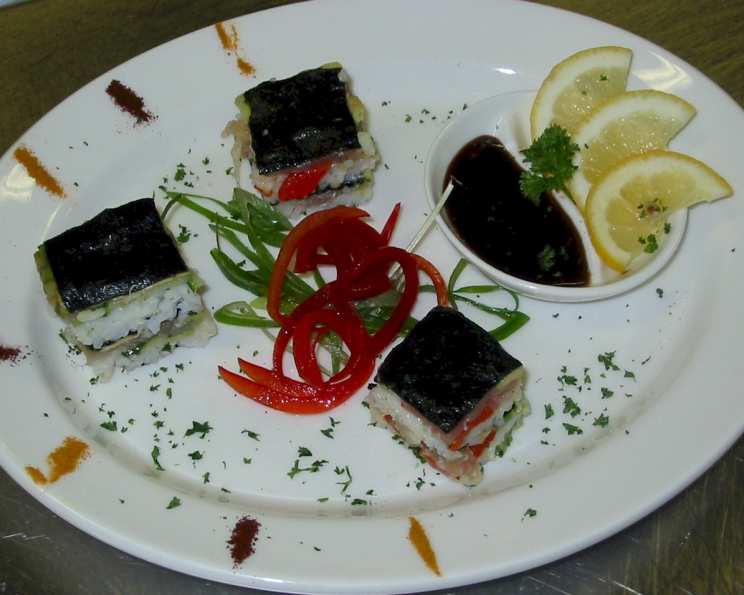
Sushi Layers: A Culinary Masterpiece
I’ll never forget the first time I saw someone make sushi. It wasn’t in a fancy restaurant, but at a potluck hosted by a friend, and a guest brought a dish that looked like a cross between a cake and a work of art. Intrigued, I watched as she carefully sliced through the layers, revealing vibrant colors and textures. One bite, and I was hooked – a symphony of flavors and textures that danced on my tongue. This Sushi Layers recipe captures that same delightful surprise and complex flavors in an easy-to-prepare format, bringing a touch of elegance to any gathering.
Recipe Overview
- Prep Time: 30 minutes
- Cook Time: 20 minutes
- Chill Time: 2 hours
- Total Time: 2 hours 50 minutes
- Yields: 60 squares
- Dietary Type: Gluten-Free (naturally)
Ingredients
- 4 1/2 cups water
- 1/3 cup rice vinegar
- 1/4 cup sugar
- 1 teaspoon salt
- 2 1/4 cups short-grain rice (or Pearl rice)
- 1/4 cup rice wine (sake) or 1/4 cup dry sherry (sake can be substituted with sherry if preferred)
- 2 medium lemons, sliced paper-thin and seeded
- 1 tablespoon small capers, drained and rinsed
- 1 (3 ounce) package of paper-thin slices smoked salmon
- 8 ounces small cooked shrimp
- 4 sheets nori
- 1 1/2 cups cucumbers, with peel, thinly sliced (about 1/2 cucumber)
- 1/2 cup sliced green onion
- 1/2 cup carrot, coarsely grated
- 1 large red pepper, diced
Equipment Needed
- Medium saucepan
- 9 x 13 inch pan
- Plastic wrap
- Sharp knife
Instructions
- In a medium saucepan, bring the water, rice vinegar, sugar, and salt to a boil over medium-high heat. Ensure the sugar and salt are fully dissolved.
- Once boiling, stir in the short-grain rice.
- Reduce the heat to low, cover the saucepan, and simmer for 15 to 20 minutes, or until all the water has been absorbed and the rice is cooked through. Check periodically to prevent sticking or scorching. The rice should be tender and slightly sticky.
- Remove the saucepan from the heat and stir in the rice wine (sake) or dry sherry. This adds a subtle depth of flavor to the rice.
- Allow the cooked rice to cool to room temperature. This is essential for handling and layering the sushi.
- Line a 9 x 13 inch pan completely with plastic wrap, ensuring there is enough overhang on all sides to easily lift the finished sushi later.
- Arrange a thin, even layer of lemon slices in the bottom of the lined pan. Make sure the slices are paper-thin for the best texture.
- Sprinkle the lemon slices evenly with the drained and rinsed capers.
- Cover half of the pan with the paper-thin slices of smoked salmon and the other half with the small cooked shrimp. Distribute the seafood evenly.
- Using wet hands to prevent sticking, pack about 2 1/2 cups of the cooked rice in an even layer on top of the seafood. Press gently to create a compact base.
- Trim 2 sheets of nori to fit in a single layer over the rice. Lay the trimmed nori sheets on top of the rice.
- Cover the nori with the thinly sliced cucumber and green onion. Distribute evenly.
- Pack another 2 1/2 cups of cooked rice on top of the cucumber and green onion, again using wet hands to prevent sticking and pressing gently to form a smooth, even layer.
- Layer the grated carrot and diced red pepper evenly over the rice.
- Cover with the remaining cooked rice, pressing down gently to compact the layers.
- Trim the remaining 2 sheets of nori to fit in a single layer over the rice. Lay the trimmed nori sheets on top of the rice.
- Cover the sushi with plastic wrap, pressing it directly onto the surface to ensure the layers adhere together.
- Place another 9 x 13 inch pan on top of the sushi and press down firmly to compress the layers evenly. This helps the sushi hold its shape when cut.
- Chill the sushi in the refrigerator for at least 2 hours. This allows the flavors to meld and the layers to set properly.
- After chilling, remove the top plastic wrap.
- Invert the sushi onto a cutting surface.
- Remove the remaining plastic wrap from the bottom.
- Use a sharp, wet, clean knife to cut the sushi into squares. Wetting the knife between cuts prevents the rice from sticking.
Expert Tips & Tricks
- To prevent the rice from sticking to your hands, keep a bowl of water nearby and wet your hands frequently. You can also add a little rice vinegar to the water.
- For a more vibrant color and enhanced flavor, consider using different colored bell peppers in addition to the red pepper.
- If you don’t have sake or dry sherry, you can omit it or use a splash of apple cider vinegar for a similar tang.
- When slicing the lemons, make sure they are paper-thin. This will prevent them from overpowering the other flavors.
- If you prefer a spicier kick, add a drizzle of Sriracha or a sprinkle of chili flakes to one of the rice layers.
- Make sure to compress the layers very well while constructing the dish. The more compressed, the better the final product will hold its shape.
Serving & Storage Suggestions
Serve the Sushi Layers chilled, cut into bite-sized squares. They make an excellent appetizer, snack, or light meal. Arrange the squares attractively on a platter, perhaps with a side of soy sauce or wasabi for dipping.
Leftover Sushi Layers should be stored in an airtight container in the refrigerator. They are best consumed within 24-48 hours, as the rice can become dry over time. It is not recommended to freeze the sushi, as the texture will change significantly.
Nutritional Information
| Nutrient | Amount per Serving | % Daily Value |
|---|---|---|
| Calories | 39 kcal | N/A |
| Calories from Fat | 1 g | 4% |
| Total Fat | 0.2 g | 0% |
| Saturated Fat | 0 g | 0% |
| Cholesterol | 7.7 mg | 2% |
| Sodium | 64.7 mg | 2% |
| Total Carbohydrate | 7.6 g | 2% |
| Dietary Fiber | 0.5 g | 2% |
| Sugars | 1.1 g | 4% |
| Protein | 1.7 g | 3% |
Note: Nutritional information is an estimate and may vary based on specific ingredients and portion sizes.
Variations & Substitutions
- Vegetarian Option: Replace the smoked salmon and shrimp with thinly sliced avocado and marinated tofu or mushrooms.
- Spicy Tuna Version: Mix some canned tuna with mayonnaise and Sriracha for a spicy filling.
- Gluten-Free: This recipe is naturally gluten-free, but always double-check the labels of your rice vinegar and other ingredients to ensure they are certified gluten-free.
- Different Vegetables: Experiment with other vegetables like julienned jicama, daikon radish, or sprouts for added crunch and flavor.
FAQs (Frequently Asked Questions)
Q: Can I use regular long-grain rice instead of short-grain rice?
A: While you can, short-grain rice, also known as sushi rice or pearl rice, is preferred because it has a higher starch content, making it stickier and better for holding its shape in the layers.
Q: How do I prevent the nori from becoming soggy?
A: The nori can become soggy if exposed to moisture for too long. Make sure to layer the nori between layers of rice to protect it from the wet ingredients. Chilling the sushi layers helps to prevent sogginess as well.
Q: Can I make this ahead of time?
A: Yes, you can make the sushi layers a day ahead of time. Store it tightly wrapped in plastic wrap in the refrigerator until ready to serve.
Q: What can I serve with these sushi layers?
A: These sushi layers pair well with a side of soy sauce, wasabi, pickled ginger, or a refreshing seaweed salad.
Q: Is there a good substitute for rice vinegar?
A: If you do not have rice vinegar, you may substitute with white vinegar, but be sure to use a smaller amount as it is more acidic. You can add a pinch more sugar to achieve the correct sweetness.
Final Thoughts
These Sushi Layers are more than just a recipe; they’re an invitation to explore your culinary creativity and bring a touch of elegance to your table. Don’t be afraid to experiment with different fillings, adapt the recipe to your liking, and most importantly, have fun with it! Whether you’re hosting a party or simply looking for a unique and delicious snack, this recipe is sure to impress. So, gather your ingredients, roll up your sleeves, and get ready to create a culinary masterpiece that’s as beautiful as it is delicious. Bon appétit!