
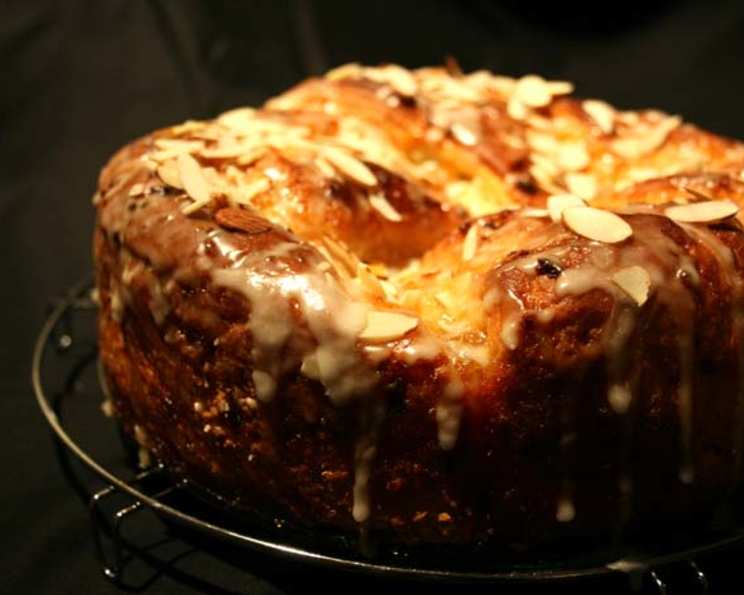
Swedish Tea Ring: A Culinary Heirloom
My grandmother, Astrid, possessed a magic touch in the kitchen, especially when it came to baking. The aroma of cardamom and warm yeast dough always filled her small, sun-drenched kitchen, signaling that a Swedish Tea Ring was in the works. I remember sitting on the worn linoleum floor, mesmerized as she expertly rolled and shaped the dough, her hands moving with a practiced grace that only years of love and tradition could instill. This recipe isn’t just instructions; it’s a fragrant memory, a link to my heritage, and a warm invitation to create your own cherished moments.
Recipe Overview
- Prep Time: 45 minutes
- Cook Time: 30 minutes
- Total Time: 1 hour 15 minutes + chilling time
- Servings: 12
- Yield: 2 large tea rings
- Dietary Type: Vegetarian
Ingredients
For the Dough:
- 2 cups body temperature water
- 2 tablespoons dry yeast
- 1/2 cup sugar
- 2 teaspoons salt
- 3 1/2 cups flour
- 1 egg
- 1/4 cup lard, melted and cooled a bit (or 1/2 cup vegetable shortening)
- 3 cups flour (approximately, for handling)
For the Filling:
- 1/2 cup melted butter
- 2 cups sugar
- 2 tablespoons cinnamon
- 1 dash nutmeg
- Chopped apples (optional) or dried reconstituted and chopped apricot (optional)
For the Glaze (Optional):
- Confectioners Sugar Glaze
- Nuts, Cherries, etc. for decoration
Equipment Needed
- Large mixing bowl
- Measuring cups and spoons
- Baking sheets
- Rolling pin
- Kitchen scissors
- Spatulas
Instructions
-
Activate the Yeast: In a large mixing bowl, dissolve the dry yeast in the body temperature water. Ensure the water isn’t too hot, as this can kill the yeast. Let it stand for about 5-10 minutes until it becomes foamy. This indicates the yeast is active and ready to use.
-
Combine Initial Ingredients: To the yeast mixture, add the sugar and salt. Beat well to ensure these ingredients are fully incorporated.
-
Add Egg and Fat: Add the egg and melted and cooled lard (or vegetable shortening). Stir until well combined.
-
Incorporate First Flour Addition: Mix in the first 3 1/2 cups of flour. This will create a somewhat sticky dough.
-
Gradually Add Remaining Flour: Gradually add the remaining 3 cups of flour, mixing until the dough becomes easy to handle. You may not need all 3 cups, so add it slowly and assess the dough’s consistency. The goal is to have a dough that is soft, pliable, and not too sticky.
-
First Rise: Place the dough in a large, greased bowl. Grease the top of the dough to prevent it from drying out. Cover the bowl with plastic wrap or a clean kitchen towel.
-
Refrigerate: Refrigerate the dough until it has doubled in size. This can take several hours, or you can leave it overnight. This slow, cold rise develops a deeper, more complex flavor in the dough.
-
Preheat Oven: When ready to bake, preheat your oven to 375 degrees F (190 degrees C).
-
Punch Down and Divide: Punch down the dough to release any trapped air. Divide the dough in half.
-
Roll Out Dough: Roll out one half of the dough into an oblong shape on a lightly floured surface. Aim for a rectangle about 12×18 inches.
-
Add Filling: Brush the rolled-out dough with melted butter. Sprinkle evenly with the sugar, cinnamon, and nutmeg mixture. If desired, add a layer of chopped apples or reconstituted and chopped dried apricots.
-
Roll and Shape: Roll up the dough tightly, jelly-roll style, starting from one of the long edges.
-
Form the Ring: Place the rolled dough on a large baking sheet lined with parchment paper. Join the ends together to form a circle or ring. Ensure the seam is well-sealed to prevent it from opening during baking.
-
Snip and Turn: Using kitchen scissors, snip about 2/3 of the way through the ring at 1-inch intervals. Turn each section so that it lays slightly on top of the next, creating a visually appealing layered effect.
-
Second Rise: Let rise until the ring has doubled in size. This second rise is crucial for a light and airy texture.
-
Bake: Bake in the preheated oven for approximately 30 minutes, or until golden brown. The internal temperature should reach around 190°F.
-
Cool and Glaze: Using spatulas, carefully remove the tea ring to a serving plate while it is still very warm. If desired, pour a confectioners sugar glaze over the warm ring and decorate with nuts, cherries, or other desired toppings.
-
Repeat steps 10-17 with the remaining dough.
Expert Tips & Tricks
- Yeast Proofing: Always check the expiration date of your yeast. To ensure it’s active, proof it in warm water with a pinch of sugar. If it doesn’t foam after 5-10 minutes, the yeast is likely dead, and you’ll need to replace it.
- Dough Consistency: The dough should be soft and slightly tacky, but not sticky. Add flour gradually to avoid overworking it.
- Cold Rise Advantage: The cold rise in the refrigerator not only develops flavor but also makes the dough easier to handle.
- Uniform Slices: For even slicing, use a serrated knife and a gentle sawing motion.
- Preventing a Soggy Bottom: Use parchment paper on your baking sheet. This will help prevent the bottom of the ring from becoming too brown or soggy.
- Crisper Exterior: Brushing the tea ring with an egg wash (1 egg beaten with 1 tablespoon of water) before baking will result in a shiny, golden-brown crust.
Serving & Storage Suggestions
Serve the Swedish Tea Ring warm, either as part of a brunch spread or as a delightful afternoon treat. It pairs perfectly with a cup of coffee, tea, or hot chocolate.
Storage: Leftover tea ring can be stored at room temperature in an airtight container for up to 2 days. For longer storage, wrap it tightly in plastic wrap and freeze for up to 2 months.
Reheating: To reheat, wrap the tea ring in foil and bake at 350°F (175°C) for 10-15 minutes, or until warmed through. You can also microwave individual slices for a quick reheat.
Nutritional Information
Please note that these values are estimates and may vary based on specific ingredients and portion sizes.
| Nutrient | Amount per Serving | % Daily Value |
|---|---|---|
| Calories | 265 kcal | 13% |
| Total Fat | 7g | 9% |
| Saturated Fat | 3g | 15% |
| Cholesterol | 21mg | 7% |
| Sodium | 226mg | 10% |
| Total Carbohydrate | 48g | 17% |
| Dietary Fiber | 1g | 4% |
| Sugars | 21g | N/A |
| Protein | 4g | 8% |
Variations & Substitutions
- Gluten-Free: Use a gluten-free flour blend designed for baking. You may need to adjust the amount of liquid to achieve the right dough consistency.
- Dairy-Free: Substitute the lard or shortening with coconut oil or a dairy-free butter alternative. Use a plant-based milk for any glaze.
- Nut Filling: Add chopped walnuts, pecans, or almonds to the filling for added flavor and texture.
- Citrus Zest: Incorporate the zest of an orange or lemon into the dough for a bright, refreshing twist.
- Cardamom: Add 1-2 teaspoons of ground cardamom to the dough for a more authentic Swedish flavor.
- Seasonal Fruit: Experiment with different seasonal fruits in the filling. Berries, peaches, or plums would all be delicious additions.
FAQs (Frequently Asked Questions)
Q: Can I make the dough ahead of time?
A: Absolutely! The dough benefits from a long, slow rise in the refrigerator. You can prepare it up to 24 hours in advance.
Q: Why is my dough not rising?
A: Ensure your yeast is fresh and active. Also, the water temperature should be warm, but not hot, as excessive heat can kill the yeast.
Q: Can I freeze the baked tea ring?
A: Yes, you can freeze the baked tea ring for up to 2 months. Wrap it tightly in plastic wrap and then foil to prevent freezer burn. Thaw completely before serving.
Q: What can I use instead of lard?
A: Vegetable shortening or butter are excellent substitutes for lard.
Q: How do I prevent the filling from leaking out during baking?
A: Make sure to roll the dough tightly and seal the seam well. Also, avoid overfilling the dough.
Final Thoughts
This Swedish Tea Ring is more than just a recipe; it’s an invitation to create a warm, welcoming atmosphere in your home. Whether you’re sharing it with loved ones or enjoying a slice on your own, this fragrant, comforting bread is sure to bring a touch of joy to any occasion. Don’t hesitate to experiment with different fillings and glazes to make it your own. I encourage you to try this recipe, share your baking adventures, and let the aroma of freshly baked bread fill your kitchen with love and happiness.