
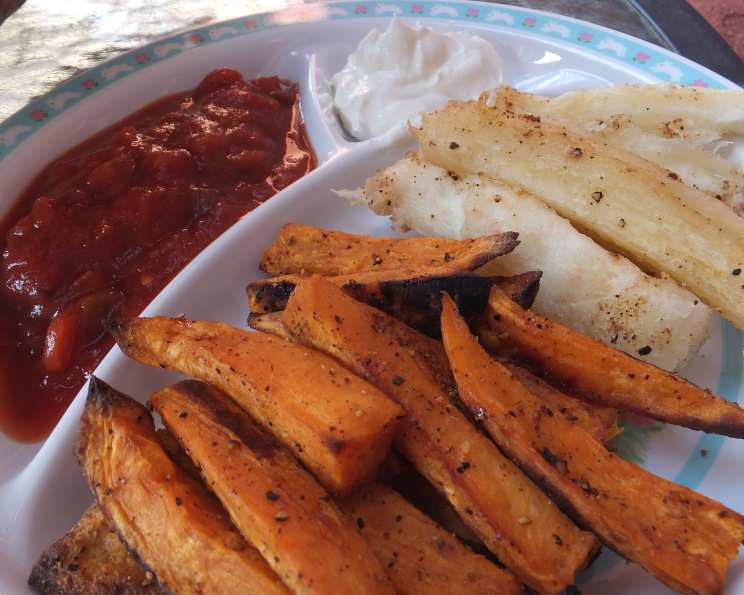
Sweet Potato and Yuca Oven Fries: A Flavorful Twist on a Classic
The aroma of roasting sweet potatoes always takes me back to my grandmother’s kitchen. She wasn’t a fan of traditional potatoes, so sweet potatoes were a staple, often roasted simply with a bit of olive oil and salt. These Sweet Potato and Yuca Oven Fries are a vibrant spin on that memory. The earthy sweetness of the potato pairs beautifully with the slightly nutty flavor of the yuca, all while being baked to crispy perfection. It’s a delightful and healthier alternative to regular fries, and the dipping sauces take it to the next level.
Recipe Overview
- Prep Time: 20 minutes
- Cook Time: 35 minutes
- Total Time: 55 minutes
- Servings: 6
- Dietary Type: Gluten-Free
Ingredients
- 2 tablespoons olive oil, divided (more if needed)
- ½ teaspoon chili powder, divided
- ½ teaspoon ground coriander, divided
- Coarse sea salt & freshly ground black pepper, to taste
- 1-2 sweet potatoes, peeled and cut into 4-inch long and ¼-½ inch thick fries
- 8 ounces cassava (buy 8 oz frozen yuca)
- Sour cream, for dipping (optional)
- Sweet chili sauce, for dipping (optional)
Equipment Needed
- 2 baking sheets
- Aluminum foil
- Large bowl
- Large pot
Instructions
- Position one oven rack in the upper-middle position and another in the lower-middle position. Preheat the oven to 450 degrees F (232 degrees C). This high heat is key to achieving crispy fries.
- Line two baking sheets with aluminum foil. This will prevent the fries from sticking and make cleanup a breeze.
- Place the sweet potato fries in a large bowl and toss with 1 tablespoon of olive oil, ¼ teaspoon of chili powder, ¼ teaspoon of the ground coriander, and a generous pinch of salt and pepper. Make sure the fries are evenly coated to ensure even cooking and flavor distribution.
- Transfer the sweet potato fries to one of the prepared baking sheets in a single layer. Ensure that the fries are not overcrowded as this will cause them to steam instead of roast, resulting in soggy fries.
- Bake the sweet potato fries on the lower-middle rack until they begin to shrivel, about 20 minutes. This initial baking period allows the sweet potatoes to soften and begin to caramelize.
- While the sweet potatoes are baking, bring a large pot of salted water to a boil. Add the frozen yuca and cook until tender, approximately 25 minutes. You should be able to easily pierce the yuca with a fork when it’s done.
- Drain the yuca thoroughly and allow it to cool slightly until it’s cool enough to handle.
- Once cooled, cut the yuca into ¼ to ½ inch thick fries, similar in size and shape to the sweet potato fries.
- Place the yuca fries in the same large bowl (no need to wash it) and toss them with the remaining 1 tablespoon of olive oil (add more if needed to coat them). Add the remainder of the chili powder, ground coriander, and salt and pepper. Again, ensure even coating for the best flavor.
- Transfer the yuca fries to the second prepared baking sheet. Make sure they are arranged in a single layer.
- After the sweet potatoes have baked for 20 minutes, move them to the upper-middle rack and place the yuca fries on the lower-middle rack.
- Bake both the sweet potato and yuca fries for 10 minutes.
- Flip both the sweet potatoes and yuca fries over using a spatula. This ensures even browning and crisping on all sides.
- Continue baking until both the sweet potatoes and yuca are golden crisp, approximately 5 to 10 minutes more. Keep a close eye on them during this final stage to prevent burning. The cooking time may vary depending on your oven.
- Remove the fries from the oven and let them cool slightly on the baking sheets before serving.
- Serve immediately, accompanied by bowls of sour cream and sweet chili sauce for dipping, if desired.
Expert Tips & Tricks
- Don’t overcrowd the pan: Overcrowding will steam the fries, preventing them from getting crispy. Use two baking sheets or bake in batches if necessary.
- Soaking: For extra crispy fries, soak the sweet potato fries in cold water for at least 30 minutes before baking. This helps remove excess starch. Pat them very dry before tossing with oil and spices.
- Even Cuts: Uniformly sized fries will cook more evenly.
- Spice it up: Experiment with different spices such as smoked paprika, garlic powder, or cayenne pepper for added flavor.
- Oil Type: While olive oil works well, you can also use avocado oil or coconut oil for a different flavor profile.
Serving & Storage Suggestions
These Sweet Potato and Yuca Oven Fries are best served hot and fresh, straight from the oven. The crispness tends to diminish over time. For an attractive presentation, serve them in a fry basket or arrange them artfully on a platter.
- Room Temperature: Fries should not be left at room temperature for more than two hours.
- Refrigerator: Leftover fries can be stored in an airtight container in the refrigerator for up to 2-3 days.
- Reheating: To reheat, spread the fries in a single layer on a baking sheet and bake at 350°F (175°C) until warmed through and slightly crisped, about 5-10 minutes. You can also reheat them in an air fryer for a similar result. Avoid microwaving, as this will make them soggy.
- Freezing: While not ideal, cooked fries can be frozen. Spread them on a baking sheet and freeze until solid. Then, transfer them to a freezer bag. Reheat directly from frozen in the oven or air fryer.
Nutritional Information
| Nutrient | Amount per Serving | % Daily Value |
|---|---|---|
| Calories | 150 kcal | 8% |
| Total Fat | 6g | 8% |
| Saturated Fat | 1g | 5% |
| Cholesterol | 0mg | 0% |
| Sodium | 50mg | 2% |
| Total Carbohydrate | 25g | 9% |
| Dietary Fiber | 3g | 11% |
| Sugars | 5g | – |
| Protein | 2g | 4% |
Note: Nutritional information is an estimate and may vary based on specific ingredients and preparation methods.
Variations & Substitutions
- Spice Level: Adjust the amount of chili powder to suit your taste. For a milder flavor, reduce the amount or omit it altogether. For a spicier kick, add a pinch of cayenne pepper.
- Different Root Vegetables: Experiment with other root vegetables such as parsnips, carrots, or even beets for a unique flavor combination.
- Herbs: Add fresh herbs like rosemary, thyme, or oregano to the fries during the last few minutes of baking for an aromatic twist.
- Dipping Sauces: Get creative with your dipping sauces! Try homemade aioli, sriracha mayo, or a simple yogurt dip with fresh herbs.
- Vegan Option: Ensure the sour cream dipping sauce is replaced with a plant-based alternative like cashew cream or vegan sour cream.
FAQs (Frequently Asked Questions)
Q: Can I use fresh yuca instead of frozen?
A: Yes, you can use fresh yuca, but it can be challenging to peel. Be sure to peel it thoroughly and remove the waxy outer layer before cooking.
Q: Can I prepare the fries ahead of time?
A: You can cut the sweet potatoes and yuca ahead of time, but it’s best to toss them with the oil and spices just before baking to prevent them from drying out.
Q: My fries aren’t getting crispy. What am I doing wrong?
A: Make sure your oven is hot enough, and avoid overcrowding the baking sheets. Also, pat the sweet potato fries dry after soaking to remove excess moisture.
Q: Can I air fry these fries?
A: Yes, you can air fry them! Preheat your air fryer to 400°F (200°C) and cook for 12-15 minutes, flipping halfway through, until golden and crispy.
Q: What’s the best way to store leftover fries?
A: Store leftover fries in an airtight container in the refrigerator for up to 2-3 days. Reheat them in the oven or air fryer to restore some crispness.
Final Thoughts
I hope you’re inspired to try these Sweet Potato and Yuca Oven Fries! The combination of flavors and textures makes them a truly satisfying and unique side dish. Whether you serve them with a simple burger or as a snack with your favorite dipping sauces, they’re sure to be a hit. Don’t hesitate to experiment with different spices and variations to make them your own. I would love to hear about your creations and any modifications you’ve made – feel free to share your feedback!