
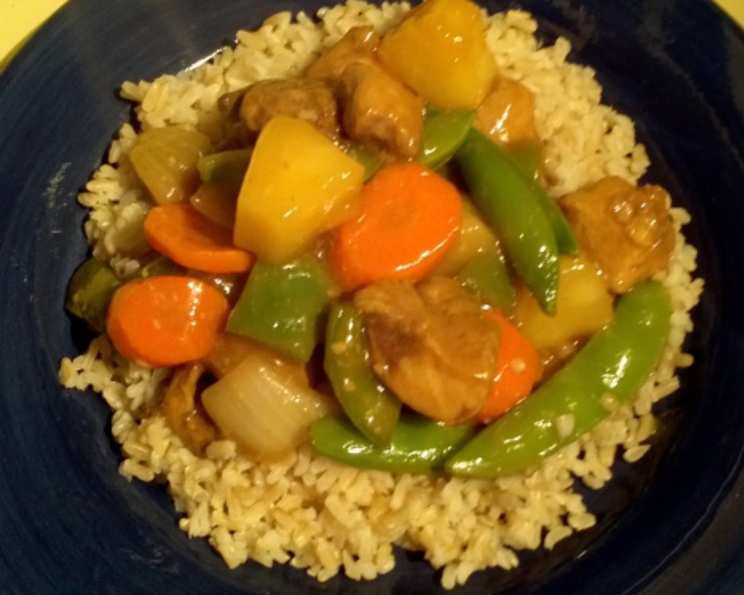
Sweet & Sour Polynesian Chicken: A Taste of the Islands in Your Kitchen
The first time I tasted something resembling this dish, I was at a potluck during a summer internship in Honolulu. The air was thick with the scent of plumeria and grilling meat, and I piled my plate high with everything I could reach. Amidst the kalua pig and poi, a vibrant, slightly sticky chicken dish caught my eye. The sweet and tangy sauce, the bursts of juicy pineapple, the tender chicken, all transported me to a culinary paradise. I knew I had to recreate that experience, and after many trials, this recipe is my ode to that Hawaiian summer.
Recipe Overview
- Prep Time: 20 minutes
- Cook Time: 25 minutes
- Total Time: 45 minutes
- Servings: 4-6
- Yield: Varies based on rice served
- Dietary Type: Can be adapted to be gluten-free
Ingredients
- 3 boneless skinless chicken breasts, cut into 1-inch dice
- 3 tablespoons cooking oil (I prefer extra-light olive oil)
- 1 large carrot, sliced diagonally 1/8-inch thick
- 1 small green bell pepper, cut into 1-inch dice
- 1 small yellow onion, cut into 1-inch dice
- 3 tablespoons minced fresh ginger, divided
- 3 tablespoons minced fresh garlic, divided
- 1 (7 1/2 ounce) package fresh snow peas
- 1 (20 ounce) can pineapple chunks in pineapple juice, drained, juice reserved
- 1⁄2 cup chicken broth
- 2 tablespoons sugar
- 2 tablespoons packed brown sugar
- 5 tablespoons apple cider vinegar
- 1⁄2 cup soy sauce, divided
- 3 tablespoons cornstarch
- Salt, to taste
- Cooked jasmine rice, for serving
Equipment Needed
- Large nonstick skillet or wok
- Mixing bowls
- Measuring spoons and cups
- Cutting board
- Sharp knife
Instructions
-
In a mixing bowl, combine the cubed chicken with 1 tablespoon of minced garlic, 1 tablespoon of minced ginger, and 2 tablespoons of soy sauce. This marinade infuses the chicken with flavor and helps keep it tender during cooking. Let the chicken marinate while you prepare the vegetables, ideally for at least 15 minutes, but longer is fine.
-
Prepare the sweet and sour sauce: You should have approximately 2/3 cup of pineapple juice from the drained can. If necessary, add chicken broth to the pineapple juice to reach the 2/3 cup mark. In a separate bowl, whisk together the pineapple juice mixture, 1/2 cup of chicken broth, 2 tablespoons of sugar, 2 tablespoons of packed brown sugar, 5 tablespoons of apple cider vinegar, 3 tablespoons of cornstarch, and the remaining soy sauce. Add salt to taste. Set the sauce aside. The cornstarch will act as a thickening agent when heated.
-
Heat a large nonstick skillet or wok over medium-high heat. Make sure the pan is hot before adding the oil; this helps prevent sticking.
-
Add 2 tablespoons of cooking oil to the hot pan. Swirl the oil to coat the surface evenly.
-
Add the marinated chicken to the pan (discarding the marinade). Ensure the chicken pieces are spread out in a single layer to promote even browning. Brown the chicken cubes on all sides, turning occasionally.
-
Once the chicken is browned, remove it from the pan and set it aside to keep warm. You can place it in a preheated oven at a very low temperature (around 200°F) or simply cover it loosely with foil.
-
Wipe out the skillet with a paper towel to remove any browned bits or excess oil. This step helps to prevent the vegetables from steaming instead of stir-frying.
-
Add the remaining 1 tablespoon of cooking oil to the skillet.
-
Add the sliced carrots, diced onion, and diced bell pepper to the pan. Also, add the remaining minced garlic and ginger.
-
Stir-fry the vegetables for approximately 3 minutes, until they begin to soften slightly but still retain their crispness.
-
Add the snow peas to the pan and continue to stir-fry for about 2 more minutes. The vegetables should be crisp-tender at this stage. Avoid overcooking them; you want them to have a slight bite.
-
Add the drained pineapple chunks and the prepared sweet and sour sauce to the pan.
-
Add the reserved chicken cubes back to the pan.
-
Bring the mixture to a simmer, stirring occasionally. Cook until the sauce thickens, which should take about 3-5 minutes. The cornstarch in the sauce will activate as it heats, creating a glossy, thickened coating for the chicken and vegetables.
-
Serve hot over cooked jasmine rice. The fluffy, fragrant rice complements the tangy and sweet flavors of the chicken and vegetables perfectly.
Expert Tips & Tricks
- For a richer flavor, use dark soy sauce instead of light soy sauce. Dark soy sauce adds depth and color to the sauce.
- Adjust the sweetness and sourness to your liking. Add more sugar or vinegar, respectively, to achieve your desired taste.
- If the sauce becomes too thick, add a splash of chicken broth or water to thin it out.
- To add a touch of heat, include a pinch of red pepper flakes or a dash of sriracha to the sauce.
- Marinate the chicken for longer for a more intense flavor. You can marinate the chicken in the refrigerator for up to 24 hours.
- Make-Ahead Tip: The sauce can be made a day in advance and stored in the refrigerator. This will save time on the day of cooking.
- If you don’t have fresh ginger and garlic, you can use powdered, but the fresh ingredients provide the best flavor. Use about 1 teaspoon of powdered ginger and 1/2 teaspoon of garlic powder as substitutes for each tablespoon of fresh.
Serving & Storage Suggestions
Serve the Sweet & Sour Polynesian Chicken hot over a bed of fluffy jasmine rice. Garnish with a sprinkle of chopped green onions or sesame seeds for added visual appeal. For a complete meal, consider serving it alongside a fresh salad or steamed greens.
Leftovers can be stored in an airtight container in the refrigerator for up to 3-4 days. To reheat, simply microwave until heated through, or warm gently in a skillet over medium heat. You may need to add a splash of water or chicken broth if the sauce has thickened too much. While technically safe to eat, I don’t recommend freezing this dish as the vegetables can become mushy.
Nutritional Information
| Nutrient | Amount per Serving | % Daily Value |
|---|---|---|
| Calories | 424.7 kcal | N/A |
| Calories from Fat | 118 g | 28% |
| Total Fat | 13.1 g | 20% |
| Saturated Fat | 1.9 g | 9% |
| Cholesterol | 56.6 mg | 18% |
| Sodium | 2230.8 mg | 92% |
| Total Carbohydrate | 50.5 g | 16% |
| Dietary Fiber | 3.4 g | 13% |
| Sugars | 32.3 g | 129% |
| Protein | 26.2 g | 52% |
Note: Nutritional information is an estimate and can vary based on specific ingredients and portion sizes.
Variations & Substitutions
- Gluten-Free: Use tamari instead of soy sauce to make this dish gluten-free.
- Vegetarian: Substitute the chicken with firm tofu or tempeh. Press the tofu to remove excess moisture before cubing and marinating.
- Protein Alternatives: Shrimp or pork can be used in place of chicken, adjusting cooking times accordingly.
- Vegetable Medley: Experiment with different vegetables like broccoli, zucchini, or bok choy based on seasonal availability and personal preference.
- Pineapple Alternatives: Mango or peaches can be used instead of pineapple for a different fruity twist.
- Cashew Chicken: Add roasted cashews to the pan in the last few minutes of cooking for added crunch and nutty flavor.
FAQs (Frequently Asked Questions)
Q: Can I use canned pineapple instead of fresh?
A: Yes, canned pineapple chunks are perfectly acceptable. Just be sure to drain them well and reserve the juice for the sauce!
Q: How do I prevent the chicken from drying out?
A: Marinating the chicken helps keep it moist. Also, avoid overcooking it; cook just until it’s no longer pink inside.
Q: The sauce is too sour. What can I do?
A: Add a little more sugar or honey to balance the flavors. Taste and adjust as needed.
Q: Can I make this dish spicier?
A: Absolutely! Add a pinch of red pepper flakes, a dash of your favorite hot sauce, or even a finely chopped chili pepper to the sauce.
Q: Is it possible to prepare this dish in a slow cooker?
A: Yes, you can adapt this recipe for a slow cooker. Brown the chicken first, then add all the ingredients (except the snow peas) to the slow cooker. Cook on low for 4-6 hours. Add the snow peas during the last 30 minutes of cooking.
Final Thoughts
This Sweet & Sour Polynesian Chicken is more than just a recipe; it’s a passport to a memory, a taste of sunshine, and a culinary adventure waiting to happen in your own kitchen. I encourage you to try it, experiment with the variations, and make it your own. Don’t be afraid to adjust the sweetness or sourness to perfectly match your palate. Share your creations and feedback, and perhaps pair it with a crisp Sauvignon Blanc for a delightful meal. Happy cooking!