
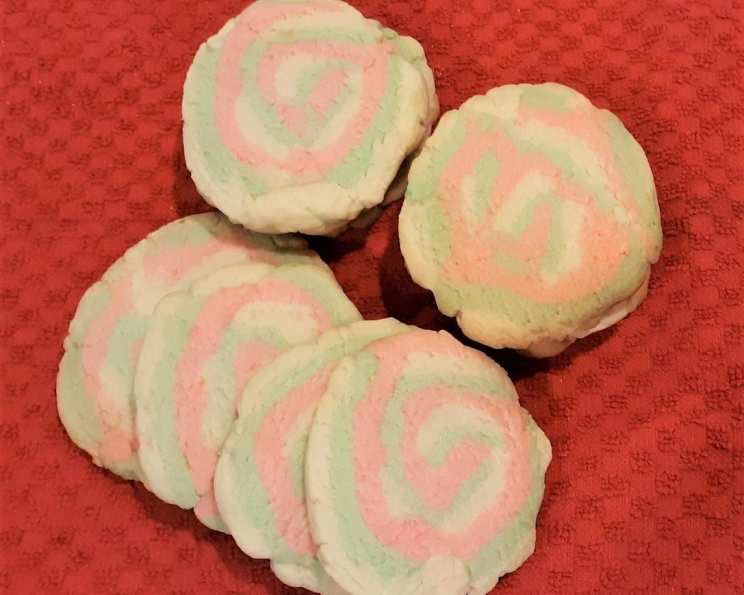
Swirl Cookies: A Symphony of Color and Flavor
Some of my earliest and fondest memories are from childhood Christmases, not necessarily the presents themselves, but the flurry of activity in the kitchen. My mother, a woman of unwavering tradition, always made a batch of these stunning Swirl Cookies. I remember being mesmerized as she rolled out the vibrant doughs, creating what seemed like miniature works of art. The scent of butter and sugar filled the air, a promise of the sweet delights to come, and now, every time I bake these, it brings me right back to those happy, festive times.
Recipe Overview
- Prep Time: 1 hour 15 minutes
- Cook Time: 7-8 minutes
- Total Time: 2 hours 55 minutes
- Yields: 3 1/2 dozen
- Dietary Type: Vegetarian
Ingredients
- 1 cup butter or 1 cup margarine, softened
- 1 1/2 cups powdered sugar
- 1 egg
- 1-2 tablespoons orange peel, grated from 1 medium orange
- 2 1/2 cups all-purpose flour
- 1 teaspoon baking soda
- 1 teaspoon cream of tartar
- 1/8 teaspoon food coloring, red gel
- 1/8 teaspoon food coloring, green gel
- Coarse sugar, if desired
Equipment Needed
- Large bowl
- Electric mixer
- Spoon
- Plastic wrap
- Waxed paper
- Rolling pin
- Cookie sheet
- Cooling rack
Instructions
- In a large bowl, beat the softened butter (or margarine), powdered sugar, egg, and orange peel with an electric mixer on medium speed until light and fluffy. Alternatively, you can mix everything thoroughly with a spoon if you prefer a more hands-on approach.
- Stir in the flour, baking soda, and cream of tartar. Mix until just combined; be careful not to overmix the dough, as this can make the cookies tough.
- Divide the dough into thirds. Carefully tint one portion with the red gel food coloring and another portion with the green gel food coloring. Leave the remaining portion plain. Remember, a little gel food coloring goes a long way, so start with a tiny amount and add more until you achieve your desired color.
- Flatten each portion of dough into a disk. Wrap each disk separately in plastic wrap and refrigerate for 20 minutes. This chilling period is crucial as it allows the gluten to relax, making the dough easier to roll and preventing the cookies from spreading too much during baking.
- On separate sheets of lightly floured waxed paper, roll each portion of dough into a 12×9 inch rectangle. Aim for a consistent thickness of about 1/8 inch for even baking.
- Place the red rectangle on top of the green rectangle, using the waxed paper ends to help flip the dough over. This prevents the dough from sticking and tearing. Carefully top with the plain dough rectangle.
- Starting on a long side, and using the waxed paper as an aid, roll the dough into a tight cylinder. This step is key to creating beautiful swirls.
- Wrap the cylinder in plastic wrap and refrigerate for 1 hour. This ensures the dough is firm enough to slice neatly.
- Preheat your oven to 375 degrees F (190 degrees C).
- Cut the dough into 1/4 inch slices. A sharp knife is essential for clean cuts that maintain the swirl pattern.
- On an ungreased cookie sheet, place the slices about 1 inch apart. This allows for proper air circulation and prevents the cookies from sticking together.
- If desired, sprinkle the cookies with coarse sugar before baking for added sweetness and a delightful crunch.
- Bake for 7 to 8 minutes, or until the edges are set and the bottoms are lightly golden brown. Keep a close eye on the cookies, as baking times can vary depending on your oven.
- Cool for 1 minute on the cookie sheet, then carefully remove the cookies to a cooling rack to cool completely. This prevents them from becoming soggy.
Expert Tips & Tricks
- For more vibrant colors, use gel food coloring instead of liquid food coloring. Gel colors are more concentrated and won’t thin out the dough.
- If the dough becomes too soft while rolling, return it to the refrigerator for a few minutes to firm up.
- To prevent the rolled dough cylinder from flattening on one side in the fridge, rotate it every 15 minutes or so while it’s chilling.
- Experiment with different flavor extracts in the dough. Vanilla, almond, or lemon extract can add a delicious twist.
- If you don’t have coarse sugar, you can use granulated sugar for sprinkling, but the texture won’t be quite the same.
- For a richer flavor, use European-style butter, which has a higher fat content.
Serving & Storage Suggestions
These Swirl Cookies are perfect for serving at holiday gatherings, bake sales, or as a special treat any time of year. They make a beautiful addition to a cookie platter and pair well with a glass of cold milk, hot cocoa, or a cup of coffee.
To store, place the cooled cookies in an airtight container at room temperature. They will stay fresh for up to 5 days. For longer storage, you can freeze the cookies in a freezer-safe container for up to 2 months. Thaw completely before serving. You can also freeze the rolled dough cylinder before slicing and baking. Simply thaw in the refrigerator overnight before slicing and baking as directed.
Nutritional Information
| Nutrient | Amount per Serving | % Daily Value |
|---|---|---|
| Calories | 1014.4 kcal | N/A |
| Calories from Fat | 493 g | 49% |
| Total Fat | 54.8 g | 84% |
| Saturated Fat | 33.9 g | 169% |
| Cholesterol | 192.6 mg | 64% |
| Sodium | 846.3 mg | 35% |
| Total Carbohydrate | 120.5 g | 40% |
| Dietary Fiber | 2.6 g | 10% |
| Sugars | 50.6 g | 202% |
| Protein | 11.6 g | 23% |
Note: Nutritional information is an estimate and may vary based on specific ingredients and portion sizes.
Variations & Substitutions
- Gluten-Free: Substitute the all-purpose flour with a gluten-free blend. Be sure to include a binder like xanthan gum to help hold the cookies together.
- Dairy-Free: Use a dairy-free butter substitute and ensure your powdered sugar is dairy-free. Some brands may contain trace amounts of dairy.
- Vegan: In addition to dairy-free substitutions, replace the egg with a flax egg (1 tablespoon ground flaxseed mixed with 3 tablespoons water, let sit for 5 minutes).
- Different Colors: Use different food colorings to create unique color combinations for various holidays or events.
- Citrus Zest: Experiment with different citrus zests, such as lemon or lime, to add a refreshing flavor.
- Nuts: Add finely chopped nuts, such as pecans or walnuts, to the dough for a nutty flavor and texture.
FAQs (Frequently Asked Questions)
Q: Why is my dough crumbly?
A: This is likely due to over-mixing the dough after adding the flour. Mix only until just combined to avoid developing too much gluten. If the dough is still too crumbly, add a tiny bit of water, a teaspoon at a time, until it comes together.
Q: My cookies spread too much during baking. What can I do?
A: Make sure your butter is not too soft. It should be softened but still cool to the touch. Also, ensure you chill the dough properly before rolling and slicing. If the problem persists, try baking the cookies at a slightly lower temperature.
Q: Can I make the dough ahead of time?
A: Absolutely! The dough can be made ahead of time and stored in the refrigerator for up to 2 days or frozen for up to 2 months. Just be sure to wrap it tightly in plastic wrap to prevent it from drying out.
Q: What’s the best way to slice the rolled dough into even slices?
A: Use a sharp, thin knife and slice with a gentle sawing motion to avoid squashing the dough. Keeping the dough well-chilled will also help.
Q: Can I use liquid food coloring instead of gel food coloring?
A: While you can, gel food coloring is preferred because it is more concentrated and won’t alter the consistency of the dough as much. If using liquid food coloring, use it sparingly.
Final Thoughts
These Swirl Cookies are more than just a recipe; they’re a trip down memory lane, a celebration of color and flavor, and a chance to create something beautiful and delicious. So, preheat your oven, gather your ingredients, and let the magic of these cookies fill your kitchen with warmth and joy. Don’t hesitate to put your own creative spin on them – experiment with different colors, flavors, and decorations to make them truly your own. And, most importantly, share them with the people you love. Happy baking!