
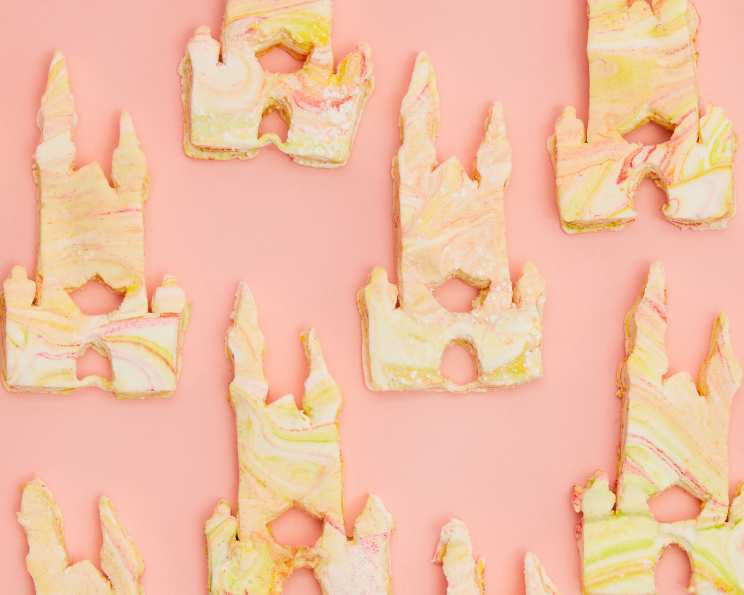
Swirled Marshmallow Castles: A Sweet Dream Come True
The first time I saw marshmallow castles, they were gracing the window of a quaint candy shop during a childhood visit to Germany. The swirl of pastel colors and the whimsical shapes felt like they belonged in a fairy tale, and I remember pressing my nose against the glass, utterly mesmerized. Years later, the memory of those enchanting treats inspired me to create my own version, bringing a touch of magic and sweetness to every occasion. These swirled marshmallow castles are not just a dessert; they’re an edible work of art, perfect for parties, gifts, or simply a delightful afternoon treat.
Recipe Overview
- Prep Time: 20 minutes
- Cook Time: 8 minutes
- Total Time: 4 hours 28 minutes (includes setting time)
- Yields: 12-15 Castles
- Dietary Type: Gluten-Free
Ingredients
- Nonstick cooking spray
- 3 (1/4 ounce) packets unflavored gelatin
- 1 cup cold water, divided
- 1 1/3 cups granulated sugar
- 1 cup light corn syrup, divided
- 1/4 cup confectioners’ sugar
- 1/4 cup cornstarch
- 1 drop Americolor leaf green gel food coloring
- 1 drop Americolor deep pink gel food coloring
- 1 drop Americolor lemon yellow gel food coloring
Equipment Needed
- Baking sheet
- Parchment paper
- Small bowl
- Medium saucepan
- Candy thermometer
- Stand mixer with whisk attachment
- Rubber spatula
- Medium bowl
- Sifter
- 4-inch castle-shaped cookie cutter
Instructions
-
Begin by preparing your baking sheet. Generously spray it with nonstick cooking spray, then line it with parchment paper. Make sure to spray the parchment paper and the sides of the pan with the cooking spray as well. This will prevent the marshmallow from sticking.
-
In a small bowl, pour ½ cup of cold water and sprinkle the unflavored gelatin evenly over the surface. Allow the gelatin to sit undisturbed until it firms up, which should take approximately 3-5 minutes. This process is crucial for properly hydrating the gelatin, which will give your marshmallows their signature bounce.
-
In a medium saucepan fitted with a candy thermometer, combine the granulated sugar, ½ cup of the light corn syrup, and the remaining ½ cup of water. Stir the mixture over medium heat until the sugar dissolves completely. Once the sugar is dissolved, turn the heat up to high and stop stirring. Cook the syrup until it reaches 240 degrees Fahrenheit (115 degrees Celsius) on the candy thermometer. This should take about 6-8 minutes. Be patient and monitor the temperature closely; reaching the correct temperature is vital for achieving the right marshmallow consistency.
-
While the syrup is cooking, add the remaining ½ cup of light corn syrup to the bowl of a stand mixer fitted with the whisk attachment. Once the syrup in the saucepan reaches 240 degrees F, remove it from the heat. With the mixer on low speed, add the gelatin mixture to the corn syrup in the bowl. Then, slowly and carefully pour the hot syrup down the side of the bowl. Avoid pouring directly onto the whisk, as this can cause splattering.
-
Gradually increase the mixer speed to medium-high and whisk the mixture until it becomes light and fluffy and has tripled in volume. This process usually takes about 7-8 minutes. The mixture will transform from a thin syrup to a thick, glossy marshmallow.
-
Once the marshmallow mixture is ready, remove the bowl from the stand mixer. Now it’s time to add the color. Drip about 5-6 drops each of pink and yellow food coloring gel, and 4 drops of green food coloring gel onto the marshmallow mixture. Use a rubber spatula to gently fold the colors into streaks, being careful not to mix them completely. You want to create a beautiful swirled effect. Only 1-2 folds should be enough.
-
Spread the swirled marshmallow mixture onto the prepared baking sheet, ensuring it is evenly distributed. Let it set uncovered at room temperature for 4-6 hours, or preferably overnight. This allows the marshmallows to firm up completely.
-
In a medium bowl, whisk together the confectioners’ sugar and cornstarch. This mixture will prevent the marshmallows from sticking and give them a nice coating.
-
Once the marshmallows are fully set, use a sifter to coat the top generously with the confectioners’ sugar and cornstarch mixture.
-
Flip the baking sheet onto a clean work surface. Dust the bottom of the marshmallow slab with more of the confectioners’ sugar and cornstarch coating.
-
Using a 4-inch castle-shaped cookie cutter, cut the marshmallows into desired shapes. Coat the cut marshmallows with more confectioner sugar and cornstarch to prevent sticking
Expert Tips & Tricks
- For extra vibrant colors, use gel food colorings as they are more concentrated than liquid food colorings.
- Don’t overmix the food coloring; the goal is to achieve beautiful swirls, not a uniform color.
- If you don’t have a stand mixer, a hand mixer can be used, but be prepared for a longer whisking time.
- To prevent sticking, dip your cookie cutter in the confectioners’ sugar and cornstarch mixture before each cut.
- If your marshmallows are too sticky to handle, place them in the freezer for 10-15 minutes before cutting.
Serving & Storage Suggestions
Serve these delightful marshmallow castles as a whimsical treat at parties, as part of a dessert platter, or as charming edible gifts. They can be stored in an airtight container at room temperature for up to 2 weeks. To prevent them from sticking together, layer them between sheets of parchment paper. Do not refrigerate, as this can make them sticky. Freezing is not recommended as it alters the texture of the marshmallows.
Nutritional Information
| Nutrient | Amount per Serving | % Daily Value |
|---|---|---|
| Calories | 192 kcal | N/A |
| Total Fat | 0.1 g | 0% |
| Saturated Fat | 0 g | 0% |
| Cholesterol | 0 mg | 0% |
| Sodium | 22.1 mg | 0% |
| Total Carbohydrate | 49 g | 16% |
| Dietary Fiber | 0 g | 0% |
| Sugars | 32.2 g | N/A |
| Protein | 1.5 g | 3% |
Variations & Substitutions
- Flavor Variations: Experiment with different extracts, such as vanilla, almond, or peppermint, to add a unique flavor to your marshmallows. Add the extract after whisking.
- Vegan Marshmallows: While this recipe isn’t naturally vegan, you can adapt it by using agar-agar powder instead of gelatin. Be sure to research the correct agar-agar to liquid ratio for successful marshmallow formation, as it differs from gelatin.
- Citrus Zest: Add a teaspoon of lemon, orange, or lime zest to the sugar mixture while cooking for a bright, citrusy flavor.
- Spiced Marshmallows: Incorporate a pinch of ground cinnamon, nutmeg, or cardamom for a warm, comforting twist.
- Chocolate Swirl: Drizzle melted dark or milk chocolate over the marshmallow mixture before it sets for an extra decadent treat.
FAQs (Frequently Asked Questions)
Q: Can I use liquid food coloring instead of gel food coloring?
A: Gel food coloring is recommended as it is more concentrated and won’t affect the consistency of the marshmallows as much as liquid food coloring.
Q: Why are my marshmallows sticky?
A: Sticky marshmallows can be caused by not using enough confectioners’ sugar and cornstarch mixture or by not letting them set for long enough. Make sure to coat them generously and allow ample setting time.
Q: Can I make these marshmallows ahead of time?
A: Yes, these marshmallows can be made a day or two in advance. Store them in an airtight container at room temperature, layered between sheets of parchment paper to prevent sticking.
Q: What if I don’t have a castle-shaped cookie cutter?
A: You can use any cookie cutter you like, or simply cut the marshmallows into squares or rectangles.
Q: Can I add sprinkles to the marshmallows?
A: Absolutely! Add sprinkles after spreading the mixture onto the baking sheet, pressing them gently into the surface.
Final Thoughts
Creating these swirled marshmallow castles is a delightful journey from start to finish, filled with vibrant colors and the sweet anticipation of a truly special treat. I encourage you to embrace your inner artist, experiment with different colors and flavors, and most importantly, have fun! These marshmallows are more than just a dessert; they’re a way to share joy and create lasting memories. Share your creations and let me know how they turned out! I would love to hear about your experience, and I can almost guarantee that these will be loved by both young and old alike!