
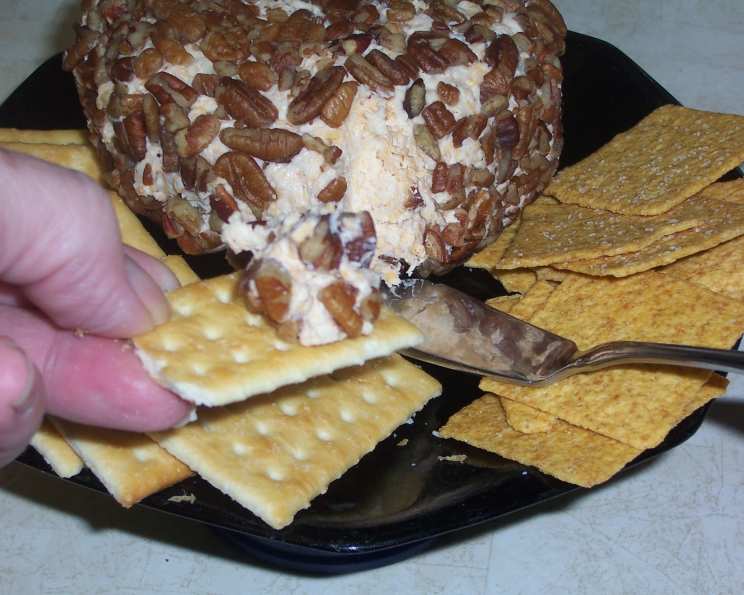
The Ultimate Swiss-Nut Cheese Ball: A Crowd-Pleasing Appetizer
I’ll never forget my first holiday potluck as a newlywed. I was terrified of bringing something boring, so I wracked my brain for something impressive yet easy. An older, wiser colleague suggested a cheese ball, specifically one loaded with Swiss and cheddar. I remember thinking, “A cheese ball? Really?” But I took her advice, and that Swiss-Nut Cheese Ball was the hit of the party! From that day on, it’s been a tradition at every gathering, a simple pleasure that never fails to bring a smile.
Recipe Overview
- Prep Time: 15 minutes
- Cook Time: 0 minutes
- Total Time: 15 minutes (plus chilling time)
- Servings: Varies depending on serving size
- Yield: 1 (24 ounce) ball
- Dietary Type: Gluten-Free
Ingredients
- 8 ounces sharp cheddar cheese, shredded (a mix of cheddar and mozzarella works well)
- 8 ounces Swiss cheese, shredded
- 1 (8 ounce) package cream cheese, softened
- 1/3 cup sour cream
- 2 teaspoons Worcestershire sauce
- 1/2 teaspoon paprika
- 1/2 teaspoon garlic salt
- 1/4 teaspoon black pepper
- 1/3 cup finely chopped nuts (walnuts or pecans are good; toasted nuts add great flavor)
- 1/4 cup fresh chives, chopped (optional; chopped fresh parsley or fresh thyme can also be used)
Equipment Needed
- Medium Mixing Bowl
- Food Processor
- Waxed Paper or Plastic Wrap
Instructions
- In a medium bowl, combine the shredded cheddar cheese, shredded Swiss cheese, softened cream cheese, sour cream, Worcestershire sauce, paprika, garlic salt, and black pepper.
- Transfer the cheese mixture to a food processor. Pulse until the ingredients are well blended and smooth. Be careful not to over-process; you want a cohesive mixture, not a liquid.
- In a separate bowl, combine the finely chopped nuts and chopped chives (if using). Stir to mix thoroughly. This mixture will be the coating for your cheese ball.
- Remove the cheese mixture from the food processor and shape it into a ball using your hands. It will be sticky, but that’s normal.
- Roll the cheese ball in the chopped nut and chive mixture, ensuring it’s fully coated on all sides. Gently press the nuts and chives into the cheese ball so they adhere well.
- Wrap the coated cheese ball in waxed paper or plastic wrap. Be sure to wrap it tightly to maintain its shape and prevent it from drying out.
- Refrigerate the cheese ball for at least 2 hours, or preferably overnight, to allow the flavors to meld and the cheese ball to firm up.
- Serve with raw vegetables such as carrot sticks, celery, cucumber slices, and bell pepper strips, or with your favorite crackers.
Expert Tips & Tricks
- Softening the Cream Cheese: Ensure your cream cheese is completely softened before starting. This will make it much easier to blend with the other ingredients and prevent lumps. Leave it at room temperature for at least an hour, or microwave it in 15-second intervals, checking frequently.
- Toasting the Nuts: Toasting the nuts before chopping them adds a deeper, richer flavor. Spread the nuts on a baking sheet and bake at 350°F (175°C) for about 5-7 minutes, or until lightly golden and fragrant. Watch them carefully, as they can burn easily.
- Flavor Boost: For an extra kick, add a pinch of cayenne pepper or a dash of hot sauce to the cheese mixture.
- Make-Ahead Magic: This cheese ball is perfect for making ahead of time. You can prepare it up to 3 days in advance and store it in the refrigerator. Just be sure to wrap it tightly to prevent it from drying out.
- Easy Unwrapping: To prevent the cheese ball from sticking to the waxed paper or plastic wrap, lightly grease the wrapping material with cooking spray before wrapping.
- Preventing a Soft Cheese Ball: If your cheese ball seems too soft to handle, add a tablespoon of cornstarch or powdered milk to the mixture. This will help to absorb excess moisture and firm it up.
Serving & Storage Suggestions
Serve your Swiss-Nut Cheese Ball chilled with a variety of crackers, crudités (such as carrot sticks, celery, and cucumber), or even pretzel crisps. Arrange the accompaniments artfully around the cheese ball on a platter for an attractive presentation.
- Room Temperature: This cheese ball can sit at room temperature for up to 2 hours, but it’s best to keep it refrigerated as much as possible to prevent spoilage.
- Refrigerator: Store leftover cheese ball in the refrigerator, tightly wrapped in plastic wrap, for up to 5 days.
- Freezer: While not ideal, you can freeze the cheese ball for up to 1 month. Wrap it tightly in plastic wrap and then in foil. Thaw it in the refrigerator overnight before serving. The texture may be slightly altered after freezing.
Nutritional Information
| Nutrient | Amount per Serving | % Daily Value |
|---|---|---|
| Calories | 2997.1 kcal | N/A |
| Calories from Fat | 2295 g | 77% |
| Total Fat | 255.1 g | 392% |
| Saturated Fat | 144.2 g | 720% |
| Cholesterol | 737.3 mg | 245% |
| Sodium | 3056.2 mg | 127% |
| Total Carbohydrate | 43 g | 14% |
| Dietary Fiber | 5.1 g | 20% |
| Sugars | 17.8 g | 71% |
| Protein | 141.6 g | 283% |
Note: Nutritional information is an estimate and may vary based on specific ingredients and serving sizes.
Variations & Substitutions
- Spicy Cheese Ball: Add a pinch of cayenne pepper or a dash of your favorite hot sauce to the cheese mixture for a spicy kick.
- Herbaceous Cheese Ball: Incorporate fresh herbs like rosemary, thyme, or dill into the cheese mixture for a more complex flavor profile.
- Vegetarian Option: This recipe is already vegetarian-friendly.
- Nut-Free Cheese Ball: Substitute the nuts with crushed pretzels or sesame seeds for a nut-free alternative.
- Different Cheeses: Experiment with different types of cheese, such as Gruyere, Gouda, or Havarti, to create your own unique flavor combination.
- Mediterranean Twist: Add sun-dried tomatoes, Kalamata olives, and feta cheese to the mixture for a Mediterranean-inspired cheese ball.
FAQs (Frequently Asked Questions)
Q: Can I make this cheese ball ahead of time?
A: Yes, absolutely! In fact, it’s best to make it a day or two in advance to allow the flavors to meld and the cheese ball to firm up. Just be sure to wrap it tightly in plastic wrap and store it in the refrigerator.
Q: Can I freeze the cheese ball?
A: While not ideal, you can freeze the cheese ball for up to 1 month. The texture may be slightly altered after freezing. Thaw it in the refrigerator overnight before serving.
Q: What if I don’t have a food processor?
A: If you don’t have a food processor, you can still make this cheese ball. Just make sure your cream cheese is very soft, and use a sturdy spoon or electric mixer to thoroughly combine all the ingredients. It may take a little more effort, but it’s definitely doable.
Q: What kind of nuts are best for this recipe?
A: Walnuts and pecans are classic choices, but you can use any nuts you like. Toasted nuts add a richer flavor.
Q: Can I use dried chives instead of fresh?
A: While fresh chives provide the best flavor and texture, you can substitute dried chives if necessary. Use about 1 tablespoon of dried chives for every 1/4 cup of fresh chives.
Final Thoughts
This Swiss-Nut Cheese Ball is more than just an appetizer; it’s a symbol of shared joy and delicious memories. Whether you’re hosting a holiday gathering, a casual get-together, or simply looking for a tasty snack, this recipe is sure to impress. Don’t be afraid to get creative with your choice of cheeses, nuts, and herbs. I encourage you to try this recipe, share it with your loved ones, and let me know what you think! Pair it with a crisp white wine or a refreshing sparkling cider for the perfect culinary experience.